DIY Stands Template and Calculator

Rocketengineer or any other knowledgable stand builder. I need some assistance.

It has been brought to my attention that my stand may not be strong enough to support my tank and i need advice on whether this is true and what changes i need to make

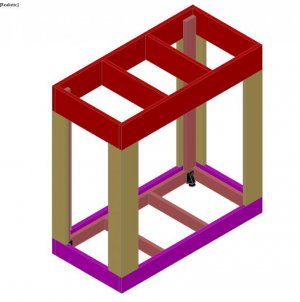
The tank isa 180, 48x36x24. I designed the stand to have a 6" lip/shelf around the edge of the tank and this is where the question of strength has come on.

Here is the frame, the only change from this as it currently stands a 2x4 upright in the front and one in the back.

<a href="http://www.flickr.com/photos/29441159@N03/8484414918/" title="IMG_7312 by owenspackman, on Flickr"><img src="http://farm9.staticflickr.com/8086/8484414918_e6e57e0f1d.jpg" width="500" height="375" alt="IMG_7312"></a>

2x4 was added in front and rear.
<a href="http://www.flickr.com/photos/29441159@N03/8501162673/" title="DSC_0067 by owenspackman, on Flickr"><img src="http://farm9.staticflickr.com/8111/8501162673_c05c439e00.jpg" width="500" height="334" alt="DSC_0067"></a>

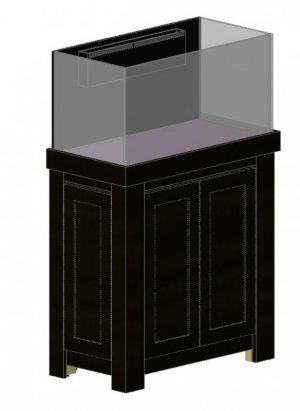
I started skinning and it now looks like this
<a href="http://www.flickr.com/photos/29441159@N03/8505730188/" title="DSC_0006 by owenspackman, on Flickr"><img src="http://farm9.staticflickr.com/8374/8505730188_ec42a8ef44.jpg" width="335" height="500" alt="DSC_0006"></a>

The tile layout shows where the tank will sit, 6" in from the sides and 6" from the font. The rear of the tank will sit along the back edge of the frame.

The concern seems to be that the tanks corners will not be sitting on the corners of the stand and have no support.

What needs to be done?!

Thanks in advance, this is the first time i've ever done a project such as this.
 
I think that stand is very likely to fail. The tank will be supported well along the back edge, but not well at all along the side edges or front edge. The three horizontal 2x4's along the top (front to back) look to be supported only by screws pinning their ends to the front and rear beams. If those screws pull out (which I think is likely, especially given that they run parallel to the grain of the 2x4's instead of across the grain) then the front edge of the tank will bow and push through the plywood top. If you think the screws will hold, you might be right, but will they still hold if the wood around those screws ever gets wet? I would never trust screws to support that kind of weight.

The good news is that you can fix it by building a stand frame under where the perimeter of the tank will be. Use the same design principals for this internal frame:
1) Under each corner (of the tank) have a solid column (or stack) of wood in a vertical line from the perimeter of the tank, to the floor (one or two 2x4's at each leg is sufficient).
2)These legs must be directly under the ends of horizontal top beams that are sufficiently wide to prevent bowing under weight (2x6 is more than sufficient (I used the formula to determine this), or 2x4 if you add center column between legs)​

I'm assuming this is a glass tank that only needs support around the edges. If it is acrylic, and needs support all across the bottom, then you'll need to keep two horizontal 2x4 cross members (front to back beams) spaced 16" apart, but put a 2x3 column/leg under each end of each one (inside the new beams, so 28" apart). This will adhere to the two design principals I described before.
 
Last edited:
I think that stand is very likely to fail. The tank will be supported well along the back edge, but not well at all along the side edges or front edge. The three horizontal 2x4's along the top (front to back) look to be supported only by screws pinning their ends to the front and rear beams. If those screws pull out (which I think is likely, especially given that they run parallel to the grain of the 2x4's instead of across the grain) then the front edge of the tank will bow and push through the plywood top. If you think the screws will hold, you might be right, but will they still hold if the wood around those screws ever gets wet? I would never trust screws to support that kind of weight.

The good news is that you can fix it by building a stand frame under where the perimeter of the tank will be. Use the same design principals for this internal frame:
1) Under each corner (of the tank) have a solid column (or stack) of wood in a vertical line from the perimeter of the tank, to the floor (one or two 2x4's at each leg is sufficient).
2)These legs must be directly under the ends of horizontal top beams that are sufficiently wide to prevent bowing under weight (2x6 is more than sufficient (I used the formula to determine this), or 2x4 if you add center column between legs)​

I'm assuming this is a glass tank that only needs support around the edges. If it is acrylic, and needs support all across the bottom, then you'll need to keep two horizontal 2x4 cross members (front to back beams) spaced 16" apart, but put a 2x3 column/leg under each end of each one (inside the new beams, so 28" apart). This will adhere to the two design principals I described before.

thank you for the reply, please tell me what you think of this solution, hopefully it will suffice. (the tank is glass by the way)

the beams underneath were changed since the photo due to the center beam interfering with the overflow, so it currently looks like this, the outter 2x4's run along the edge of where the tank will sit.
<a href="http://www.flickr.com/photos/29441159@N03/8508988078/" title="IMG_7453 by owenspackman, on Flickr"><img src="http://farm9.staticflickr.com/8111/8508988078_167d0142c5.jpg" width="500" height="375" alt="IMG_7453"></a>

Step one:
Here are the front corners currently
<a href="http://www.flickr.com/photos/29441159@N03/8507875791/" title="IMG_7447 by owenspackman, on Flickr"><img src="http://farm9.staticflickr.com/8392/8507875791_58bbe8ebf3.jpg" width="500" height="375" alt="IMG_7447"></a>

I will use a 2x8 and 2x4 screwed together at a 90. The 2x8 running from bottom to underside of horizontal 2x4 beam. The 2x4 will run vertical from bottom to underside of plywood. These will be fixed in place with screws from outside, through the frame. Using the 2x8 will allow it to run from flush at the front of the cabinet, inward 8" supporting 2" into where the tank starts, as the tank sits 6" back.
<a href="http://www.flickr.com/photos/29441159@N03/8507875631/" title="IMG_7449 by owenspackman, on Flickr"><img src="http://farm9.staticflickr.com/8370/8507875631_7fe47bc691.jpg" width="375" height="500" alt="IMG_7449"></a>
<a href="http://www.flickr.com/photos/29441159@N03/8507875927/" title="IMG_7446 by owenspackman, on Flickr"><img src="http://farm9.staticflickr.com/8377/8507875927_aaea3a096d.jpg" width="500" height="375" alt="IMG_7446"></a>

Step two:
In the center i will screw two 2x8's together to form a 4x8. These will run vertical from bottom to underside of plywood, starting flush from the cabinet from 8" inward.
<a href="http://www.flickr.com/photos/29441159@N03/8508983526/" title="IMG_7451 by owenspackman, on Flickr"><img src="http://farm9.staticflickr.com/8389/8508983526_cfe73fd119.jpg" width="375" height="500" alt="IMG_7451"></a>
 
The thing your planning to do in the corners will work fine, and support the two sides.

Adding the center column in front will help a lot, and eliminate the risk of the tank falling, so nobody will get hurt, but I'm not 100% sure that nobody will ever get wet. Supporting the front of the tank only in the middle means that the front edge of the tank bottom will want to sag on each side of the center support. It won't sag because to do that either the bottom pane of glass would need to break its seam with the front piece, or the front piece would need to crack. I think this fix will but some amount of strain on that seam and/or the front pane, and could possibly lead to a big leak. I don't know how much of this kind of strain a tank can tolerate without leaking, so I always try to play it safe by supporting the tank equally all the way around.

If I were in your shoes, and had enough insurance to cover the liability of a possible leak (destroying the down stairs neighbor's stuff) I would go ahead and make the two changes you plan to make, and do one more thing to shore things up in the front, which I think would make the chances of a leak very low:

Cut a length of 2x4 3.5" long and screw it to the inside of the front horizontal 2x8 so that it will sit under the front end of the horizontal 2x4 (front to back) beams that I see in the last picture. Use four 2.75" wood screws to hold that little block against that 2x8, and make sure that it is pressed up tightly against the 2x4 above it when you put in the screws. I would use stainless steel screws for added protection against salt water, and I would use some good water proof paint all around the block, and the end of the 2x4 above it, to try to ensure that water never gets to the wood around the screws. Cut and place another block under the end of the other horizontal 2x4 beam on the other side of the center support.

That way, the 48" span along the front will be supported in five places, with only a few inches (10 max?) between the supports, which I would guess is plenty.

Be sure that when you cut the new legs and center support to length, that they as long as they can be while still fitting.
 
The thing your planning to do in the corners will work fine, and support the two sides.

Adding the center column in front will help a lot, and eliminate the risk of the tank falling, so nobody will get hurt, but I'm not 100% sure that nobody will ever get wet. Supporting the front of the tank only in the middle means that the front edge of the tank bottom will want to sag on each side of the center support.
Thanks again for your detailed response. I need to sit down in front of the cabinet with the explanation to make sure I understand. Could you clear up the quoted text for me though?

The last line mentioned sagging as the front is only supported in the middle. Wouldn't the added legs in the corners also be supporting the front as the front corners of the tank would sit there? Therefore the front supported in 3 places or am I missing something?

On my build thread someone had suggested running a 2x4 along the 48" length, screwed into the front 2x8x, placed directly under the 4 front to back horizontal 2x4s. Then my corner support and front support could be placed directly under this in the same fashion as my previous pictures. Would this not then spread the support out the whole front length of the tank?

I may cut these pieces tonight and take photos of their placement. Again thanks for your detailed answer when I get home I will see if I'm smart enough to understand!
 
Wouldn't the added legs in the corners also be supporting the front as the front corners of the tank would sit there? Therefore the front supported in 3 places or am I missing something?
You're right. I was unclear. I was saying that each of the two 2-foot spans of the front of the bottom, between those three support points, would want to sag. Adding two more support points would give you five short spans instead of two larger ones, and while each would "sag" a little (stress the seam and front pane) the stress per span would be 60% less, and probably acceptable.

On my build thread someone had suggested running a 2x4 along the 48" length, screwed into the front 2x8x, placed directly under the 4 front to back horizontal 2x4s. Then my corner support and front support could be placed directly under this in the same fashion as my previous pictures. Would this not then spread the support out the whole front length of the tank?
I actually like that solution much better, because you would no longer be depending upon the screws to hold the new beam up (they would be there, but you wouldn't be depending on them). The new 2x4 beam would be supported at each end by a column of wood, and, I assume, another vertical support in the center. That would work.

I think the best solution would be to add a new horizontal 2x4 beam 6" in from the front, so that it is under the front edge of the tank, and put a 2x4 leg under each end, and a third in the middle. The legs on the end can also support the beams that run under the sides of the tank. The two existing front to back beams in the middle wouldn't be needed at all. In other words, use 2x4 beams directly under the sides and front of the tank, and support them with 2x4 legs at the corners, plus one in the center of the front one. (and just remove the other front to back beams, since you only need to support the edges of the tank.

BTW: I'm assuming that this tank rests on a plastic rim/frame around the bottom, so that the bottom pane of glass is raised 3/8" or so. Is that true? If so, the bottom pane of glass would have been designed to support the weight with only support around the perimeter. Since 36 x 48 is a rather large and unusually shaped bottom, I wonder if it was intended to have more support than just around the perimeter. If so, my "best" solution above needs to be modified.
 
Beam size: factored bending res factored shear stiffness weight
resistance (1b/ft) resistance

1 3/4" x 7 1/4" 7,624 4,415 111 3.7
1 3/4" x 9 1/4" 12,080 5,633 231 4.7
1 3/4" x 9 1/2" 12,704 5,786 250 4.8


The above come from Versa-lam 3100 2.0e Design Boise Cascasde


versa-lam_ca_east_spec_english.pdf is the doc from google search page 2 where I got the info....

Does this provide enough info?


Honestly I would rather use a pair of 1X2s in an L shape over a 2X2 because the shape gives it more stability. I might want a 1X3 for the top and bottom frames but that depends on how you want to finish it.


If the tank sits in the middle of the 2X you don't need anything else.


You need to look at the specs of the LVL. There are many different kinds with a range of strength/stiffness values. It might be fine but more information would help make that determination.
 
OK, trying again...on the message section all of the info is nice and spaced out, but is posts different....so I am trying again with another format...

If it doesn't work than Beam size on first is 1 3/4 x 7 1/4; factored bending res is 7,624; fac shear res is 4,415; stiffness is 11; weight is 3.7....etc

Beam size: factored bending res factored shear stiffness weight
resistance (1b/ft) resistance

1 3/4" x 7 1/4" 7,624 4,415 111 3.7
1 3/4" x 9 1/4" 12,080 5,633 231 4.7
1 3/4" x 9 1/2" 12,704 5,786 250 4.8


The above come from Versa-lam 3100 2.0e Design Boise Cascasde


versa-lam_ca_east_spec_english.pdf is the doc from google search page 2 where I got the info....

Does this provide enough info?
 
You're right. I was unclear. I was saying that each of the two 2-foot spans of the front of the bottom, between those three support points, would want to sag. Adding two more support points would give you five short spans instead of two larger ones, and while each would "sag" a little (stress the seam and front pane) the stress per span would be 60% less, and probably acceptable.


I actually like that solution much better, because you would no longer be depending upon the screws to hold the new beam up (they would be there, but you wouldn't be depending on them). The new 2x4 beam would be supported at each end by a column of wood, and, I assume, another vertical support in the center. That would work.

I think the best solution would be to add a new horizontal 2x4 beam 6" in from the front, so that it is under the front edge of the tank, and put a 2x4 leg under each end, and a third in the middle. The legs on the end can also support the beams that run under the sides of the tank. The two existing front to back beams in the middle wouldn't be needed at all. In other words, use 2x4 beams directly under the sides and front of the tank, and support them with 2x4 legs at the corners, plus one in the center of the front one. (and just remove the other front to back beams, since you only need to support the edges of the tank.

BTW: I'm assuming that this tank rests on a plastic rim/frame around the bottom, so that the bottom pane of glass is raised 3/8" or so. Is that true? If so, the bottom pane of glass would have been designed to support the weight with only support around the perimeter. Since 36 x 48 is a rather large and unusually shaped bottom, I wonder if it was intended to have more support than just around the perimeter. If so, my "best" solution above needs to be modified.

Ok C-Rad, here is what i did tonight, it can all be removed if needed, BUT hopefully this will work.

I attempted to run the 2x4 48" across the front 2x8, under the joists, but my 2x4 wasn't completely straight and one end would not have been supporting, so i went with 2 20" pieces.

Here is what i did - In both front corners I placed a 2x4 directly under the outer joist (supporting the tanks sides) and the center joists. These were screwed into the 2x8 frame with both decking screws on each end and a 3" lag bolt in the center.
<a href="http://www.flickr.com/photos/29441159@N03/8512094772/" title="IMG_7466 by owenspackman, on Flickr"><img src="http://farm9.staticflickr.com/8390/8512094772_c58a42b599.jpg" width="500" height="375" alt="IMG_7466"></a>
<a href="http://www.flickr.com/photos/29441159@N03/8512094592/" title="IMG_7462 by owenspackman, on Flickr"><img src="http://farm9.staticflickr.com/8369/8512094592_106fb889ec.jpg" width="500" height="375" alt="IMG_7462"></a>

To help the 2x4 supports I placed a horizontal 2x4 directly under the 2x4 support and under the outer 2x4 joist supporting the tank edge. This was screwed into the 2x8 frame.
<a href="http://www.flickr.com/photos/29441159@N03/8512095136/" title="IMG_7468 by owenspackman, on Flickr"><img src="http://farm9.staticflickr.com/8379/8512095136_a7f7d472fa.jpg" width="375" height="500" alt="IMG_7468"></a>

Legs were then created with a 2x4 and 2x8 screwed together at a 90 degree. These were placed in the corners, directly under the 2x4 outer joist. The 2x8 finishes about 4" after the front of the tank.
<a href="http://www.flickr.com/photos/29441159@N03/8512094374/" title="IMG_7470 by owenspackman, on Flickr"><img src="http://farm9.staticflickr.com/8508/8512094374_1dda276e66.jpg" width="375" height="500" alt="IMG_7470"></a>

In the front center i screwed two 2x8's together and placed them horizontally from the cabinet bottom to under the plywood. The end of the 2x8's finish about 1.5" after the front of the tank.
<a href="http://www.flickr.com/photos/29441159@N03/8510982497/" title="IMG_7474 by owenspackman, on Flickr"><img src="http://farm9.staticflickr.com/8384/8510982497_007604bf6f.jpg" width="375" height="500" alt="IMG_7474"></a>

So now the 2 outer joists are support but the 2x4 support and the 2x8 legs. The two center joists are supported by the 2x4 support. The center of the tank is supported with the 2x8 column under the plywood. That is 5 front supports.

The tank is a rimless tank, but its from miracles, and the pictures they have shown me of their rimless tanks show a plastic trim around the bottom.

Let me know what you think of this fix.
 
hey rocket or maybe someone else we just built this stand for our 125 72x18x24 and for the top frame we did 2x6s instead of 2x8s without a center support will this work? thanks for the help
 
Im going to be building a stand for a deep blue 80 gallon frag tank, 48 x 24 x 16'" tall tank.

I am planning on doing the top brace of the stand in 2 x 6, and I was wondering If I could get away with using 1/4 oak for the top of the stand instead of 1/2?
 
hey rocket or maybe someone else we just built this stand for our 125 72x18x24 and for the top frame we did 2x6s instead of 2x8s without a center support will this work?

According to the formula for deflection, I calculate that the deflection would be:
For a 2x6: .082"
For a 2x8: .036"
For a 2x6 with a center brace: about .003" (VERY little)
For a 2x4 with a center brace: about .0115" (still very little)​

Based on the rule of thumb that says anything less than 0.1" of deflection is okay, you can use a 2x6, but I'd feel better with less deflection, and use a center brace (but I'm really conservative about this kind of thing)
 
Ok C-Rad, here is what i did tonight, it can all be removed if needed, BUT hopefully this will work....Let me know what you think of this fix.

Those fixes will probably work, but it's not as good as it could be. Can you cut a notch in the vertical 2x8 in the middle so that a single horizontal 2x4 can go through it, and be supported by it, instead of having pieces of 2x4 on each side of it? If you make the notch at just the right height, then it will act as a leg suupporting the middle of the new horizontal beam. As you have it, you are relying solely on the screws to support the weight, and I think that's a bad idea. A column of wood will support a huge amount of weight, even when it gets wet, but screws will pull out long before a column would fail, and don't hold well if the wood gets wet, or they get corroded.

Your picture of the screws shows screws of different lengths. And it doesn't look like you are using enough of them. I would use four or six screws in each 2x4 block, and they MUST be long enough to bite into the front 2x8 as much as possible without going all the way through (I think 2.75" long would be correct).
 
Im going to be building a stand for a deep blue 80 gallon frag tank, 48 x 24 x 16'" tall tank.

I am planning on doing the top brace of the stand in 2 x 6, and I was wondering If I could get away with using 1/4 oak for the top of the stand instead of 1/2?

What part of the bottom of the tank will make contact with the stand? Just a rim around the outside edge of the bottom, or the entire bottom? If just a rim, the plywood thickness is irrelevant, so use any thickness you want. If the whole bottom, then you'll need beams (crossmembers) under the plywood (not just around the edge of the tank) no matter how thick the plywood is. In that case I would use 3/4" plywood and space two crossmembers 16" apart.
 
DIY Stand for 50g

DIY Stand for 50g

This year, I will be purchasing a Reef Savvy 50g rimless (36x18x18) and plan to build a stand using Rocket Engineer's design. I've been working on my design for many weeks and showed it to my co-worker who does wood working. He believes the 2x4 Rocket Engineer design is major overkill for the 50g tank I plan to purchase, especially since I will be using 1x hardwood lumber for the finishing trim. By his suggestion I redesigned my stand using 1x4 and 1x6 lumber and Rocket Engineer's design.

The framing will be either Hard Maple or Red Oak for the Framing for my stand. in the attached image the top frame (red) will be 1x6's not only for strength but for height, because I want my stand to be 40" tall instead of the typical 36". The vertical frame (tan) and bottom frame (magenta) will be 1x4's. The inside bottom frame and vertical screw board (light red) will be 1x3 because I plan to use 3/4" white Laminate board for the bottom of the stand and I want a 1/4" lip around the edge of the stand to hide the unfinished edge of the Laminate.

I also plan to purchase Heavy Duty leveling (600lbs) per leg support brackets (black) because my upstairs condo floor is not exactly level thus I want the ability to level the stand no matter where I plan to place the stand.

Please feel free to offer any opinion as to wether 1x4 and 1x6 would be a good option for a 36x18x18 tank.
 

Attachments

  • REEF-SAVVY-1x-FRAME.jpg
    REEF-SAVVY-1x-FRAME.jpg
    45.8 KB · Views: 7
  • REEF-SAVVY-1x-NO-DOORS.JPG
    REEF-SAVVY-1x-NO-DOORS.JPG
    50.8 KB · Views: 7
  • REEF-SAVVY-3D.jpg
    REEF-SAVVY-3D.jpg
    33.9 KB · Views: 6
Last edited:
I see one big problem: the placement of the feet.
It looks like the feet are holding up the tacking strip (pink) not the weight bearing frame (tan). The way it looks, 100% of the tank weight will be supported by the screws holding the tacking strips to the frame, and that's a big no-no. You can only use feet if they rest under the purple pieces. Even then, it looks like each foot would only support the end of one of the two purple pieces that come together at each corner (The front one, but not the side one.) The weight pushing down on the side red beams will push down only on the side vertical (tan) columns, not of the front vertical columns that would have feet under them. If I look closely at your drawing I can see that the side vertical columns sit MOSTLY on top of the side purple pieces, but also rest a little (3/4") on top of the extreme ends of the front purple pieces. That's probably enough, so if you cut a couple of inches off of the ends of your pink pieces (clearing them out of the corners), put your feet under the ends of the front purple pieces, let the front purple pieces extend over the cut ends of the side purple pieces, AND make sure that, just as in your drawing, you let the SIDE leg columns, extend over the edges of the front leg columns, it should work very well.

By the way, this frame is still massive overkill. I ran the deflection formula for the long top beams if you were to use pine 1x3's for everything(.75"x2.5") and got a deflection of 0.056", which is not a problem. With pine 1x4's it goes down to 0.015" which is very solid. Hardwood would deflect even less, but it is expensive, and harder to work with. I would use pine 1x4's for the whole thing, but pine 2x2's for the tacking strips (but that's just me)
 
I have been through 40 pages and cant seem to find anything on longer tanks...what size would you need to span 92"? I posted some specs on LVL on the last page but what about a 2 x 10?
 
I can calculate the beam deflection for a tank if you supply the Length, Width, and Height of the tank for various beam dimensions (I assume a gross weight of 11.5 lbs/gallon).

Do you really need a 92" span with no legs in between?
 
Same here, I read about 20 pages, and got lost

Looking on a build for a 120G Tank

Dimmensions are 48"x24" for the tank, so I'll build it bigger

I need to load the sump which is a 75G Tank under neath from the side

The tank is 18" wide, by 48" long

Any help apprecaited, new tank coming in next Thursday, I'd like to build the stand this weekend
 
Back
Top