drummereef's 180g in-wall build

Last step was to finish wiring the first/last LEDs in the series. I used 20 gauge stranded wire for these connections. I stripped the wire, then tinned before making the connection. I ran the long "negative" wire through the tubing to hide it. I used some O-rings to protect the wire as I was pulling it through the tubing.

LightBarBuild1-22.jpg~original


Here you can see where the hidden +/- wires come out of the tubing that will lead back to the Inventronics Drivers.

LightBarBuild1-24.jpg~original


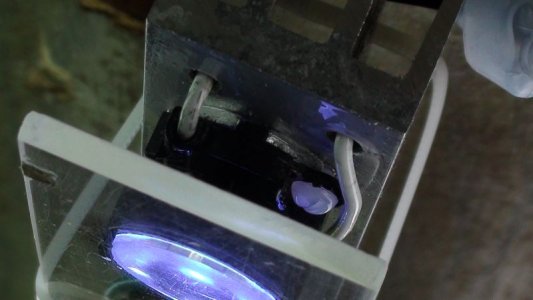
Once finished, I tested the bars. Woah that's bright! :)

LightBarBuild1-23.jpg~original


And the finished bars with the Carclo Optics installed. I still need to finish up the mounting brackets to be able to install the bars on the light rack. Once installed, I'll wire them to the drivers. More to come! :fish1:

LightBarBuild1-25.jpg~original
 
Last edited by a moderator:
Man I think all the children in the world will be without gifts this year for christmas.

I'm guessing you have Santa's Elves running around your house drilling holes, taking pics, feeding the lil'man, etc.
 
Brett- Watch the temps carefully with that assembly. I'd suggest if you run into issues you could open the ends and find another mounting solution and pass some air through the pipes. It's super clean this way and looks awesome but much of the way those square tubes dissipate heat is through natural convection pulling air through the tubes, or through a fan. (There fans that fit right into that tube that you've no doubt seen).

Excellent execution as usual.
 
Last edited:
I personally don't see any problems in his future with heat....This is just based off my experience with them on the tubing. While they are fairly warm to the touch, it's nothing I would be concerned about. I've been running mine for about 2 years now and had nothing happen to this point (knock on wood).
 
Looks awesome, but wouldn't expect anything less from you. You clearly set the bar for DIY :thumbsup:

I will mention that I ended up pulling all my steel #4/40's and replaced them with nylon (SS would also work). In a short amount of time the screws became a corrosion issue, but remember mine are a lot closer to the water then yours will be. That all said you may want to coat the screw heads and maybe even any exposed metal with a electrically stable acrylic (look up as "acrylic conformal coating").

I ended up pulling all my LED's cleaned them up and rebuilt with the nylon screws, retested everything for shorts etc then sprayed the water facing side of the entire unit with LED clear paint (basically the acrylic coating in a spray can). Sorry but I have not made an update on my build log showing the effect of the low mounted LEDs, corrosion and my current fix.
 
Man I think all the children in the world will be without gifts this year for christmas.

I'm guessing you have Santa's Elves running around your house drilling holes, taking pics, feeding the lil'man, etc.

Haha. This is why it's taken me 3 weeks to get this far. :D Believe me, if I had Elves running around I'd be putting them to work! :lol:

Awesome write up and VERY clean as always! Can't wait to see how they look on the tank.

Thanks 110g. Getting closer. :)

Brett- Watch the temps carefully with that assembly. I'd suggest if you run into issues you could open the ends and find another mounting solution and pass some air through the pipes. It's super clean this way and looks awesome but much of the way those square tubes dissipate heat is through natural convection pulling air through the tubes, or through a fan. (There fans that fit right into that tube that you've no doubt seen).

Excellent execution as usual.

Will do. I considered drilling some holes in the back side of the tubing to dissipate some of the heat but I wanted to wait to see if there was any significant heat buildup first. I will keep an eye on it though. :)

I personally don't see any problems in his future with heat....This is just based off my experience with them on the tubing. While they are fairly warm to the touch, it's nothing I would be concerned about. I've been running mine for about 2 years now and had nothing happen to this point (knock on wood).

Good to know Crome. Thanks. :)

Looks awesome, but wouldn't expect anything less from you. You clearly set the bar for DIY :thumbsup:

I will mention that I ended up pulling all my steel #4/40's and replaced them with nylon (SS would also work). In a short amount of time the screws became a corrosion issue, but remember mine are a lot closer to the water then yours will be. That all said you may want to coat the screw heads and maybe even any exposed metal with a electrically stable acrylic (look up as "acrylic conformal coating").

I ended up pulling all my LED's cleaned them up and rebuilt with the nylon screws, retested everything for shorts etc then sprayed the water facing side of the entire unit with LED clear paint (basically the acrylic coating in a spray can). Sorry but I have not made an update on my build log showing the effect of the low mounted LEDs, corrosion and my current fix.

Good to know Pete. I just emailed Bill at ReefLedLights to see what these screws are made of, I'm assuming regular steel by their looks. Do you think putting a light coat of clear fingernail polish on them would work? Otherwise, McMaster-Carr has #4-40 Stainless screws I could order. Lowe's has a large selection of stainless screws but I don't recall seeing any that small. I'll check though. Thanks for the info. :)
 
Good to know Pete. I just emailed Bill at ReefLedLights to see what these screws are made of, I'm assuming regular steel by their looks. Do you think putting a light coat of clear fingernail polish on them would work? Otherwise, McMaster-Carr has #4-40 Stainless screws I could order. Lowe's has a large selection of stainless screws but I don't recall seeing any that small. I'll check though. Thanks for the info. :)

I think the fingernail polish will definitely help, I'd go as far as to try and seal them on the threaded part around the LED star holder

I think Lowes or HD carry them but they may in quantity in longer ones. They may have some shorter ones but I'd bet they might be packaged in smaller quantities. I picked up the nylon ones and stainless ones at Frys's as they are common in electrical use.
 
Last edited:
I think the fingernail polish will definitely help, I'd go as far as to try and seal them on the threaded part around the LED star holder

I think Lowes or HD carry them but they may in quantity in longer ones. They may have some shorter ones but I'd bet they might be packaged in smaller quantities. I picked up the nylon ones and stainless ones at Frys's as they are common in electrical use.

Sounds good. I'll go ahead and change them out. It's a cheap fix that will be a better long term solution. Thanks again. :)
 
Sounds good. I'll go ahead and change them out. It's a cheap fix that will be a better long term solution. Thanks again. :)

here are some pics of the nylon screws I used (I also picked up stainless in case the nylon didn't work) the second pic shows the finished product, you can see how it's all glossy from the clear LED spray paint
 

Attachments

  • nylon screws.jpg
    nylon screws.jpg
    62.5 KB · Views: 5
  • nylon screw on LED.jpg
    nylon screw on LED.jpg
    50.2 KB · Views: 6
here are some pics of the nylon screws I used (I also picked up stainless in case the nylon didn't work) the second pic shows the finished product, you can see how it's all glossy from the clear LED spray paint

Great, thanks Pete. My local hardware stores didn't have anything smaller than 32's so I ended up ordering them from McMaster-Carr. I also ordered backup SS just in case (like you said :D) Should be here today. I need to pick up a box to enclose all the wiring connections but hope to have it up and running by Sunday. Looking forward to the 4 day weekend! I'll finally have some time (hopefully) to get something done. :rollface:
 
UPDATE:

Alright guys, I spent the last couple days finishing up the LED project. Just wanted to update you on the progress. Hope you like it. :)


I swapped out all the steel screws with #4-40 Black Nylon Machine Screws. I was pleasantly surprised at how securely they fastened the BJB connectors.

LightBarFinish.jpg~original


LED assembly with the Nylon Screws. I like the clean, stealthy look they added to the project.

LightBarFinish-2.jpg~original


As mentioned previously, I had to make some custom "L" brackets to complete my design. I used 1/8" x 1" Aluminum Bar, bent to a 90 degree angle in a vice. From there I cut them down to the appropriate size, drilled mounting holes, and polished them with some 0000 steel wool.

LightBarFinish-3.jpg~original


I used 1/4" Socket Cap Screws to mount the LED bars to the brackes. I also used 1/4" nylon washers on either side of the Socket Cap Screws. This will hopefully separate the metals enough to avoid any galvanic corrosion.

LightBarFinish-4.jpg~original


I attached the brackets to the light rack with 10-32 Stainless Steel Thread Cutting Screws (from McMaster-Carr). These are great screws for tapping soft metals.

LightBarFinish-5.jpg~original
 
Last edited by a moderator:
After hanging the light rack back up over the tank I finished up the wiring...


I added a project box to hide all the wire connections. I soldered the AC power leads from the drivers and also the VDM module cables to the dimming leads. I used the 4-pole terminal strip for the DC leads from the drivers and LED umbilical.

LightBarFinish-11.jpg~original


After all the wiring had been routed and cleaned up, the LED Power Panel now looks like this.

LightBarFinish-10.jpg~original


The bigger picture...

LightBarFinish-9.jpg~original


Some details on how the wires exit the Light Bars and snake around the main power umbilical. I used PVC sleaving to protect all the wires and finished with Basilisk expandable sheathing for the umbilical.

LightBarFinish-8.jpg~original


And here is how the wires terminate at the junction (project) box.

LightBarFinish-12.jpg~original


Here's a picture of only the LED bars, before I put the Metal Halides back on the light rack.

LightBarFinish-6.jpg~original


And finally, the Halides and LEDs together. :)

LightBarFinish-13.jpg~original
 
Last edited by a moderator:
Do you like the spread you are getting? Looks almost identical to mine with the very slight shadow that appears in pictures over the braces.
 
looks great!!!

have you had much chance to play with the dimming?
what would you say is the minimum setting on the dim? 5% 10%?

what do you think of the color enhancement?
 
Do you like the spread you are getting? Looks almost identical to mine with the very slight shadow that appears in pictures over the braces.

Yes indeed! The spread is great, no issues as far as I can see. There is a slight shadowing that, like you said, is weirdly only visible in pictures. When viewing the tank the shadowing is almost non-existent. In my situation, I'm glad I made rotating bars. I notice a fairly significant coverage difference between the lights pointing straight down and slightly angled in towards the center of the tank. I think that's because of how my light rack is positioned over the tank etc... Overall I'm very pleased with them so far. :)

Your diy skills are so impressive.

Thank you ValorG. :)

Organisation at it's finest. Very very impressive.

An organized reef is a happy reef. :D Thank you dainiusiva. ;)

looks great!!!

have you had much chance to play with the dimming?
what would you say is the minimum setting on the dim? 5% 10%?

what do you think of the color enhancement?

Thanks Pete! I have been messing around with the dimming and finally have something dialed in I like. The Inventronics Hyperon Drivers I'm using dim to 13% - at least that's what the documentation says. Visually it's fairly significant, which is perhaps more obvious since they are all Royal Blue LEDs. I currently have the bars ramping up/down separately which makes dimming even more obvious. I'll post a graph below to show the photoperiod. :)
 
So I wanted to post a graph of the photoperiod I currently have programmed.


I programmed a 2 hour sunrise, 5 hour full daylight period, and a 2 hour sunset. The LED bars ramp up separately over a 1 hour period, then run at 100% while the Radiums alternate ON every 1/2 hour. Both the LEDs and Radiums run at 100% for 5 hours, then the program is reversed at the end of the light cycle. Let me know what you think! :)

CYAN - LEDs Dimming UP/DOWN 13%-100%, 30 minute ramping period each.
BLUE - LEDs on 100%
Yellow - 250 Watt Radium ON/OFF


Photoperiod.jpg~original
 
Last edited by a moderator:
what do you think of the color enhancement?


Forgot to answer the last part of your question... :spin2: The color enhancement is very nice. There's a subtle but visible difference with the LEDs on, gives the Radiums just a touch more blue and brings out subtleties in the corals and coralline algae. The tank's clarity seems much better however. I've seen how "clear" all LED tanks look so I'm guessing the added blue spectrum cleaned up some of the gray-blue of the Radiums. The obvious "wow" factor is during the sunrise/sunset periods and only when the LEDs are on. The corals look crazy nuts when only the LEDs are lit up. Overall I like the effect it gives the tank, the added usable hours to the tank, and the sunrise/sunset effect. The fish seemed to have responded well. They definitely don't dart around like they used to when the halides would abruptly turn on/off like before. It's a much more natural transition of light and color. :)
 
Back
Top