Mountains of sawdust (360g plywood, LED, Arduino build)

username, I think my "fish" for the freshwater test will be my kids. :lol: It's WAY bigger than their kiddie pool. Though I do have several tetras in my 10g planted FW tank so I could test it with them in there. :lol: It might give them some sort of personality disorder after living in a 10g for a year.

My plan for the FW test is to bring the tank to my house, and put it in the garage, upside-down. Then, build the 2x6 top frame for the stand right on top of the tank, so I know it's a 100% perfect fit. Then, flip it over, and test it out. Assuming it passes the test, I will then bring the finished top frame into the house and build the stand under it.

FishMan, got the box yesterday but I haven't opened it yet. I think my postal carrier was pretty upset with how heavy it was. :lol:
 
Last piece of glass is in, as of last night. No more pics, my phone was freaking out again.

A few comments:

1) Glass is heavy! The tank is now too heavy for me to maneuver by myself. Pre-glass, I could stand it on end, turn it around, even "lever" it up on to a table, all alone. Now I really can't safely accomplish any of that. There's a 2" scar in the drywall to prove this. :mad:

2) Tape/mask areas you don't want silicone to get on! Wear gloves! It's sticky stuff!

3) I positioned the tank such that I could access both sides of each panel as I glued them in. This was GOOD because I could work the silicone into a fillet before it cured, and clean up excess.

4) Cure times are longer than you'd think. There was some cleanup needed on the first piece of glass. When it was about 36 hours old, I tried to scrape it off with a razor. It was clearly dry, no longer tacky, but it was sort of "smearing" on the glass as I scraped it off. It was coming right off, but leaving a smudge mark behind. I tried another spot from the same mess last night, now about a week old, and it scraped right off. So, the silicone definitely keeps "changing" long after it looks/feels dry. To make sure it's totally solid, I'm going to wait a solid week to do the water test.

5) Air bubbles in the silicone are very hard to avoid. There are still some small ones in there but I'm not worried - we're talking about a 1" - 2" wide seam, that's not really structural (water pressure will hold the glass in place, the silicone is just there to keep it water tight.) But still, it took some squeezing and finessing to get rid of big bubbles in a couple spots.

6) Silicone is a strong adhesive! For the fun of it, I "glued" two scrap pieces of the 3/4" ply together with it when I did the first seam. Just ran a 1/2" wide bead on one piece of wood and stuck the other against it. Last night I tried to pull them apart by hand and I couldn't. They wiggled against each other plenty, but the bond held.
 
If you have some thick seams a week may not be long enough. Most RTV requires moisture to cure. Hows your humidity?
 
Good point. The seams are maybe a hair over 1/16" thick, but anywhere from an inch and a quarter to 1.75" wide, plus or minus.

Humidity is average to slightly high.
 
Does part of you want to hold out a few months for the XM LEDs? That would be cool, although I guess there's always something better to hold out for as far as technology goes.. And Like Dr. Suess says, everyone spends too much time waiting.
 
Meh. I'll probably kick myself for saying this in a few years, but the XP-G strikes me as "plenty good enough."

Plus, there's always the ATS, and the frag tank I'll probably end up with, and quarantine tank(s), etc. . . I can play with lighting on those pretty cheaply.
 
And at some point you could transfer the XP-Gs over to other applications throughout your house that have a much lower duty cycle. I've recently been thinking about using my handful of XR-E's as cabinet lights etc.
 
I don't want to digress too far off topic of your awesome build, but the inside of 3/4" or 1" aluminum U-channel (inverted so that the stars are mounted on the exact backside of where people have been mounting them for the fixture builds) is absolutely ideal for mounting the stars and using as undercabinet lighting. It completely conceals the stars & connections, while acting as well as anything can for heatsinking, with a little bit of capacity to reflect some of the residual light to boot if optics aren't used.

And then a $9 laptop charger from ebay with a buckpuck, or a meanwell lpc makes the perfect cheap power source...
 
DWZM; With a 16th inch - no problem. I could imagine half an inch thick and a couple of inches across... In the center of that mass you would need to wait way more than a week for the moisture to get in thru the cured skin to cure the rest. But with it only 16th just the application probably entrained enough.

wid; The inverted U-Channel is an excellent idea for under-cabinet!
 
I don't want to digress too far off topic of your awesome build, but the inside of 3/4" or 1" aluminum U-channel (inverted so that the stars are mounted on the exact backside of where people have been mounting them for the fixture builds) is absolutely ideal for mounting the stars and using as undercabinet lighting. It completely conceals the stars & connections, while acting as well as anything can for heatsinking, with a little bit of capacity to reflect some of the residual light to boot if optics aren't used.

And then a $9 laptop charger from ebay with a buckpuck, or a meanwell lpc makes the perfect cheap power source...

Yeah, I've thought of that. And of gutting cheap track lighting and fitting LEDs. The problem is usually lack of time to turn my ponderings into reality.

DWZM; With a 16th inch - no problem. I could imagine half an inch thick and a couple of inches across... In the center of that mass you would need to wait way more than a week for the moisture to get in thru the cured skin to cure the rest. But with it only 16th just the application probably entrained enough.

Well, I made "test joints" when I did each panel so I'd have a reference point. I'll break them apart and check the insides to see what it's like before I assume the tank is completely done.

looks sweet. giving me ideas. how long till its all done?

Technically the tank itself IS done. :lol: Stand, water test, electrical, plumbing, LED rig, controller, ATS, dosing and water change systems, etc. all remain in various stages of (mostly un-) completion. Also need to make about three times more rock than I have to date. Hoping to introduce the first livestock in late summer, which means I need to get my game on in the next month or two.

the wife will love this.

I'm lucky enough that my wife DOES love this. She's no reef nerd but she appreciates the visual impact and is excited about having something interesting for me and the kids to play with. :)
 
Great thread! Will you post the materials used for this build? Thanks!

1) Wood
2) Glue
3) Screws
4) Epoxy
5) Glass
6) Silicone
7) Paint

:D

In all seriousness, I think I've provided at least some details on materials as I went. If you have specific questions, or are missing something, please do ask!
 
Oh, and the "big move" has occurred:

IMG00185-20100515-1638.jpg


It JUST fit in the truck. Like, edge to edge it was squeezed in between the wheel wells, and there was maybe an inch or two of clearance in front of and behind the tank. I was standing on the tailgate holding the ladder rack to take that photo.

Planning on mocking up the plumbing in the garage so I can water test, but either I measured something wrong, or I ordered the bulkheads from a different vendor than I got the hole measurements from, because the 1.5" bulkheads are all a few millimeters bigger than their holes. :( 
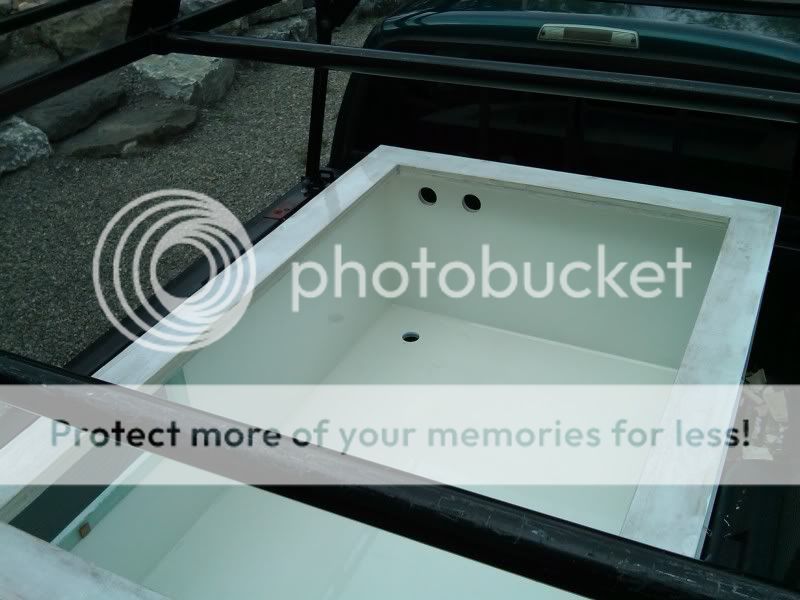
Luckily I drilled too big then poured epoxy to the final size, so I should be able to enlarge them without hitting wood. If I do hit wood, I'll just recoat it.

More delays! Good thing I'm in no serious rush.
 
Well a am confused. I thought it was going in the house. If you wanted a truck tank I am sure there would have been easier ways, and I think viewing panel where a bit of a waste :) Seriously, I thought you were building in the garage so where is it going/gone. Don't tell me you took it so could find the right size bulkheads :) Looks great and I am following since I love the idea. Too bad it would never work in my house
 
:lol:

We were joking as we moved it that we should just leave it in the truck. We could drive around and charge people a buck to look at all the cool fish and corals.

Only problem is, we'd have to have quite the revenue stream to support the modifications required on the truck in order allow it to actually drive with a ton and a half of water in the back.
 
Back
Top