You are using an out of date browser. It may not display this or other websites correctly.
You should upgrade or use an alternative browser.
You should upgrade or use an alternative browser.
Mountains of sawdust (360g plywood, LED, Arduino build)
- Thread starter der_wille_zur_macht
- Start date
der_wille_zur_macht
Team RC
Sure.
Got the epoxy from here:
http://www.uscomposites.com/epoxy.html
I used the 635 thin system with the slow hardener (it's the only one they sell that doesn't blush, iirc.)
I got the glue for assembling the plywood box at Home Depot. Just plain old Gorilla Glue. Some will debate that it's not as strong as other types of glue, but for this sort of joining, it's totally fine (and probably stronger than many alternatives.) At any rate, with the screws and biscuits it's less critical.
I got the silicone from Grainger. I used this:
http://www.grainger.com/Grainger/items/4UH12?Pid=search
Blakeup295
New member
posted 2 times oops~
Blakeup295
New member
Nice!!
Nice!!
just noticed this thread this is amazing! you have done somthing i would love to do sometime in my lifetime this look like its going to be sick!!!
is this still in motion of being complete ? IM DEF subscribing! :fun4:
Nice!!
just noticed this thread this is amazing! you have done somthing i would love to do sometime in my lifetime this look like its going to be sick!!!
is this still in motion of being complete ? IM DEF subscribing! :fun4:
der_wille_zur_macht
Team RC
Hey all,
Sorry about the absence. Life, work, and personal matters have exploded in the last few weeks. The project is on hold for now (as is all my free time, hence lack of posting on the forums in general). Will post an update as soon as things are moving again.
Thanks all!
Sorry about the absence. Life, work, and personal matters have exploded in the last few weeks. The project is on hold for now (as is all my free time, hence lack of posting on the forums in general). Will post an update as soon as things are moving again.
Thanks all!
tahiriqbal
Sialkot
Welcome back.... we all got bit worried ....glad to hear from you once again...")
Thanks for checking in DWIZ! Been wondering if everything was okay.
amcarrig
Allons-y!
Thanks for checking in DWIZ! Been wondering if everything was okay.
+1 Hope to see you posting again soon!
Hey all,
Sorry about the absence. Life, work, and personal matters have exploded in the last few weeks. The project is on hold for now (as is all my free time, hence lack of posting on the forums in general). Will post an update as soon as things are moving again.
Thanks all!
We all know how that goes. Just keep us in the loop when you get this thing up and running! It will be a site to see!
Thanks
TheFishMan65
New member
reefman,
You may not get an immediate answer, but I am pretty sure it is these 12 pages somewhere.
You may not get an immediate answer, but I am pretty sure it is these 12 pages somewhere.
Reefman heres his quote from a few posts ago about the epoxy you asked him about
Sure.
Got the epoxy from here:
http://www.uscomposites.com/epoxy.html
I used the 635 thin system with the slow hardener (it's the only one they sell that doesn't blush, iirc.)
I got the glue for assembling the plywood box at Home Depot. Just plain old Gorilla Glue. Some will debate that it's not as strong as other types of glue, but for this sort of joining, it's totally fine (and probably stronger than many alternatives.) At any rate, with the screws and biscuits it's less critical.
I got the silicone from Grainger. I used this:
http://www.grainger.com/Grainger/items/4UH12?Pid=search
der_wille_zur_macht
Team RC
Checking back in again. Things are calming down and hopefully I'll be able to participate a little more regularly coming up soon. Sorry again for the sudden disappearance, it was one of those "perfect storm" things where a lot of stuff hit the fan at the same time. I know I owe some people a few things. I haven't been online much at all lately, my PM box here at RC has been full for a few weeks so I'll be going through that shortly.
Worked on the tank last night for the first time in weeks. Routed the too-small 1.5" bulkhead holes out and re-epoxied them. Also cut and routed the acrylic for the overflow box. I'd had the overflow modeled but holding the panels up inside the tank lets me see how BIG it's gonna be! It's 24" long, 12" deep, and 12" wide.
Having the tank sitting in the garage and not actively working on it for a few weeks has let me contemplate some of the details a little more thoroughly, especially aquascaping and lighting. Will post details as soon as things are worked out in my head.
Hopefully will be water testing some time next week, as all I'm waiting for right now is the epoxy on the newly-enlarged bulkhead holes to cure. Getting excited about this again.
TheFishMan65
New member
Glad to hear from you - welcome back. Should I go find the welcome to reef central banner ")
der_wille_zur_macht
Team RC
It would be appropriate wouldn't it? :lol:
If my worthless crashy BlackBerry would take photos without having a panic attack, I'd post some shots to illustrate my revised plans for lighting and aquascaping. I tried drawing it in GIMP but I get frustrated too quickly.
If my worthless crashy BlackBerry would take photos without having a panic attack, I'd post some shots to illustrate my revised plans for lighting and aquascaping. I tried drawing it in GIMP but I get frustrated too quickly.
der_wille_zur_macht
Team RC
Ok, problem solved. I downloaded Inkscape (an open source vector illustration application) and drew this:
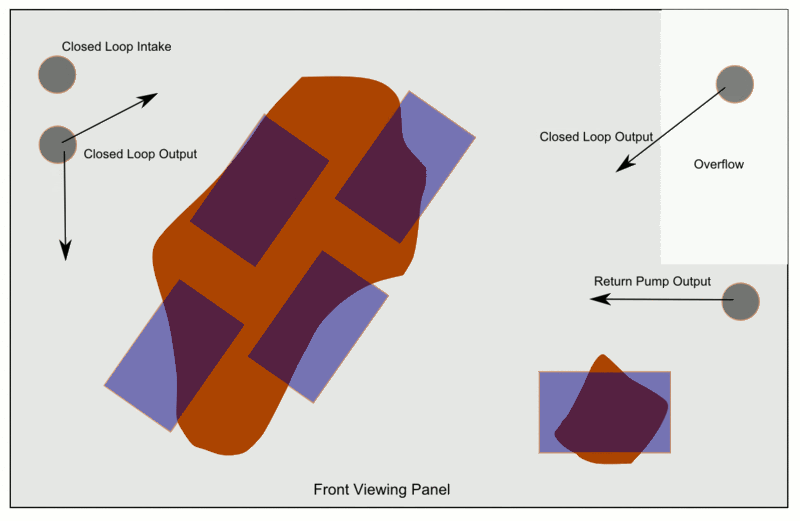
Brown globs are live rock. The blue rectangles are LED modules. Instead of blanketing the entire tank from edge to edge, I'm JUST putting light where I want/need it. Besides being efficient, this will hopefully create an interesting gradient of light from one part of the tank to another. Each LED module will have 18 - 20 LEDs. So, yes, I will only have around 100 LEDs for a 360g tank. Basically, I'm approaching the design as if the big stack of rock towards the left was a typical 90g tank stuffed with rock from edge to edge, and the little blob in the front right corner was a typical nano. I hope this makes sense. I drew the blobs too big, looking at it now - basically, I want small rock structures surrounded by lots of open water. I'm hoping this helps enhance the sense of scale, i.e. that it's a real reef in the wide open ocean.
Brown globs are live rock. The blue rectangles are LED modules. Instead of blanketing the entire tank from edge to edge, I'm JUST putting light where I want/need it. Besides being efficient, this will hopefully create an interesting gradient of light from one part of the tank to another. Each LED module will have 18 - 20 LEDs. So, yes, I will only have around 100 LEDs for a 360g tank. Basically, I'm approaching the design as if the big stack of rock towards the left was a typical 90g tank stuffed with rock from edge to edge, and the little blob in the front right corner was a typical nano. I hope this makes sense. I drew the blobs too big, looking at it now - basically, I want small rock structures surrounded by lots of open water. I'm hoping this helps enhance the sense of scale, i.e. that it's a real reef in the wide open ocean.
der_wille_zur_macht
Team RC
Oh and I laid out the components for the VFD closed loop:
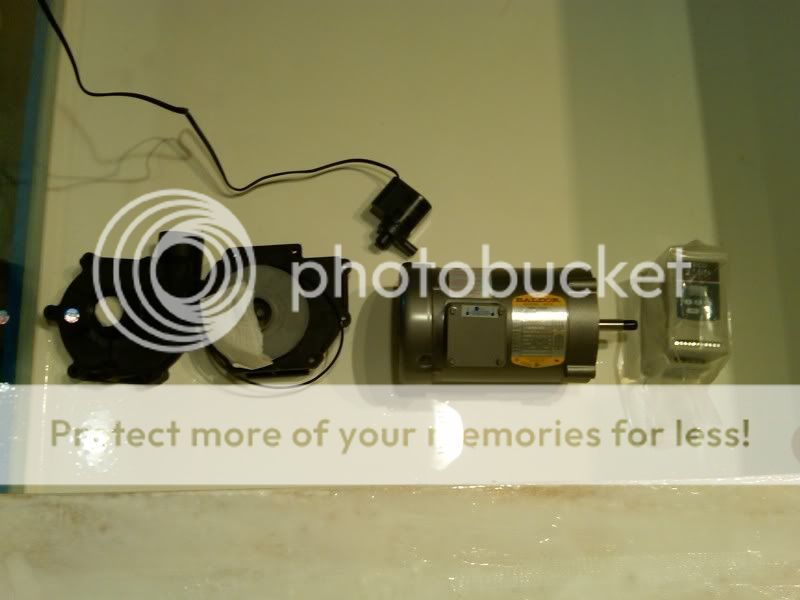
MJ1200 included for a sense of scale. Impressions: The VFD itself is much smaller than I'd imagined, and that motor is a BEAST.
MJ1200 included for a sense of scale. Impressions: The VFD itself is much smaller than I'd imagined, and that motor is a BEAST.
Similar threads
- Replies
- 26
- Views
- 1K