Must-haves for EASY DIY controller?

hey DWZM, not sure if I"m following you on this one. I AM running resistors in line to my transistors, very similar to what you're recommending. so not to sure where you're going with this. you also say "too high" of a current.. what would be too high?

Yeah, but you're also running LEDs in series with the transistors, so your circuit probably has other issues - like Dustin suggested, I'd put the indicator LED and it's current limit resistor in parallel with the transistor. In Dustin's circuit, the transistors are driven straight off the MCP23008's pins. Depending on the impedance of the pins, this might or might not be a problem. When driving transistors from microcontroller pins, it's common to use a base load resistor to limit current pulled from the pin. For example:

transistor.png


Apologies if I'm just confusing matters, I realize I'm jumping in the middle of a discussion already in progress. But if I were building your circuit, I'd modify as explained above. If I were building Dustin's, I'd put a resistor in series with the base of the transistor, with the value calculated to pass just enough current to turn the transistor on. Otherwise even if it works when turning one or two circuits on, it might exceed the IC's max current limit when you have ALL of the output pins turned on.

Also, I dunno if this was discussed or not yet, but it's worth checking the relay strips you're using to make sure there are snub diodes across the relays.

Dustin you mention something about a certain order for soldering for the battery what do I need to know

Which version of the board do you have? We moved a bunch of stuff in that area in the latest rev so it's not quite so tough.
 
DWZM-

Thanks for the pointers. Since I'm no electrical guy I'll put my schematic up for you guys to take a look at before I go crazy with the PCB part of it.

However I did figure out getting to the PCB from the schematic thanks to your pointers.

Lemme do a rev 2 taking into account somethings I learned and some of the suggestions about resistors in line with the transistors.
 
HydraRelayV11.jpg


Here is the first run at it. Im using a slightly different chip the PCF8574 instead of the MCP23008 cause I had a hard time finding the footprint for the one DustinB had listed.

Starting on the board but I think I'm gonna need someone with a little more experience to look at that. Tried to cram it all on a 5cm x 5cm board to make it a little cheaper for everyone.

HydraRelayBoardV11.jpg
 
Very good point DWZM, thanks for bringing that up. I didn't think the transistor could possible pull that much. Looking through some datasheets I found that the MCP23008 has a max output of 25mAH per pin. The 2N2222 transistor can draw up to 50mAH on base. After searching around, I have seen many schematics on for both the arduino and pic chips with a 10k resistor in series with the GPIO pins.

Nauticac4, the libraries I'm using were posted by DWZM on his LED driver site: http://code.google.com/p/hpled/downloads/list

It's the "allyourbase" file. I'm also using the sparkfun library. Be sure there is enough room for at least a heatsink on the 317T, with a 12v input to 7.2v it does need one for sure. Also, DWZM had a good idea about may trying to standardize shields for the hydra as there may be different things people want to try. Maybe something as simple as putting a 4-pin header with +5v,GND,SCL,SDA.
 
I have read this thread, probably twice now, but I am a total noob when it comes to all of this stuff so I have to ask what is probably an obvious question. What is the total number of PWM that was designed for controlling lighting when all was said and done?
 
Ill download that file tonight and take another crack at it. Other than the components being a little different does anyone see anything regarding placement, size, schematic?
 
I got my board done except for the atmega chips and the led that I dont know what way to put it in because is should be directional but the board doesn't show this can i get a hint that have not come in yet I am also getting close to my sr8 pack mod
 
You should be able to see it. The ground pin is away from the ph jack and the positive is towards the ph jack. The long pin is your anode(positive), it should face towards the ph jack.
 
Here is the first run at it.

Few comments:

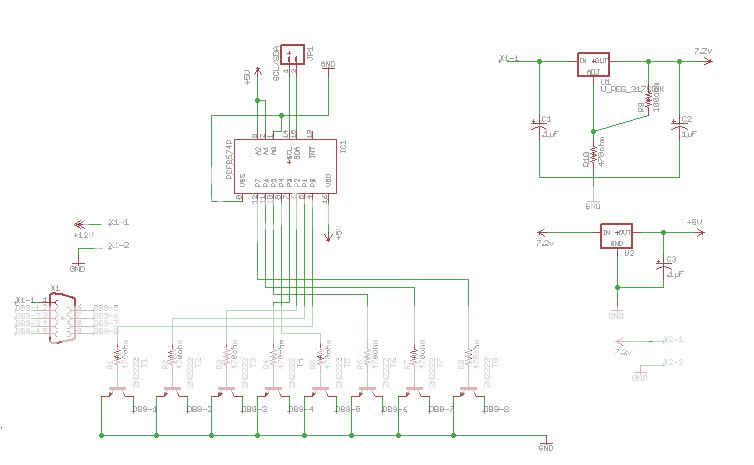
1) As noted above, I think it would be a good approach to standardize on the MCP23008 for GPIO expansion, so we can keep the code universal. Otherwise there's nothing wrong with that chip you picked.

2) Also as noted earlier, I'd rather see the address pins set up with jumpers or solder bridges to GND and 5v so you can choose any address you want.

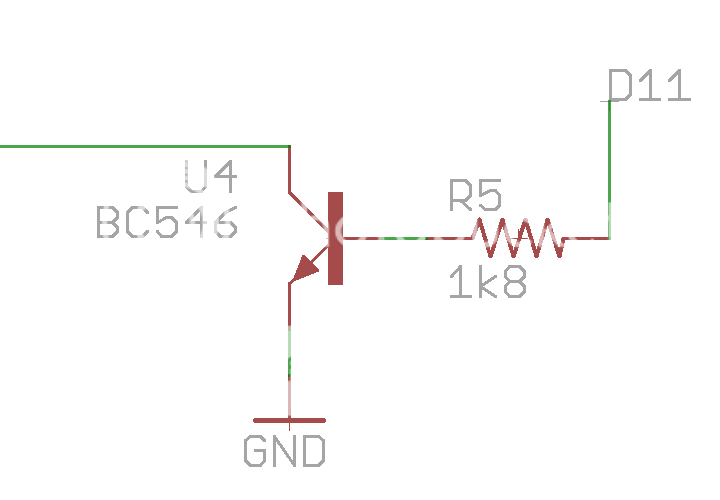
3) Not enough caps on that board! Just about ANY active IC should always have a .1uF ceramic cap right next to it's power pin(s). In other words, you need one on the port expander. It's also generally considered good practice to put one on each side of a linear reg (the 7805 and 317). Also I think you want to check the values/types of the caps you have drawn in the schematic. You're showing a .1uF electrolytic for C1 and C3, and a 1uF electrolytic for C2. Those aren't really typical values or types for this sort of application. Check out the caps around the voltage regs on the mainboard to get an idea.

4) You may be able to find a linear reg with a fixed output voltage to use instead of the LM317. That would reduce parts count by two (the resistors to set the voltage for the LM317). Not a big deal in terms of cost but it frees up board space.

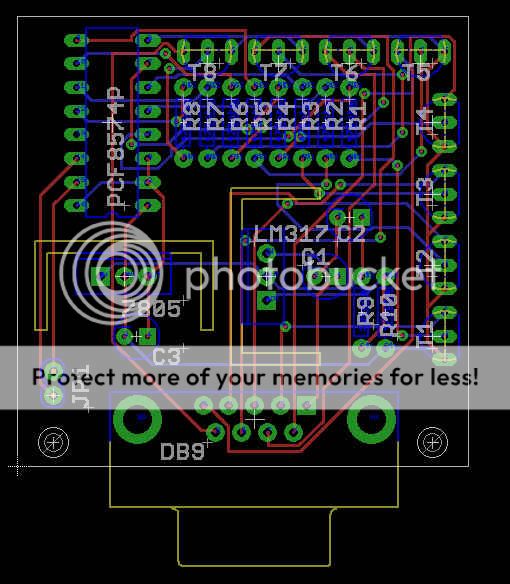
5) For C1, C2, and C3, make sure you can easily get electrolytic caps in the capacitances and voltages you need in that package size - you need to check pin spacing and diameter of the cap. Otherwise it would suck to get the boards made and then have a hard time finding caps to fit. If you look at the caps and package sizes used on the main Hydra board you can get an idea for what's available, as I tried to only use stuff that was really easy to get.

6) I think you could get a little simpler with your layout if you wanted to (I don't think you NEED to, but I think it's actually fun to try). I'd try to physically arrange things according to the "flow" of the circuit. Put power management "first" with the GPIO chip next to it. Then put the resistors next to the IC, and the transistors on the other side of the resistors. Then put the output header (the DB9 connector) on the other side of the transistors. This could really cut down on the complexity of the traces. Also, it's probably not strictly required, but I don't see a reason to not have a ground plane on the top and bottom of the board.

7) If you're going to release the design with the hopes of sharing with others (I hope you do!) then I would suggest adding some descriptive text - it can be a few words. Also, might want to put your name somewhere on the board, as well as a version number and release date. This way, if the design ever changes, it'll be obvious which physical PCBs match which versions of the design files.

8) I would definitely like to see any expansion boards use the same pinout as on the mainboard for communications (I2C in this case) - so as Dustin suggested, it would be nice to see a 4-pin header including 5v and GND on your board instead of just the 2 pin SDA and SCL header you have on there now.

Which brings up another point I've been thinking about. Power management. I see you guys are using a reg on your breakout boards to generate a "raw" 7.2v to feed the power input on the mainboard? And, you're generating 5v on your breakouts? I get the thought process but it seems to me like there is some room for confusion if we don't have a standard approach to what/where/how power is managed. For instance, I know the 5v reg on the mainboard is going to be pretty taxed as it is, but do we really need or want to generate 5v to power a GPIO expansion chip on a breakout, or can it just run off the onboard reg? Also, I'd like to see the mainboard's power supply independent of any special purpose breakout, so you could run the mainboard without the breakout if you needed to.

Thoughts? I guess my approach would be centralize what makes sense to centralize (5v regulation in this case), and then if any breakout needs a weird voltage (12v in this case) let that be handled onboard that breakout. Maybe we need a power management breakout board? :)
 
I don't think we would necessarily have a problem running this application off the main board with a 12v adapter. However, we may see some regulators heating up the more we put on them. I'm drawing @ 276mAH on the stock board, so there is extra room there.

I chose to use the LM317 because it's what I had laying around and what I felt I wanted to do due to my 12v relay strip. That was I only need one regulator. I'm not really sure if we could even come up with a universal standard. Some may only run the board off a wall wart, others may run theirs off the board with a separate 12v supply for the strip.

Right now I see 2 options that most people are likely to take with the relay setups, and it's almost a given everyone will want relay control.
1) You have the option of using the futurlec relay boards with the american dj power center.
2) You have the option of using the guitar center relay strip with a transistor board.

I know it's nice to have separate boards for different things, but maybe we can keep them to a minimum.

For example, we know everyone that uses relay control will "likely" need a 12v source. What if we created a single board with a 12v input, 7.2v regulator, 5v regulator, and MCP23008. We would also have a 12v out, 7.2v out, 5v out, SCL/SDA connections, jumpers for addressing, a header for the mcp23008 gpio pins, and places for the transistors that people could choose to populate based on their relay control setup of choice.

This would give us a way to bring the required 12v in and either send it to the transistors or send it to a header to power the futurlec relay strip. We could still have it based off the standard serial jack that would work for either option(would need a way to provide ground to the futurlec board if using a serial plug). We also have a dedicated 5v source to power this port expander as well as a chain of i2c boards if needed without taxing the main board.

Just thinking out loud... I'll try to sketch a layout later.
 
I took a swing at it based on DustinB's layout and not really understanding much of the engineering behind it, more or less the limited knowledge I have and what I have learned in a few of the threads here.

Guys thanks for the pointers I will try to incorporate the suggestions into the next revision and also take into account attempting to make the board work with the Futurlec relay boards as well.

I downloaded the sparkfun and the library DustinB suggested and did another revision with those parts.


Since power managment from the mainboard might be an issue should I add a DC jack to this board so that it can supply its own power this taking the main board completely out of the equation for anything other than controls.
 
Since power managment from the mainboard might be an issue should I add a DC jack to this board so that it can supply its own power this taking the main board completely out of the equation for anything other than controls.

Wouldn't be a bad idea, would allow you to mount the board in the back of your enclosure and drill a hole to plug the supply in.

EDIT: Speaking of the fixed regulators, I found this +7.5v 2A regulator at mouser: http://www.mouser.com/ProductDetail/STMicroelectronics/L78S75CV/?qs=DEIWxvUoIVwMJ75mGSPq5w==
I really don't want to pay $6 shipping for a $0.43 part.
 
Last edited:
Guys thanks for the pointers I will try to incorporate the suggestions into the next revision and also take into account attempting to make the board work with the Futurlec relay boards as well.

There really isn't much the futurlec boards need. It takes 12V for the relays and the ttl signal. I have to measure it, but I don't think the second MCP takes much current
 
I think what we're getting at here is a generic I/O expander breakout that has ttl (direct off an MCP) and "other" (via transistors and/or a different voltage) switching capabilities. Should be pretty easy to design something generic to satisfy both requirements. In fact I bet we could make it generic to the point that you could use different source voltages (wall warts) and/or swap different regs or transistors on the board to control any voltage/load you needed.
 
Well I am a mechanical engineer not an electrical engineer. I'll take a second crack at it but I will definetly need some pointers on specs for some of the parts. If some one wants to take the time to draw out a schematic even hand sketch one Ill take the time to draw it up and do the layout in eagle.

I've got seem decent notes and will take a crack at it tonight/tomorrow.
 
just a quick blerb for anyone stumbling on this, it looks like seegler is going to put an order in for a new batch of boards (approx 10)

I'm going to be ordering parts off the BOM, that will (SHOULD) include everything you need to get the hydra assembled.

if anyone has Additional parts that are available at Mouser or Digi-key, if they get me the part number before the 15th, i will add it into the order. (and ultimately into their request)

I'm planning on doing 10 full kits (for the probable 10 boards) that will be made. send me a PM for details, serious inquiries only. it will be cash up front.

btw is the BOM that's posted currently up to date?
 
Please wait til tomorrow before doing anything guys. You haven't seen it, but we have been working on the board and the BOM behind the scenes.

We will post an updated BOM tomorrow that is accurate and will make it much easier to order the needed parts for the board. We will also post a new version of the board with all through-hole parts making is very simple for anyone with a basic soldering ability will be able to assemble the board. Everyone has been very patient so far, but please, one more day. :D
 
Back
Top