Plumbing my Sump am Bulkhead issues

kniesh

New member
Hi, I've been keeping freshwater fish 15 years and decided to take on marine properly. I'd never done a sump before and stupidly I ordered a tank drilled but no pipe work down from ND. I done a lot of reading up but I've completely messed up the bulkhead part in the central weir, and was hoping someone might have some advice? I'm almost sure I have to start again now from scratch. Buy all the pipe work again?

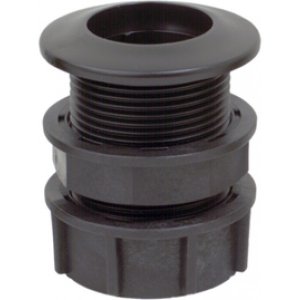
Basically I think I've attached the bulkheads the wrong way. I watched a YouTube vid on it an I think I mis-interpreted what was said. The weir is so tight that I really struggle to get my hands down there now to do anything. Plus all the pipe work underneath an above is now glued in so I can't just take them out.

Also, I've just read that the pipes need to be glued in to the bulkheads? For some reason I didn't even check this, mine is one pipe that slides from underneath, straight through to the top part in the weir. I take it this is wrong?

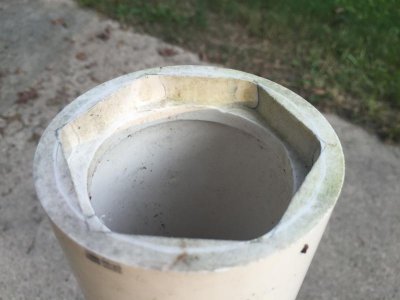
I have attached some pics below so you can see exactly how I've messed this up. Any advice would be greatly appreciated please?

8f647492fa32cfdb4c627d66e4bfe238.jpg

ff72c7527cd7f8eff1032bcea16d0331.jpg

15894ba815d6a4c3f433e199a060dfe6.jpg

2a2d71cb37307d6402bd8b5e73e8bf68.jpg

46b32cde7040d5f7a89b14306d6b1381.jpg


Thanks, Vinny


Sent from my iPhone using Tapatalk
 
Gaskets should be on the flange side, even with the bulkheads installed that way (putting the gaskets on the outside of the tank). I have mine installed upside down like that (with the gaskets on the outside). As is, your bulkhead threads will leak down outside the tank and past the flange (no gasket that i see)...

Is that second screw bit some kind of compression fitting? It looks like these are compression fitting bulkheads (didn't know that was a thing). If you loosen that outer nut thing can you slide the pipes around? If so you can maybe save the setup. Remove the compression nut then the bulkhead nut to get to the gasket. Wiggle down the bulkhead/pipe as far as you can to get more room to push the gasket through to the outside of the tank... once its there, against the flange, wiggle the bulkhead back up, reseat the nut, the compression nut, and should be all good. You can also take advantage of the unions on the ball valves to help drop the bulkhead/pipe.
 
Thanks for the reply. Yes the top but inside the tank allows me to twist the pipe around. However, as the 90 degree angles below are already glued I can't really slide the pipe through the bulkhead.

This is one pipe going through the bulkhead. Not 2 pieces slid in from below an above, an it's not glued. Is this right. I've attached a pic of the below. Is this black sponge thing the Gasket?

Inside bit of bulkhead, but this should be on the outside? Loosening the top screw just allows me to twist the pipe.
e6efb8b66bcfd578d50292e67b65f08a.jpg


The bottom, outside but. Assume this should be in the inside. The black bit resting against the glass is a sponge. An it's here the leak comes through
f271ee167b0c73e0a75e2ed6ca14029a.jpg


Sent from my iPhone using Tapatalk
 
I see a white gasket type thing on the inside next to the glass and a black gasket on the outside of each bulkhead next to the glass. Is this correct?
I dont see where you will need new bulkheads.They will still be good and can be removed and reinstalled as long as it is as Gorgok says, (The pipes move)
The 2 pipes on the left are long enough to cut and use a coupler to reconnect them. The pipe on the right where the 90 is very close to the bottom of the tank will prob need to be replaced.
Im still miffed as to why they have a compression nut set up. Most people either glue the pipes into the bulkhead from the bottom if they are slip. If the bulkhead is threaded on the inside then a threaded pipe or nipple is used. Then separate pipes are used for the inside of the overflow.Those pipes do not need to glued.
 

Attachments

  • 8051151-600x600.jpg
    8051151-600x600.jpg
    42.9 KB · Views: 0
Last edited:
Short of redoing it, You could try to remove the seal and use silicone. Tighten down till it squeezes out just a bit, let it dry, and then maybe another 1/8 turn. or better yet just get new gasket. The teflon one goes on the bottom to stabilize the fitting.
 
Is that white bit a hard washer? Or a rubber gasket? I assumed it was rubber, but it may be a hard plastic backup ring, to make the nut not grind against the walls of whatever that is installed on so its easier to turn. If so its in the right place and most of what i said is no longer valid.

If that foamy thing is foam rubber (gasket) and the plastic ring is indeed just a hard plastic backup ring maybe you need to tighten the nuts up some and see if that helps. I made a tool for my bulkhead nuts out of 4" pvc pipe with the nut shape dremeled in. Worked great to get to hard to reach nuts and give it that last little turn.

If the black thing is not a gasket, but a foam insulator of sorts, maybe these are not designed to be waterproof... And instead be a passthrough that can sort of hold a pipe in place. Very strange. Seems like a very heavy construction for a non-waterproof thing though, not like a cable gland.

Any idea what they were labeled as?
 
The black one does seem to be a foam. It seems to absorb the leak as it comes through. The white one is indeed a hard plastic type thing. They weren't labelled, this was just labelled as a tank connector. I still have hope it just needs tightening to be honest. But now I've glued the other pipes in, it is extremely difficult to get back in there


Sent from my iPhone using Tapatalk
 
I see a white gasket type thing on the inside next to the glass and a black gasket on the outside of each bulkhead next to the glass. Is this correct?
I dont see where you will need new bulkheads.They will still be good and can be removed and reinstalled as long as it is as Gorgok says, (The pipes move)
The 2 pipes on the left are long enough to cut and use a coupler to reconnect them. The pipe on the right where the 90 is very close to the bottom of the tank will prob need to be replaced.
Im still miffed as to why they have a compression nut set up. Most people either glue the pipes into the bulkhead from the bottom if they are slip. If the bulkhead is threaded on the inside then a threaded pipe or nipple is used. Then separate pipes are used for the inside of the overflow.Those pipes do not need to glued.


Yeah all I seen on the videos they were different. An the pipe just slipped straight through but with a little white rubber stopper that slides into the connector. Think this is instead of gluing them in, just doesn't look very solid to me


Sent from my iPhone using Tapatalk
 
The Teflon washer is not a seal. I would suggest seeing if you can getting new seals or make a set. Remove the Teflon and replace with new soft rubber seal. You should be able to pull the bottom down enough to cut and remove to seal, you could then cut one side of the Teflon and slip it in, this is not a seal but a spacer. Good luck
 
The Teflon washer is not a seal. I would suggest seeing if you can getting new seals or make a set. Remove the Teflon and replace with new soft rubber seal. You should be able to pull the bottom down enough to cut and remove to seal, you could then cut one side of the Teflon and slip it in, this is not a seal but a spacer. Good luck
 
Anyone got any pics of what they've designed to tighten these big nuts? I'm convinced they just need tightening now, but it is so awkward to get in an do it so it may just need a lot of improvising
 
This was my solution on reaching nuts deep in a box. Basically just a long enough pvc pipe of big enough diameter to surround the nut, then extra bits added on the inside to fatten it up (cut off and glued in strip of the same pipe). Printed out the nut size on paper and traced it onto the pvc, then dremeled it out. A cross hole at the other end lets me put a rod through it and get a solid grip.

Now if i need a 70mm x 3' deep socket, i have one handy...
 

Attachments

  • IMG_2325.jpg
    IMG_2325.jpg
    39.7 KB · Views: 0
If you haven't already done something here, this is my suggestion:

Cut all three pipes off under the tank, the emergency drain as close as possible to the 90.

Remove the bulkheads and flip them. Reinstall with couplings on the stubs and reconnect in tank plumbing. No need to glue.

The return pipe and drain pipe should be able to be reconnected because the bulkheads are longer in their new orientation, just don't cut the pipes too short in step one.

Try a street 90 in the emergency drain and see if it clears the drain. If not you'll have to lower the drain to make room, or put a street 90 in that bulkhead also, offset it to the front of the tank 45 degrees then 45 back to be parallel with the emergency drain. Make sure to offset it enough that the unions of the valve clear the other pipe.

Speaking of the valve, I don't think you'll be happy with a ball valve as your throttle. In many cases they're a struggle to tune.

Not too bad, you should be able to salvage the bulkheads and most of the work you've already done.
 
Thanks for the replies. I haven't done anything yet, other than spend money on strap wrenches that didnt seem to work. Are we certain then that these are installed the wrong way, I've been trying to figure out a similar way to yours for a day or 2 now I14abeer. I think this is my next route.

Also, regarding these Bulkheads, I've seen everyone saying they've never seen these ones before, so I'll put the pics up off the website I bought the tank. They have a bulkhead on there, and also a Bulkhead (table conduit). I will put the pics below. The one i have is the table conduit one. Does this make any odds on what way round it should be, and also is it definitely right they are the wrong way round?

all help much appreciated here, thanks, Vinny
 
Back
Top