Silent and Failsafe Overflow System

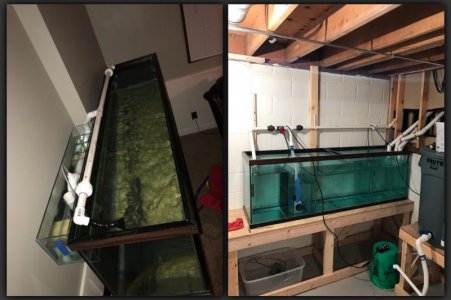
Turning the 90 on the open channel sideways won’t really do anything to help. Think of the open channel with just the bulkhead without a 90. If the water level is more then about 1/4” above the bottom of the inlet on the bulkhead it will be loud. Turning the 90 sideways won’t affect this. That is about where the water level has to be for it to be silent. The open channel is essentially what u set the water level to inside the overflow box.

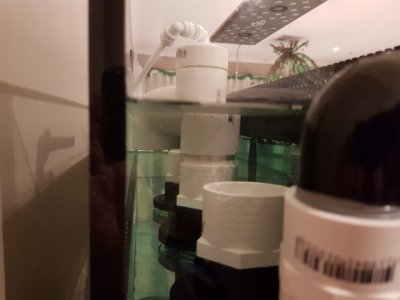
Your issue is that when u have the water level at the correct hieght the slots that u cut in the syphon 90 start sucking air because they are cut to high.

It looked like the bottom of your 90 has more then 3/8” clearance from the overflow box. Being that is the case I don’t know if it will work how I said to test it. I would still try it & cut a piece of pipe 3/8” long & insert it into the 90. It may be enough to get it working. If not even though it sucks, u will have to change out the 90 on the syphon & this time don’t glue it inside of the overflow.

I wouldn’t even mess with the open channel. On a back drilled tank like yours it isn’t the 90 that sets the water level. It is the bulkhead itself. So trying to manipulate the 90 doesn’t really solve anything.

The syphon will purge the air. What will happen is when u start up the return pump the water in the overflow box will rise above normal operation until the syphon purges all of the air. Then the water will lower & go back to the normal operating hieght. So basically it will self regulate to get the air purged, the water will build up until it is enough to purge the air. The emergency may even take a little water at first until it stabilizes.

One of my tanks is the same setup as yours with the internal box & back drilled tank. I drilled all the holes at the same hieght just like u. On startup it builds up to where it is right at the emergency but it will eventually purge the air from the syphon & stabilize. It takes it 30 seconds or so. When I setup that tank I even cut the slots in my 90’s like u did, but I had to replace the syphon 90 for one without slots because I was having the same issue as u.

The first thing I would do is cut a piece of pipe to cover the slots on the syphon. Then start the return pump with the valve about 1/2 way closed. Give it a minute & see what it does. U will more then likely have to keep slowly closing the valve to get the water level to rise. Once u can get the water level to rise enough to where the syphon kicks in just let it stabilize to where the water level is consistent in the overflow. Once u get to this point & it is consistent u will know if u need to raise or lower the water level. Make very small changes to the valve until u can get the water level to the bottom of the inlet on the bulkhead. After u turn the valve a small amount give it a minute because it takes a few seconds for the change to show. When u get the water stabilized to about 1/4” above the bottom of the bulkhead u will know if u need to change the 90 on the syphon. If it is still sucking air u will have to change it out because that is around where the water level will have to be. If u have trouble getting the water level to that hieght then u will probably have to also change the ball valve to a gate valve
 
Last edited:
Thank you LSUFAN. I grabbed all the parts and tools and headed to the office today. Cut thin rings to slide into the syphon toothed 90. Got there and realized the 90's are 1 1/4" not 1 1/2" so of course they didn't fit. :mad: Hummed and hawed and decided to make changes.

I'm swapping the syphon and open channel. This will allow me to 1) completely put in a new syphon 90 with no slots 2) allow my syphon to have a near vertical drop in the back of the sump via 2 45's rather than the current set up where it travels forwards to the front of the sump (even though it fully syphoned with the current setup when I blocked the open channel).

I had all the parts except I need to pick up a valve and a bulkhead. I just have to replace the T with a coupling and replace the plumbing forwards into the overflow box. Threaded bulkhead this time!

The top terminal caps are just threaded with teflon tape so I can easily switch them so the air tube remains with the newly allocated open channel.

I will take your advice and hopefully be able to tune it once I glue what needs to glue and allow it to cure. I will update. Thanks again.
 
Sorry if this has been asked but I’ve spent days and countless hours trying to read everything out there. But can you run 1-1/2” bulkheads with 1-1/2” pipe on the drains. And where’s the best placement for gatevalve on siphon, up high or down low by sump?
 
Sorry if this has been asked but I’ve spent days and countless hours trying to read everything out there. But can you run 1-1/2” bulkheads with 1-1/2” pipe on the drains. And where’s the best placement for gatevalve on siphon, up high or down low by sump?

What size tank do u have?
But yes, u can use 1.5” plumbing if u have enough flow through the system. The location of the gate valve isn’t critical in most cases. I would put it where it is easy to get to whether it is behind the tank or in the stand. Most of the time it is easier to get to under the stand close to the sump, but it depends on the setup. The only time it may make a difference where it is installed is if u have the sump located far away from the tank like in a basement or u have horizontal runs in the plumbing . In that instance it would be best to have the valve at the end of the run close to the sump & not at the tank.
 
Last edited:
Its a 125 that I’ve been working on for the last month. I’ve put a glass C2C in already and waiting for the glass to come in so I can make the exterior overflow box. Then I have anoher 125 for my sump that I’m also waiting for glass to make baffles.
I have a 90 now and needless to say I’m not very happy with just about everything about it. So I also built a fish room in my basement and once all said and done it’ll make life easier for the up keep. No more carrying buckets. It’s a multi level so it’s reallg only gonna be about a 6-7’ drop.
If I knew how to post pictures here I would and I’ve been on a different forum trying to get help and no one seems to be any help there.
 
For pictures I used to use photo bucket but they now charge something like 3 or 400 hundred dollars a year. I already had a flickr account so I just uploaded pics there then posted the links here. Worked fine.
If I knew how to post pictures here I would and I've been on a different forum trying to get help and no one seems to be any help there.
 
Its a 125 that I've been working on for the last month. I've put a glass C2C in already and waiting for the glass to come in so I can make the exterior overflow box. Then I have anoher 125 for my sump that I'm also waiting for glass to make baffles.
I have a 90 now and needless to say I'm not very happy with just about everything about it. So I also built a fish room in my basement and once all said and done it'll make life easier for the up keep. No more carrying buckets. It's a multi level so it's reallg only gonna be about a 6-7' drop.
If I knew how to post pictures here I would and I've been on a different forum trying to get help and no one seems to be any help there.

1.5" will be ok if u plan on being on the higher end of tank turnover. U just don't want to be trying to have 200 or 300 gph with 1.5" plumbing. 1" plumbing would also be ok. I would place the valve by the sump being it will be in the basement. That is the only time the location of the valve really makes a difference. It does make it a little harder to tune because u can't see the overflow box to see what the adjustment has done. The good thing about a beananimal is once u get it dialed in u don't have to touch it. I havnt touched my valve on my syphon in atleast a couple years.

U can use the thumbnail in the post to post a picture. When u make a post it is the icon at the top that looks like a paper clip. A lot of people have started using Flickr or imgur but they don't work from a mobile phone. I am always on mobile so I have found postimage.com to be the easiest for third party hosting.
 
I'm sure this has been asked many times before. But what are the advantages of an external been animal overflow compared to an internal wier with a been animal ?
 
The drains themselves work eighther way. The biggest difference is not having a big overflow box inside of the tank.

With a interior overflow box only, it has to be 3" to 4" wide to be able to fit the elbows. If u have a exterior overflow box then u don't have a wier inside of the tank. The other option is a narrow 1" to 1.5" wier inside of the tank with a exterior box to hold the plumbing. Similar to the ghost style overflow boxes.
 
I'm sure this has been asked many times before. But what are the advantages of an external been animal overflow compared to an internal wier with a been animal ?

Like LSUfan noted above, they work the same more or less. Space is what it comes down to. The thread is massive and I've read it a couple times now while setting up my 240. I seem to recall seeing both with zero complaints. It is all about looks and space in the end. When set up properly to his design it works. And works well. Very well.
 
Hi.

I hope it's ok with herbie overflow questions as well. I need some help decide size for a overflow for my 20gallon tank that i have setup as an AIO since a year back.


These are the the boxes i have in mind. It's a diy project.

Inside black box dimensions: 11.8x1.1x5.5" lxwxh.

Clear acrylic box inside: 11.8x3.2x6.3" lxwxh
Sound good or do i need to make the boxes larger?

Some more info.
2 Bulkheads 1 1/2" and for drains 1"
I will use a plastic mesh instead of teeth.

Tank 26x26x11.4" lxwxh and sump around 16gallon.

Thanks.
 

Attachments

  • 1.jpg
    1.jpg
    10.6 KB · Views: 13
  • 22.jpg
    22.jpg
    13.1 KB · Views: 17
  • 23.jpg
    23.jpg
    12.9 KB · Views: 17
I just installed a 20'' Synergy External overflow box on my new SC-150.
There is currently no water in it at the moment. I'm waiting on my order to come in on a total of 8 30lb bags for my Tropic Eden Pink Tonga Mesoflakes for my Substrate.
Then it time to start my plumbing.

I do have a question if you run one of these External Overflow boxes like i am. All the parts that came with the Synergy 20'' box was 3 1.5'' pipes external and 3 prefab pipes that have been pre-cut @ 1.5''. My sump has 1'' bulkheads so somewhere i am going to have to reduce it down. Should I reduce it to 1'' right before it hits my sump or after the 1.5'' True Unions then add a 1'' reducer and go all 1'' to the bulkheads on my sump! Let me know your thoughts on which way you would plumb it?
 
I would drill the sump to accept 1.5” bulkheads & use 1.5” on everything. U will be surprised how much more water a 1.5” open channel can take & remain silent. That means u will be able to have more flunctuation in the system & it remain silent without having to touch the valve on the syphon.

Otherwise I would reduce down at the bulkhead in the overflow box & just use all 1”. A 1” to 1.5” reducing bushing will slide straight into the bulkhead, then the 1” will slide into the bushing. If u have a union at the bulkhead in the overflow box then u can do it the same way but from the union instead of the bulkhead
 
Got my C2C and bean animal setup on this 125 DT and been test running with some water. It's been running for 6 days now and it's the quietest and smoothing running fish tank I've seen(not that I've seen a lot).
I'd like to thank this site though for it's where I got most of my info while reading and searching the net for my new diy fisg tank build.
Now that's it operates the way I hoped and some, it's time to start the stand/bookcase and rehome everything from my 90gallon into this.
 

Attachments

  • BDC8C413-258C-4252-93A0-56F6536CC65E.jpg
    BDC8C413-258C-4252-93A0-56F6536CC65E.jpg
    57.4 KB · Views: 16
Hey guys

I'm having troubles with my new tank and the beananimal overflow.

3q8ri


Very hard to get a proper picture as its close to a wall.
In the picture you can see 4 pipes the closest to the camera is a return pipe so forget that one.
First one should be full siphon, then open channel, then emergency. All pipes are 1.5", only the full siphon has a valve.
Basically whats happening is I can't get the system to run correctly unless the full siphon has the whole top section (upside down U shape disconnected, as seen in the pic) removed and left as just the bulkhead.

If I connect the complete piping back onto the bulkhead and make it look like a Beananimal should it seems like the full siphon gets air stuck in it and all the flow goes into the open channel with a heap of bubbles produced in the sump.

It seems to run perfect the way it is at the moment (as seen in pic), but can it run like that forever without any issues.

I'm a bit stumped at the moment. Can anyone offer any advice?

Thanks in advance!
 
My first guess would be the end of the pipe is submerged to far into the sump & it is making it hard on the syphon to purge the air. How far are the pipes submerged into the sump?

Do u have a picture of the rest of the plumbing going to the sump?
 
Both pipes are around 1" into the water in the sump.
I'm not at home at the moment but can get a picture later on and post online
 
Shortening the pipe in the sump helps purge the air, but it usually isn't a issue unless it's submerged more then 1". U can also lower the syphon standpipe or raise the open channel standpipe. By doing eighther or both it will help the syphon purge the air. How u have the standpipes the water in the overflow isn't building up enough to purge the air because the open channel takes all of the water before it gets to that point.

From the looks of it the two standpipes are at the same hieght. In a exterior box like yours it's a good idea to have the open channel 1/2" to 3/4" higher then the syphon.

I use the standpipe on my syphon, but if u don't want to mess with it it is fine running how u have it now without the standpipe. Put a strainer on it & its good to go.
 
Hi Bean,
Great system but I do have a few questions for you before I start mine. 1. What is the purpose of the John Guest fitting? IS it just to make the connection airtight? 2. You used the tees with a cap I would assume because your system is external. Mine will be internal so could I just use elbows? 3. You state in your original article that all three drains are at the same height (with execption of the emergency being an upturned elbow) I've seen so many people on You Tube setting all 3 at different heights, why are they doing this?
 
Back
Top