Silent and Failsafe Overflow System

Question: I'm trying to feed a waterfall scrubber off my drain lines, currently I have a standard bean animal on 1.5" pipe. I would like to lower the open channel and create a second siphon line also controlled by a gate valve feeding the ATS (it will have an overflow elbow so if the slot gets clogged, water will still flow at the rate set by the gate valve).

Essentially, will this system work with two gate valve controlled siphon lines and one emergency dry pipe? or should I convert the dry pipe to the open channel to accept fluctuations? Open to any advice, thanks.

Im doing a variation of this here:
http://www.reefcentral.com/forums/showpost.php?p=25060297&postcount=9365

Your going to still need Open Channel and emergency channel. The 2nd gate valve is to handle whatever can't be handled by the first overflow.

LSU is right - it's technically no longer a beananimal.
 
A thank you to BeanAnimal for this great design. My plumbing which is as close a copy of his design as possible, has worked flawlessly since January 2017... the only issue was my own dumb fault by not having a return pump as strong as I needed for my system.

It would take a long time, sometimes over an hour to equalize after feeding and I thought I must have created some flaw in the plumbing setup, but after increasing return pump flow rate 500 more GPH - It equalizes in less than a single MINUTE...and then whisper quiet.

It's a beautiful design!
 
Question: I'm trying to feed a waterfall scrubber off my drain lines, currently I have a standard bean animal on 1.5" pipe. I would like to lower the open channel and create a second siphon line also controlled by a gate valve feeding the ATS (it will have an overflow elbow so if the slot gets clogged, water will still flow at the rate set by the gate valve).

Essentially, will this system work with two gate valve controlled siphon lines and one emergency dry pipe? or should I convert the dry pipe to the open channel to accept fluctuations? Open to any advice, thanks.

That would basically mean turning it into a herbie. The main advantage of the bean is that you have an open channel that can also function as a siphon. Many of the herbie setups I have seen do not have an adequate emergency, that will not handle the full flow in the event the siphon becomes completely blocked. Bean solves this problem. You'd be better off T-ing the single siphon drain. If possible, one thing you might consider is adding a fourth drain as your second siphon. That is what I am doing for my new build - actually I am having three siphons (one to ATS, one to refugium and one to sump), one open channel and one emergency.
 

Attachments

  • IMG_0700.jpg
    IMG_0700.jpg
    71.2 KB · Views: 0
Last edited:
Quick question I hope. I have a 240 that I am starting to plumb this week. It is a peninsula style tank with the overflow on the side rather than the back. So not a traditional coast to coast. It has two 1" return lines on the outside of the overflow with 3 1 1/2" bulkhead/overflow drains in the middle.

My question is if I use the two 1" returns will the overflow natural direction cause problems? Or will it be counter productive? Not sure if I'm asking the question right. I apologize. I'm just thinking that the water direction entering the overflow will be greater than the return pump and 1" lines.

I have a XF230 Gyre that will be the primary water circulation and a Jebao DC 12000 pump for return. At least that was my plan but could change if need be. This is for a 240 gallon tank that is 54" L x 30" H x 30" D.
 

Attachments

  • retrn.jpg
    retrn.jpg
    26.6 KB · Views: 0
If I am understanding what u are saying then u will be fine. Most people's returns are on the same end as the overflow. On most setups they are both on the back glass, u will just be switching it around to where it is on the side pane of glass. They have quite a few peninsula tanks with it setup that way.

U will have to extend your returns from the bulkheads in the overflow box to where the water exits inside of the tank & not inside the overflow box. How u do this will depend if the tank is notched or u have pass through holes to get water from the tank to the overflow box. If u have pass through holes then u probably would have a bulkhead in the back of the tank for the returns. So u would connect the bulkhead in the overflow box to the bulkhead on the tank. If the tank is notched or u don't have a bulkhead on the tank itself for the return, then u would probably have to connect to the bulkhead in the overflow & go over the side of the tank to get the returns into the tank.

Hi LSU - thank you. I was not sure so wanted to ask and I was not sure exactly how. The good news is that the tank is in the garage on the stand so I can start the plumbing this week. Few remaining parts are coming in with the main being the flexible PVC and a couple unions.

Thank you again.
 
I don't think this question has come up yet.

I'm in the middle of my 112g build. My external overflow box has 3 pre-drilled holes in the bottom for 1" bulkheads. I would like to increase my open channel size to 1.25" as 1" doesn't leave much room for air space. Would a 1" bulkhead with a reducing coupling to 1.25" create enough turbulence that might increase noise? My return flow should be around 700-900GPH


Here's another model I made of the reducer in the back.
 
Last edited:
Looks like I may have a tight fit if I stay with the tanks 1 1/2" primary bulk head fitting. There is not enough room unless I vary the height. Is that a reliable option? Are there other PVC fittings that might work or is my best option to reduce inside the overflow to 1" pipe and leave the lower half 1 1/2"?

I'm not sure if that will cause noise or trouble or how fluid dynamics work (does it fill the pipe, does it matter, etc)? I've attached an image if it helps any although not sure how the size will scale. My apologies.

Thanks for any tips or tricks.
 

Attachments

  • o2.jpg
    o2.jpg
    53.6 KB · Views: 0
Deja vu all over again

Deja vu all over again

I am about to start back into the hobby after being out for the last 15 years. After several false starts, I believe that I will really do it this time.

So, I am rusty and dusty. Still, this style of moving water to the sump makes good sense. Thanks, Bean Animal and all of you who have added so much information over 400 pages, if you include the original thread. I have read the first thread, prior to the split, in entirety, and more than 10 pages after the split. Since I have not read the rest to discover answers to my questions, I am going to just ask, even if my questions have been answered before.

I have a 90 gallon tall with starfire glass, begging to be pressed into service. Unfortunately it has an old-fashioned tower overflow which measures 7.5" (L) X 5.5" (W) X 22.5" (H); it is drilled with 1" schedule 80 bulkheads in the bottom. It has teeth along three sides of the top. I remember that they introduce noise. I may use a dremel to get rid of the teeth.

I know that I must add a third pipe for the emergency channel.

So, here we go:
1) Should I add a 1" or larger bulkhead through the back to serve as the emergency drain and use the two existing bulkheads in the overflow for the full siphon and open channel as is with 1" pipe and fittings?
2) Should I, instead, attempt 1.5" pipe and fittings in the overflow (if I can shave them enough to fit) and then go with a pipe reducing bushing to the 1" bulkheads in the bottom of the overflow? I am worried about venturi effect if I do this because of narrowing the flow after the siphon has been established. I also wonder about vortexing because of the limiting size of the overflow itself.
3) Another way to go would be to make the open channel 1.5" and leave the full siphon at 1".

And I know that I could just plug the drains in the bottom of the overflow, add a coast-to-coast external, and plumb from there.

What did you think? I am open to all suggestions.
 
There is no need for anything more than 1" pipe on a 90G tank..
and before you do anything you need to ensure that the bottom (or whatever pane you plan to drill) isn't tempered..
 
There is no need for anything more than 1" pipe on a 90G tank..
and before you do anything you need to ensure that the bottom (or whatever pane you plan to drill) isn't tempered..

Thanks for your timely reply. Between the time I posted and now, I have been to both Lowe's and Home Depot to pick up some 1.5" pipe and fittings. I will be taking it back, since it does not fit in the overflow tower. I am glad to know that the 1" will function properly with my 90 tall. The bottom of the overflows are already drilled, taken care of by the tank builder. I only have to concern myself now with a bulkhead hole in the back of the tank for my emergency channel.

I do hope though, given the size of the overflow tower, that I will not have an issue with vortexing. Anyone want to make a guess at what might be optimum depth below the surface in the overflow box that I ought to mount my siphon and open channels. I will have the siphon channel .5" to 1" below the open channel to facilitate purging of air from the siphon channel upon start up.

ummm...bump
 
Anyone want to make a guess at what might be optimum depth below the surface in the overflow box that I ought to mount my siphon and open channels. I will have the siphon channel .5" to 1" below the open channel to facilitate purging of air from the siphon channel upon start up.

Generally, with a Bean you set the water height in the overflow box with the open channel height. That is, you want the water in the open channel elbow to be around half the diameter of the elbow or thereabout. The siphon should be totally submerged, about an inch below the open channel, depending on how much space you have in the overflow. Mine are in deep trapezoidal overflows so space is not a big issue.

If you don't want a loud waterfall sound, I'd try to keep this height between 1-2" from where the water enters the overflow box. I have it set at about 2" in my tanks and there is some amount of waterfall sound that is muffled when the top is on the return area and the canopy is closed. I traded the slight increase in sound for what I perceived to be more efficient surface skimming. However, since you are not going to glue these pipes (just press into the bulkhead), the height is easily adjustable to fit your preferences.

Thank you. What you said squares with what I thought I understood about this approach to moving tank water to the sump. What you said was stated clearly. I appreciate that. I tore my old tank down and left the hobby just as the Bean Animal system was developed/developing in 2009. I am trying hard to learn and relearn so much about being a reefer again.
 
Today I finished the plumbing in the overflow box and valves below. Thought I was going to be able to fill the tank and do a leak check but I didn't buy part to connect to the Jebao DCT 15000 return pump I was going to use. I think I need a 1 1/2" NPT female adapter then will add a union. That and there are is a connection I am not 100 percent thrilled at from one of the returns to the sump. I am using Flex PVC and it is a bit more difficult to work with than what I expected.

Also the overflow returns are 1" bulk heads while the overflows are 1 1/2". Originally I was going to use 1 1/2" for the overflows but there was just not enough room. So I had to reduce down to 1". Hopefully that will work ok. I'm going to change the returns to shorter pipe but threw these on just to let water return back into the tank. I'm considering adding a pair of Sea Swirls. If not I'll shorten them and try the RFG variable return nozzle.

I think I have the height properly set. Only other thing now that I can see is I didn't add the valve/air tube on the emergency drain. Bit more work but will see what I can find to connect flex pvc to the Jebao and then do a quick lead check on the primary overflow and valves. Hopefully by next weekend...
 

Attachments

  • o4.jpg
    o4.jpg
    61.8 KB · Views: 0
Today I finished the plumbing in the overflow box and valves below.

*** SNIP ***

Finished plumbing, fixed a major bulkhead leak, and now into the revisit dumb questions, re-read thread, and fix what I have incorrect by error or assumption(s).

What is the proper way to adjust flow? I think I have a couple issues though so a couple questions.

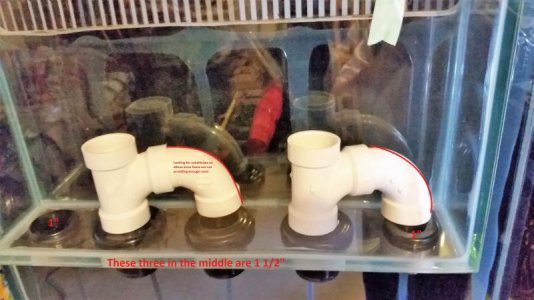
1. First image is my sump. Should all of the return lines be submerged? Looking at the image the left return line is fully submerged. The one in the right is not. Not sure why they built it that way but maybe I can put a pipe in there and extend it if so. It is 1 1/2" PVC.

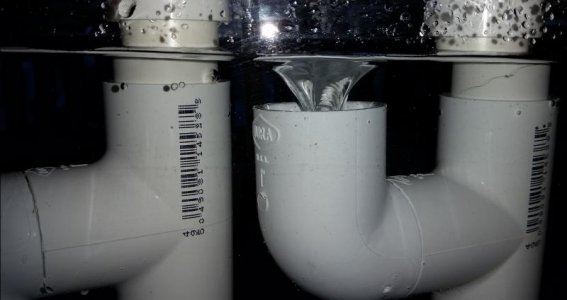
2. Second image and concern is the emergency overflow. I "know" it is supposed to handle the flow for a short time and be loud in doing so. This image is showing the vortex which I guess is correct? I ran it a couple other times to test and it is completely submerged under water and I didn't notice a vortex. That return is on the far right of the sump and not fully submerged either. Or is this the way it is supposed to be?

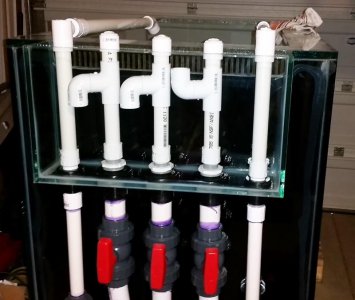
3. Final image is the fine tuning bit. Are both returns that are not the emergency (flipped upside down one) supposed to be flowing water? Also should I raise the height a bit more? It seems that there is room and it would lower the overflow noise a bit.

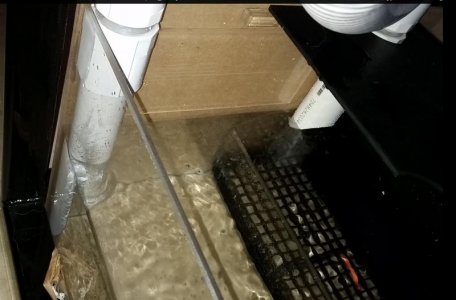
I'm finding that I'm closing the ball valves more than what I expected and I'm not sure how this is balanced. Is the water level in the overflow box low to the base of the elbow because it is draining faster than the return pump can return? Or maybe higher than the top of the elbow in the picture because I'm returning too much and not draining? Or is this back to the sump and not properly submerged?

I can see adjusting both return lines that are not emergency by closing is adjusting the water height and noise. I'm just not sure what is proper. I'm thinking of extending the two pipes by 1/4 to 1/2" so the top of the tee / elbow is parallel with the top of the upside down emergency. Maybe that is the right thing to do. Then find a way to extend the pipes in the sump a bit more that are not submerged.

Nice system. Issues are my ignorance :) But it is fun I must say and learning something new. I was buying parts at the local parts store. Plumbing stuff I forgot or wanted to change. Fella walks up - hey, you wouldn't be a plumber by any chance would you? Me, lol - no sir. I am the last person you want to ask for help :) We both laughed.

Edit: Just re-read Bean's original post / blog explaining it. I found something I did backwards so going to go test....will update in a bit.

UPDATE: Edit 2 & Final: Fixed a couple issues after re-reading original blog/instructions per edit above. Main issue was that I had the airline attached to the emergency drain. Since the end caps are not glued down I just moved it to the open channel and that did wonders. I also raised the full siphon and open channel pipes in the overflow by 1/2" which helped with some noise and splashing that was going on. Now after re-start from a off state it is silent. I mean the only thing I can hear is the DC pump. Very nice. I have a few plumbing mistakes I want to make neater but overall I'm pleased. I'll let it run over night and see how it looks in the morning. So far though the past hour it is running great!

Thanks Bean and everyone who contributed to the thread.
 

Attachments

  • o5.jpg
    o5.jpg
    47.7 KB · Views: 0
  • o6.jpg
    o6.jpg
    33.7 KB · Views: 0
  • o7.jpg
    o7.jpg
    43.2 KB · Views: 0
Last edited:
Finished plumbing, fixed a major bulkhead leak, and now into the revisit dumb questions, re-read thread, and fix what I have incorrect by error or assumption(s).

Thanks Bean and everyone who contributed to the thread.

Your plumbing is way more complicated than is necessary. It is similar to Bean's original drawings. Bean needs the extra plumbing because he has no external OF box.

You only need to control (valve) the flow on the full siphon line. I see no advantage to constricting the other two.

The siphon needs to be a 'u' configuration. It can be made with just two elbows, street and regular if you are short on space.

In my setup the siphon has a strainer on it.

The open line is topped with just an elbow. Only a small amount of water usually flows in this line. The amount of flow is controlled by the full siphon valve. If you open up the siphon, the open line will have less flow.

The height of the open line controls the water level in the OF box. This also controls the amount of noise coming from the tank to OF box flow.

The emergency is just an open pipe. No fitting on top. It's level is slightly above the open line.

In practice this is what happens. If the siphon is blocked the open line starts to siphon but since it is not restricted, it siphons more than the inflow. This makes a loud sucking noise calling my attention to the problem. Think flushing toilet noise here!

If for some reason the open would get blocked the emergency would finally see water and start sucking air and water and make an even louder flushing sound.

Adjustment is really simple. Start with the valve open. As the valve is closed, water level in the OF box rises. Once the level reaches the open line it should not rise. If, for some reason it still is rising, open the valve slightly till the desired level is reached.

This might not be a pure BA system but it is based on his great design. It's been set up since August 2013. I think I've adjusted it once but then I learned if it's acting up I need to either clean the return pump or the siphon strainer! :lmao:
 
help fine tuning system!

help fine tuning system!

Been lurking here off/on for 2 yrs, 400 pages is intimidating!

Finally got around to a system for my 55g tank and custom built 18g sump. The return pump moves an estimated 550-575 gph via 3/4" line to a spray bar. This is the prototype before venturing into it with my 8' 300g tank. I can't get the system quiet and not sure why.

I can hear water splashing below the ball valve as well as in the open channel. I have played with the valve, raising and lowering the water height in my internal box but can't seem to find the right spot. I can get the syphon to not have any bubbles but I still hear water, not always constant, but as if it fills then overflows if that makes sense (i.e. not always a constant gurgling sound). If I restrict syphon flow I get bubbles in the open channel. If I open up the syphon more it bubbles. I'm stuck...

Plumbing is 1 1/2" (smaller bulkheads as original plans), all bulkheads the same height. Stack caps on with Teflon tape. All joints in the syphon and open channel glued except the last short piece of 1 1/2" that drops into the sump (7/8" below water line). Both downturned 90's are made with teeth and sit about 3/8" off bottom of internal box.

1) How do I properly fine tune this system?

2) Can I get this system silent with such a low flow w.r.t. the plumbing size (575gph and 1 1/2" plumbing)?

3) I did not submerge the emergency channel due to space constraints. It empties into a different chamber than can have its water level fluctuate due to evaporation. I figure if the 1st 2 channels block and the emergency becomes functional it can handle 575 gph as an open channel not requiring an airtight full syphon. Is this correct? (the last 45 and short piece of 1 1/2" wasn't glued, everything above was).

The tank is ready to be re assembled but I'd like to quiet down the system first, won't be easy to fine tune the valve once in place. Thank you in advance, hope the pics load!
 
Last edited by a moderator:
picture hosting site

picture hosting site

My photos were originally showing up but now they seem blocked. I have used photobucket in the past. Now it says I have to upgrade for 3rd party posting for $400 per year! Can anyone suggest a new site to use so I may post pictures here for your help with my system.

Thank you.
 
If u are on a pc then a lot of people have went to imgur or Flickr. They don’t work well or at all on a mobile though. For mobile a lot of people use tapatalk. I don’t like how the forums are with tapatalk. I’m always on my mobile so I can’t use Flickr or imgur. What I found works best for me is Postimage. After photobucket made the switch I looked for a easy way to post pics for weeks. I finally found postimage & it was simple to post from.
 
Back
Top