You are using an out of date browser. It may not display this or other websites correctly.
You should upgrade or use an alternative browser.
You should upgrade or use an alternative browser.
The Life Reef Skimmer Club
- Thread starter d2mini
- Start date
Celtic_Fox
New member
Even though they are called "bio reactors" they are just a standard upflow fluidized reactor. Basically just a really nice phosban reactor. If I was buying again I would absolutely buy all "bio reactors".
Sent from my iPhone using Tapatalk
Orcus is correct. Jeff at Lifereef calls them Bio-Media Reactors, but they are just reverse (up)flow. I used the term to be consistent with his website - for anyone going over there and reading up on them.
Plus, I like upflow reactors in general. They usually channel less and of course the air bubble at the top is forced out naturally. I could have monkeyed around with grommets or something on the cheaper downward flowing reactors to restrict the output, but then I might still have to burp them somehow, etc.
I don't plan on running bio-media at all (or at least fluidized bio-media), but with this setup I have the option of running it in either cylinder (or both if I find the stuff in my system enjoys feasting on high amounts of bacteria in the water column). And if I don't like how they're working, I'll just order the oversized downward flow reactors. =)
Last edited:
Celtic_Fox
New member
I have the LF1-300S with Life Refugium. For those that are running a LR sump and fuge, how have you set up the plumbing?
In the stock set up, the fuge drains directly, via PVC, into the chamber with the return PVC, and in fact is on the same side of the baffle in that center chamber, under the egg crate and filter pad. As a result, and run off into the overflow in the fuge (algae, etc.) will go directly into the return PVC without passing through a filter pad.
I modified my set up to have that PVC fuge drain stop and drain into the other side of the baffle in the center chamber, so that all the fuge drain water would need to pass though the filter pad before entering the return PVC. This is working fine as post this modification, I am seeing macro algae leaves and hair algae accumulating on the filter pad. I have since added filter bag mesh to the egg crate on top of the overflow in the fuge, but this is something that I am still tweaking as I do not want to cause a blockage at this point in the system.
I'm actually going the opposite route. I want the refugium drain emptying directly in front of the return pump intake so pods and other good things go directly to the tank. I am switching out the PVC pipe for a barbed elbow and hose combination to take up less space, but that is only for space reasons - what little space there is in the CLF1 is being taken up by my larger than normal amount of pumps. ;-D
I plan on having an algae scrubber above the refugium so at this point I do not know if that will change the amount of hair algae escaping the refugium - but I hope it will restrict the amount of algae in the refugium in general so I would think it will reduce it. However, I think the return pump will shred any occasional hair algae that gets in it and it won't be much different than the single cells and spores that are in the water column anyway.
As for macro algae leaves - I would think that the slotted overflow pipe Jeff sends with his refugiums would stop almost all of them. If it's not, perhaps try wrapping the pipe in a mesh?
Last edited:
promptcritical
New member
What is the reason that the venturis are installed at an angle instead of the air one being straight up? Just curious is all.
Hi All!
I had floors installed at my house, so I thought this was a good time to get a new sump. Went with a Trigger Systems Emerald Cube. However, I managed to break my SVS3-24 while cleaning it out. I broke the seal free where the pvc enters through the flange plate. Jeff offered to fix it for me, but I'd hate to send it all the way in and back for a (hopefully) simple mend. Would something like Oatey's ABS to PVC cement work on this? The pipe is pvc, and the plate is acrylic. I can't find Weld-On 40 (as suggested by Jeff) locally to me.
Thanks for any tips!
Brian
Bpb
New member
Brian. My output tube with the gate valve broke as well. Can't blame the construction because I bought it used already broken but repaired. It was disassembled when shipped and when I tightened the gate valve back on I over tightened and broke it again.
I was in a pickle as I carbon dose and didn't have a backup skimmer and needed it back up quick. No weldon 40 or 16 here locally either. I decided to give it a try with Oatley pvc glue. Honestly. If you look at the acrylic cement and pvc glue they have the same active ingredient. I'm guessing it's just different thickening agents they use. Anyhow...
I put a thick layer of Oatley over the crack and let it seep in around the circumference of the pipe and held it still for 5 minutes. As the cement dried it held in place. I then put a layer of super glue over it, and covered it further with 2 part epoxy. Now... I haven't torqued it to see if it will hold against aggressive pulling, but it sealed up the connection and after about a month it haven't come loose or leak. Worth a shot if you're feeling like it.
If mine were a brand new flanged unit with colored pvc I'd probably send it in for a real repair to keep it looking sexy. Mine was already old, and super hazy from years and years of use. Also a non-flanged model so it's not as new and pretty as the brand new ones. I didn't care if the repair was a little messy looking.
Sent from my iPhone using Tapatalk Pro
Orcus Varuna
New member
Hi All!
I had floors installed at my house, so I thought this was a good time to get a new sump. Went with a Trigger Systems Emerald Cube. However, I managed to break my SVS3-24 while cleaning it out. I broke the seal free where the pvc enters through the flange plate. Jeff offered to fix it for me, but I'd hate to send it all the way in and back for a (hopefully) simple mend. Would something like Oatey's ABS to PVC cement work on this? The pipe is pvc, and the plate is acrylic. I can't find Weld-On 40 (as suggested by Jeff) locally to me.
Thanks for any tips!
Brian
Weld-on 40 is basically Oatley Clear PVC cement with bits of acrylic dissolved in it. What I would recommend is order weld-on 40 or grind up some acrylic in oatley glue and let it dissolve overnight before fixing the skimmer. The active ingredient you want listed first is Methyl Ethyl Ketone. Your fix with one of those listed should hold well but if you want it fixed and to look finished send it to Jeff.
Sent from my iPhone using Tapatalk
I'm going to try fixing it tomorrow. How long should it cure before going back to work, do you think?Weld-on 40 is basically Oatley Clear PVC cement with bits of acrylic dissolved in it. What I would recommend is order weld-on 40 or grind up some acrylic in oatley glue and let it dissolve overnight before fixing the skimmer. The active ingredient you want listed first is Methyl Ethyl Ketone. Your fix with one of those listed should hold well but if you want it fixed and to look finished send it to Jeff.
Sent from my iPhone using Tapatalk
Thanks!
Brian
Bpb
New member
Mine was also purchased used with some cracks repaired already. Looks ragged, for sure. But works better than any other skimmer I've ever owned. So I don't mind a Frankenstein look. One day, I'll buy a new, purty one. Maybe...
I'm the exact same way. I get skimmer envy looking at these brand new flanged skimmers with the green and orange acrylic parts all super clear and shiny. But at the end of the day I paid $100 for a lifereef skimmer and mine skims every bit as well as any brand new model. I can deal with some crack repairs and hazy acrylic. For now. Maybe one day in the distant future when I make a lot more money and have a much bigger tank with a much more display oriented sump I'll invest in a new one for looks. I fully intend to run this bad boy till it disintegrates though
Sent from my iPhone using Tapatalk Pro
Hitch08
New member
Could some one that has a sp4 tell me the true width I'm getting conflicting measurements 6.5"-7.5" the LF1300s sump space is only 6 3/4"x13" maybe this is why the mag is default not only performance but it's what the sump can accept the mag18 is only 5" on its side
Salt - front to back, the base for the sp4 is about 6.5". The whole thing, front to back, is more like 7.5". To measure that, I pushed my SP4 up against a wall and measured to the front of the intake, as best I could. Note that the wire comes out of the back, so that makes it stick a little further out from the wall. Also, you'd want some clearance for it to intake water.
The widest (left to right when looking at the intake) part of the base is 4.5". The pump is not wider than the base.
Hitch08
New member
While I'm at it, here is my Fluval SP4 running on a 30" (stock venturi). The SP4 is rated at 88 Watts.

Here is my SP6 running on the 30" (stock venturi). The SP6 is rated at 135 Watts.

EDIT: The skimmer seems to be settling in. This is a bit less than 24 hours in.

Within the next week, I should receive the Mazzie venturi from Jeff. If I can still edit this post, I'll add that too.
Here is my SP6 running on the 30" (stock venturi). The SP6 is rated at 135 Watts.
EDIT: The skimmer seems to be settling in. This is a bit less than 24 hours in.
Within the next week, I should receive the Mazzie venturi from Jeff. If I can still edit this post, I'll add that too.
Last edited:
Emmanuel75
Member
What's the performance like between the two pumps?While I'm at it, here is my Fluval SP4 running on a 30" (stock venturi). The SP4 is rated at 88 Watts.
Here is my SP6 running on the 30" (stock venturi). The SP6 is rated at 135 Watts.
Within the next week, I should receive the Mazzie venturi from Jeff. If I can still edit this post, I'll add that too.
Sent from my LG-H918 using Tapatalk
Hitch08
New member
What's the performance like between the two pumps?
Sent from my LG-H918 using Tapatalk
Good question. Unfortunately, I don't know the answer.

I think that it has raised the temp in the tank about a degree. Other than that, I think it's too early to tell. It's not skimming much at all. Although I washed it in a vinegar/water mixture, my guess is that it still had some oil on it. I probably didn't wash it enough. It'll need to settle in a bit before I can really say.
The overall goal is to increase turbulence via the larger pump and air/water mixture via the mazzie venturi (which was shipped late last week).
jason2459
Well-known member
Thanks for sharing! I'm excited to see the difference.While I'm at it, here is my Fluval SP4 running on a 30" (stock venturi). The SP4 is rated at 88 Watts.
Here is my SP6 running on the 30" (stock venturi). The SP6 is rated at 135 Watts.
EDIT: The skimmer seems to be settling in. This is a bit less than 24 hours in.
Within the next week, I should receive the Mazzie venturi from Jeff. If I can still edit this post, I'll add that too.
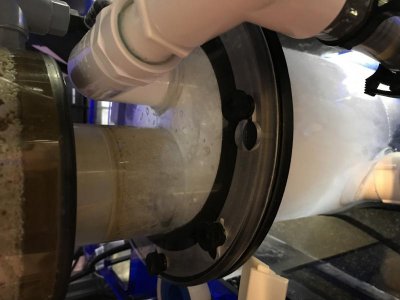
Finally got mine! After reading this thread and all of D2mini's threads I decided on a LifeReef skimmer! I love it so far, definitely not getting the black tar like everyone else but getting about 20ozs of green tea every few days, I turned it down to try to get darker and now it looks like the attached photo, do I need something bigger than the mag9.5? Or does it just take time, thanks!
Attachments
laserjim
Another Day In Paradise
Thanks for the knock off link. Hopefully I can help you out some day.:thumbdown
Last edited:
Similar threads
- Replies
- 3
- Views
- 155
- Replies
- 2
- Views
- 119
- Replies
- 1
- Views
- 106
- Replies
- 17
- Views
- 3K