DIY Stands Template and Calculator

Me, either...

Me, either...

I've read through about 60 pages of this monster 200+ page article... But haven't really seen anything for Bowfront tanks.

I want to start building one soon but wanted to see if there were any I could model from... And hopefully ask some questions about!

Any help would be much appreciated!
Thanks

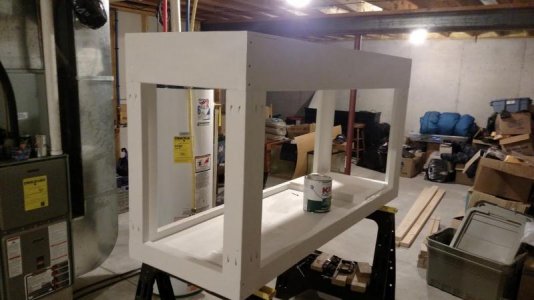
So I rather went it alone. So take what I've done and like most things you read on an internet forum: With a grain of salt.

http://www.reefcentral.com/forums/showthread.php?t=2416181

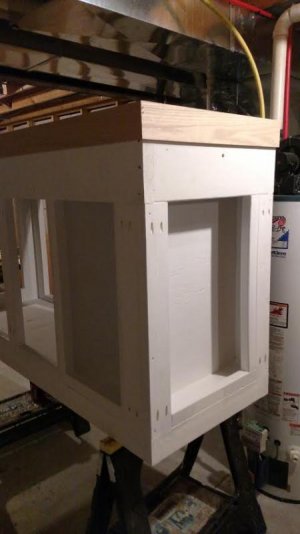
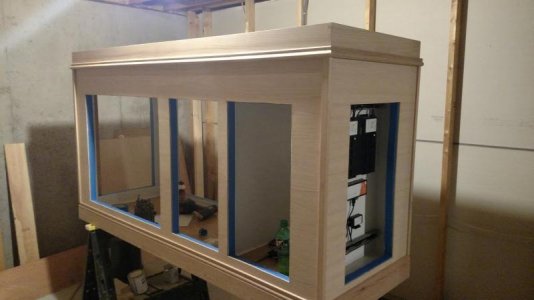
I've been distracted with a "quick" 50 gal build so this one is on hiatus. But I'm about ready to kick it off again - I now have an outline of how I'm going to do the hood and keep the bow all the way to the ceiling.

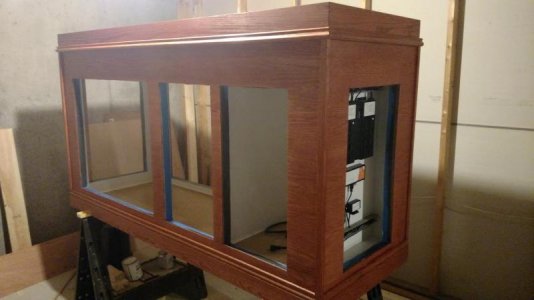
The concrete under this tank cab is really uneven. I've never seen concrete this horrible. This portion of the house was built by Billy Bob and Joe Earl with a 30 packs in hand I'm sure.

I'm kinda apprehensive of the effort needed to level the stand and keep everything supported on the floor. There's perhaps a good 1/8" or so hump right in the freakin' middle. I'll figure it out.
 
Looks like this thread is still active

Just purchased a 90gal RR setup and used the plans as shown from the original design. Only different I made was I used 2X6 for the legs instead of 2X4s. I also positioned them slightly different so the 5.5 inch span was on the short side and the 7.5 inch was on the long side. This effectively cut the length unsupported between the legs to 34 inches. I still used 2X4s for the top and bottom rails though.

I should be ok without using a center brace right?

I was also thinking about using a 2X6 laid flat across the top rails to frame the tank as well to allow for a little more wiggle room and support would this add any structural support to the stand at all?
 
Well I built the stand as stated above. Instead of a simple screw board like in the original design I used 2 2X4 to make an L much like the actual corner was supposed to be and used that beefed up screw strip to help support the tank and prevent future twisting. Im going to use plywood on the top to keep it a solid surface with holes cut for plumbing and use a center support just in the rear of the stand.

I will skin the stand with 1/4 plywood just for fun to hide all the screws and then am going to build a 1 piece cover that will slide in place over the front and sides of the stand with doors in the front. This will give me complete open access when needed by removing the cover as well as allow me to change it in the future if I decide I want a different look without tearing the whole thing down. The doors in the front will give me the access I need for the daily routine
 
Awesome thread, I read all 145 pages and got some great ideas before starting my build. Here is my painted frame for my new 210 build. It will house a 90 gallon sump. Hope to have it skimmed in oak this weekend.
 
Can this float off the float a bit?

Can this float off the float a bit?

I am looking to build according to the plans at the beginning of this thread, but I would like to be able to float the whole stand about 4 inches off the ground with only 4 legs actually touching the floor (I may swap them out for 4x4s)

This is a 240 gallon tank, so I just want to make sure the stand definitely takes the weight well.

Concentrating over a ton of weight into four tiny footprints would not be an issue in stand design. That could be done. But that much weight in a 4" by 4" might cause the floor to sag at any spot that is not directly over a floor joist.
 
I am building a stand for the IM Fusion 40 (40 gallons of water).Stand is built completely out of 2x4's, and the dimensions are 25"x20.5"x36". The top of the stand will be 3/4" oak plywood and the rest of the tank will be skinned with 1/2" plywood.

Does anyone see any issues with the way I built it? The only screw up I see is the screw strips run the entire height of the stand. Is this going to be a major issue?

stand.jpg
 
60 cube stand build

60 cube stand build

So... I'm almost done, just need to paint (dark grey) and find a piece of granite to go on the lower tier. Oh and trim around the tank on the top tier...

2x4 frame -
top tier to hold 60g cube (24x24)
lower tier - just plane counter top to place supplies, pictures, whatever... mainly just wanted an extended base cabinet to hold all the goodies

DAF8B7CA-22B0-429E-BEB3-DBF8FE4C1F1D_zpsz7medbje.jpg


6E1A5DB4-03EC-4D82-A842-C7D511FADC63_zps8hwrmuc0.jpg


AE272B21-2BA4-48AA-A988-29414099B6CE_zpslydgrkuf.jpg


524303F7-4AC7-4903-BC68-CE0182F07588_zpsarkedc4w.jpg


4638FBE8-7250-418C-9792-3CC28CFCEA4D_zpsjmdo3bpn.jpg
 
Here are a few pics of my tank stand build.
 

Attachments

  • Tank Stand frame.jpg
    Tank Stand frame.jpg
    46.6 KB · Views: 4
  • tank stand frame 2.jpg
    tank stand frame 2.jpg
    34.9 KB · Views: 4
  • Tank stand 11.jpg
    Tank stand 11.jpg
    35.9 KB · Views: 4
  • Tank stand 12.jpg
    Tank stand 12.jpg
    36 KB · Views: 3
  • Tank stand 8.jpg
    Tank stand 8.jpg
    29.3 KB · Views: 4
really like stands with the electronics in their own section. Nice.

Thanks for the compliments. That is one thing that stuck out to me when looking at stands and builds over the years is the electronics were always in the same compartment as the water and humidity. I wanted to do what I could to avoid any future problems and corrosion, that stuff isn't cheap after all.
 
crankbait09, it is common to have small gaps because 2X lumber is never perfectly straight. Adding wedges isn't the best solution but it won't hurt either. As long as there is contact between the pieces, the legs should be fine.

The top of the stand should be FLAT. Make sure there are no high or low spots using a long straight edge (I use a 4 foot level but ignore the bubble). Once the stand is in place, shim below the stand to get the top level. Most floors are a little off so it will take shims under the stand to make the tank sit flat.

Excuse me for interrupting but I am not quite understanding the making sure the top is flat. I'm not sure how you are using the straight edge and ignoring the bubble. Do you mean just run it across the length of each cross member and look to see if it is bowed up or down at all. (I recently failed at building my 40g breeder stand because my top was not square and I guess flat as well.)

Any tips for making sure the top and bottom are flat? I ended up re-doing these frames by using a straight edge at the corners and the tops where everything met and intersected at the corners. Its kind of hard to make sure the lumber is bowed one way or the other though :/

Thanks!
 
How do you guys feel about this frame made with 1x4 and 1x6 if I skin it with either 1/2 or 3/4 for a 80g tank?

View attachment 302864

It wouldn't be for me to be able to sleep at night using 1X lumber, but that doesn't mean it will not work. Most store bought stands are made out of just particle board and they hold a lot of weight. I am not an engineer but it looks well built and I think skinned in either 1/2" or 3/4" plywood you will be fine.

Any reason you didn't go with larger 2X dimensional lumber?
 
It wouldn't be for me to be able to sleep at night using 1X lumber, but that doesn't mean it will not work. Most store bought stands are made out of just particle board and they hold a lot of weight. I am not an engineer but it looks well built and I think skinned in either 1/2" or 3/4" plywood you will be fine.


Any reason you didn't go with larger 2X dimensional lumber?


I like how clean it looks and someone else local to me built it with 1x for a much bigger tank and skinned in 3/4 and it held fine. This is my 3rd stand I've built and only my first one with 1x. I still am a little unsure about it so I may go back to the store and buy more wood to add a little more support.
 
Back
Top