DIY Stands Template and Calculator

I think if you use pocket screws, the green supports can go away - but I'd read back on this thread and verify, or wait for someone else to chime in
 
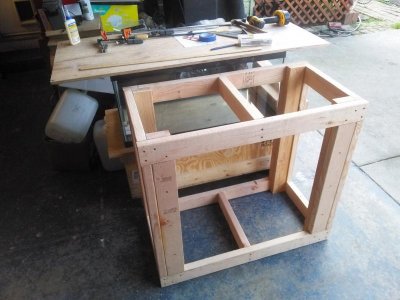
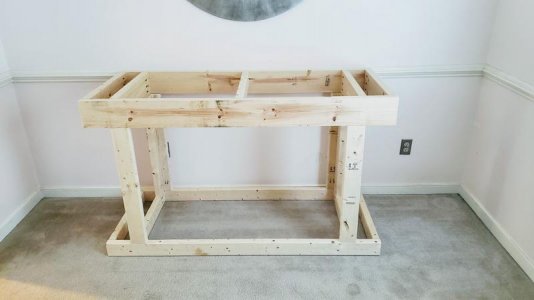
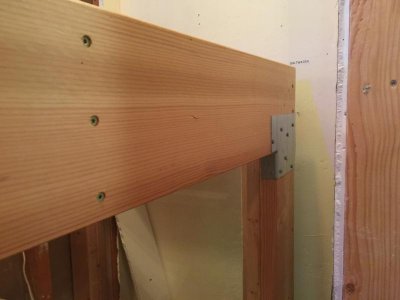
I just got done with the basic frame for one of these, using kiln dried douglas fir. I went for 38x20x35H, for a 40 breeder tank. Only modification is an additional center piece in the bottom frame, and the green (screw strip) pieces span the entire height of the frame for added piece of mind. I will be skinning the bottom frame/platform, top of the frame, and adding two shelves to use the stand as a bookshelf too.

For anybody that is considering building one of these, the single biggest piece of advice that I can give, is use very good screws! The amount of pain/fuss it will save you cannot be stressed enough. I decided to go ahead and follow the advice I was given regarding using these GRK screws, and they are sold specifically with the recommendation that they do not require predrilling or countersinking. They work as advertised for sure- the only issue I had with them was due to me putting one right next to a knot that I hadn't noticed, and subsequently splitting the piece... I simply glued and clamped the piece and it was easily repaired, due to it being a very small split. I was using kiln-dried douglas fir- if you were to use a harder and/or denser wood you may still wish to predrill for added insurance against splitting, especially in the areas where you are drilling into the endgrain of the boards. No matter what you do, apply lots of glue between pieces, and clamp them well during assembly to ensure they are nice and tight during screw-up.


These are the screws I used-

https://www.homedepot.com/p/GRK-Fasteners-9-x-2-1-2-in-Star-Drive-Bugle-Head-R4-Multi-Purpose-Screw-100-per-Pack-103101/203525228

I can honestly say that I will never cheap out on screws again, or bother with philips-head for such applications. These were an absolute breeze to use.

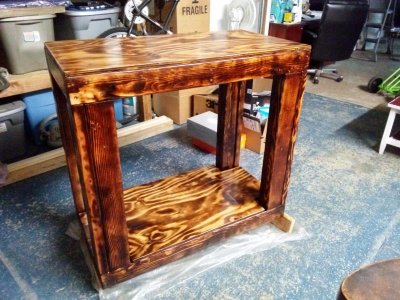
Here's the stand so far- it's getting a torch taken to it to darke and bring out the grain, as well as a boiled linseed oil finish. Going for a simple and rustic look.

attachment.php
 

Attachments

  • IMG_20190303_170419.jpg
    IMG_20190303_170419.jpg
    61.2 KB · Views: 4
this is the one, thank you for the inspiration. No down to the shop to begin.... Wish KresDFW's pics where still in the thread. they no longer show up. I would like to see your inspiration.
 
Green 2x4s

Green 2x4s


Great thread. Why don't the green 2x4s go all the way to the top too? Wouldn't that easily create more suppport?
 
They are only stiffeners. If you have to plane the top members, or the bottom members, having the green members extended all the way to the top means you have to plane across the ends of boards.

Don't do it. Trust me. I had someone build a stand for me and specifically pointed out these were not to extend to the top/bottom, but they thought they knew better. The top was not perfectly flat and I spent hours working away at the ends of those stiffeners because they were protruding up too far.
 
Update on mine-

no stain, just boiled linseed oil and polyurethane, after torching and sanding the wood.

Next step is some shelves (this is doing double duty as a bookshelf) and mounting the light hanging bars.
 

Attachments

  • IMG_20190415_164150.jpg
    IMG_20190415_164150.jpg
    90.9 KB · Views: 5
A question. I plan to start a 36 x 18 x 18 tank for now, with the possibility to upgrade it to a 48 x 24 x 24 in a few years down the road so the stand will be sized for the larger tank.

I was planning on the building the top frame with cross members in the middle and also at the points that the 36" tank will sit, but the vertical braces would still only be at the corners. I am thinking that if I run LVLs , 2x6s or sistered 2x4s for the 48" length it should easily handle the weight of a 50g tank that is only 6" away from the outer edge of the vertical support but I thought I would get opinions.

The entire frame will be assembled with a dowelmax jig so strengthwise it shoudl already be much stronger than pocket screws or glued/screwed butt joints.
 
I would think that you *should* be fine if you go 2x6 for your upper rails, especially if you put some supports front to back between the rails that will put the rim of the 36x18 tank directly in the middle of each piece of wood. I've seen plenty of similar setups over the years that seem trouble free. Are you skinning the stand as well?
 
Last edited:
Also, finally put the shelf in mine, and loaded it with books :)


Going to try and find a narrow ~10 gallon or so container for a topoff reservoir that will go behind the books on the bottom soon, but otherwise I'm very happy with it.
 
I would think that you *should* be fine if you go 2x6 for your upper rails, especially if you put some supports front to back between the rails that will put the rim of the 36x18 tank directly in the middle of each piece of wood. I've seen plenty of similar setups over the years that seem trouble free. Are you skinning the stand as well?

Yes, ply sides and the front will be partially skinned. Considering some cross bracing in the corners front and back too.
 
Looking at building a stand for a 48x48x24 plywood tank that I am looking at building. I plan on framing the tank like walls of a house to prevent bowing. Would the the stand be essentially the same to build?
 
Hi, hoping to get some feedback on a new stand for my Marineland 300dd tank. I currently have the factory stand which I find too short at 29" and smaller than ideal openings on each end of the stand. I can't remove my skimmer body due to the height and can't put a larger sump due to the 17" x 22" openings.

My goal is to build a taller wood stand with larger openings on the end. I'd like to increase the height to 36" or maybe 40" if possible.


It would be ideal to not have a center support but I'm concerned this heavy of a tank would not be safe without it. If I need a brace then a single would be ideal rather than two supports.


Any feedback on these questions and materials needed would be appreciated.
 
First time poster, long time lurker. Finally getting around to putting things together; hardest part has been finding lumber that's not all bent to hell. Stand is made for a 48x24x24 120G tank. Top frame is made of 2x6's and is 60x25; I made it wider just to give myself a bit more space down below. Bottom frame dimensions are the same, but made of 2x4's. I omitted the internal braces (GREEN) as I'm using pocket holes...at least that's what I think I read in this thread somewhere. If that is incorrect, let me know and I'll go back and put the supports in. For all my efforts, there is still about a 1/8" wobble to it once it all came together, but hopefully it will settle with the weight of the tank; and if not, I'll try some shims.

Next step will be to prime/seal the frame, skin it with either 1/2" plywood or face-boards...I haven't decided; add trim and figure out the door situation.
 

Attachments

  • 20190727_182846.jpg
    20190727_182846.jpg
    32.5 KB · Views: 3
For a tank that is 84 inches long x 35 deep and 25 tall would I need to use 2x8s for the uprights and for the base on the floor and how many supports?
 
I'm not sure what happened to Rocket Engineer, but I followed his advice to use a 2x8 top frame with no center support on the back side.

This is an in-wall build. 260 gallons, 72x28x30 tank.

The 2x8 is unsupported for a span of 64.5".

I took measurements of 2 spots in the middle of the unsupported section before and after I filled the tank up to about 7 inches from the top.

Measurements are from the floor to the plywood top.

I got some deflection which worries me a little. The tank is 3/4" glass on the bottom and needs to be supported across the entire bottom.

Do I need to sister another 2x8, glue/screw 3/4 plywood, add angle iron to bottom edge?

My concern is deflection over time, not a complete failure.
 

Attachments

  • IMG_9070.jpg
    IMG_9070.jpg
    49 KB · Views: 4
  • IMG_9674.jpg
    IMG_9674.jpg
    37.1 KB · Views: 3
  • IMG_9069.jpg
    IMG_9069.jpg
    35.5 KB · Views: 4
  • IMG_9686.jpg
    IMG_9686.jpg
    24.9 KB · Views: 5
Back
Top