DIY Stands Template and Calculator

I will be building a new stand for my new tank. The tank measures 60”x36”x24”.

Any advice on size of materials? My sump will be in my basement so I don’t really need the space/open concept to fit equipment underneath. I will however be putting doors on the front to access/service any plumbing. The tank uses an external overflow with a bean animal setup.

Any advice is greatly appreciated! Thanks!
 
Basically a 220, 2 x 4 construction should be fine.
The beginning pages will answer any questions on construction.
Build the sump up on a bench for easier maint. & eliminate a sore back.
 
As I posted in the "Reef Discussion" forum, my tank developed a leak last night. It was somewhere in the seam on the bottom.

I built my stand following the design on the first page of this thread. Since my old tank had the overflow in the back left, I installed two of those blue 2x4's for the upper rails (the ones that are intended to keep the upper rails from twisting). They are each about one-third of the way across. In other words, instead of having one blue one go across the middle, I installed two. I did use 2x8s for the top frame, since its a 120 gallon tank.

Wishing that I didn't do that, as those will now block the overflows in the new tank.

I did add a sheet of plywood to the top. It was glued and screwed. Will the top sheet of plywood be sufficient to keep the upper rails from twisting? As noted, I will need to cut out part of the two blue ones in order to use the overflow.

Alternatively, should I install a new 2x4 in the middle? I could only really glue it in place.

Thanks!
 
Just finished mine for my new tank!

60”x36”x24” tank

2x4 and 2x6 construction. I will be adding a sheet on top as well. But, I added two vertical supports on the “back”, offset from center since plumbing from my external overflow will be routed through. I also added one vertical support in the “front” in the center, I’ll be doing some sort of shelving on each side.


DDPF2Ms.jpg
 
Hello everyone, I have been reading this massive thread last several days, and have one quick question.

I have a 4x2x2 tank, and am thinking about building a stand using template outlined in the original thread (before it split) My tank is glass and has plastic frame around it. I understand how tank is supported and so on, so my question is this: Can I somehow build a 5 foot wide stand for a 4 foot wide tank? It would be nice to have extra room for all the equipment, but not sure if it can be done safely due to the way tank is supported with original plans.

Thanks for the help
 
Does some one have the calculator link?

It expired. Looking for a cut list for a 75 gallon.

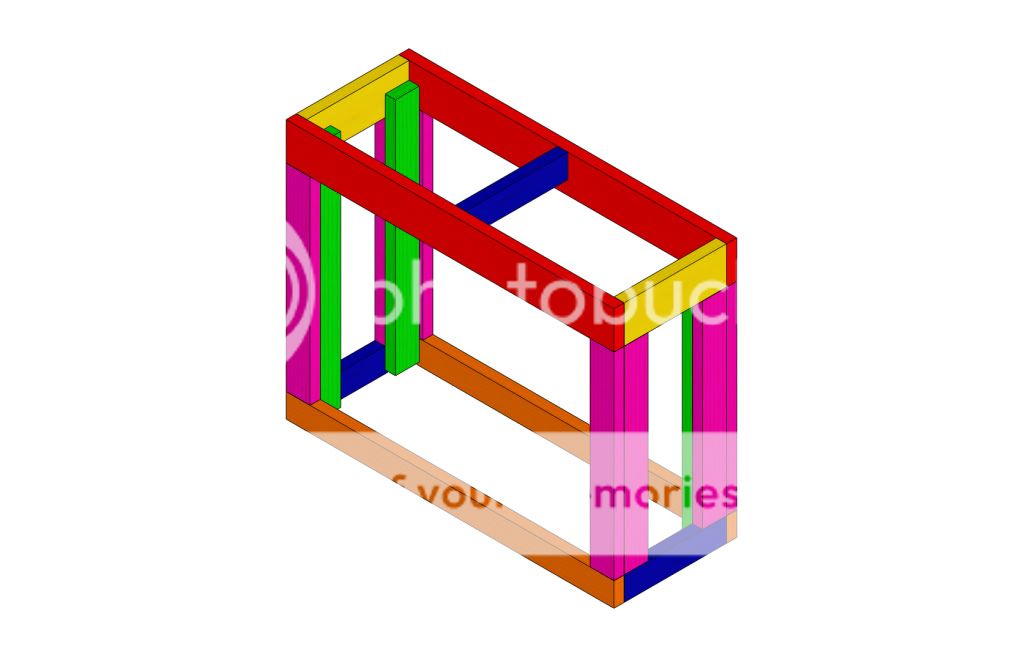
From original thread:

StandTemplate.jpg~original


The basic principle of the design is two box frames connected by four legs. The upper one supports the tank and transfers the load to the legs. The legs are made of several pieces of 2X4 to assist in construction and sheething the stand in plywood for strength and cosmetics. The bottom frame transmits the load of the tank into the floor.


Design notes:
*The plan for this stand consists of 21 pieces. Like color pieces are the same length and of the same board size.
*The box frames are screwed together first, then the legs are built off the bottom frame, the top frame is then placed on top and secured to the legs.
*The green pieces are screw strips. These provide limited load strength but serve to make assembly easier and help keep the stand square.
*The blue piece between the upper rails (red) works to keep the upper rails from twisting.

Ok, now to the cut list:
First off: The calculations below are based off of a stand that is "W" inches wide X "D" inches front-to-back X "H" inches high.

(2) Red - Upper Rails: Length = W
These will be sized according to length: 2X4 for 48" or less for smaller tanks (Rule of thumb is 75g-90g); 2X6 up to 72" with 125g-150g being acceptable; For longer spans and larger tanks 2X8s are recommended.

(2) Yellow - Upper Ends: Length = D-3"
Theses will be made of the same material as the upper rails.

(4) Green - Screw Strips: Length = H-2"
These 2X4s are shorter then the tank is tall.

(8) Purple - Uprights: Length varies:
- 2X4 Upper Rails: Length = H -7"
- 2X6 Upper Rails: Length = H-9"
- 2X8 Upper Rails: Length = H-10.75"
These 2X4s support the weight of the tank. The ones on the short sides of the stand provide a flat surface for attaching a plywood facing and while they do provide some strength, they are optional.

(2) Orange - Bottom Rails: Length = W
These 2X4s act to spread the weight of the tank over a larger area.

(3) Blue - Bottom Ends: Length = D-3"

Covering the sides of the stand with plywood will help to stiffen the stand against twisting and shifting. Doors can be mounted to the legs as desired.

So there it is. 21 pieces in 6 lenghts equals a tank stand that should fit the bill for most people. There are other plans out there but this is a simple design using simple tools and common wood sizes. It may not suit everyone's application but it should fit the bill for most common size tanks.
 
Just finished mine for my new tank!

60"x36"x24" tank

2x4 and 2x6 construction. I will be adding a sheet on top as well. But, I added two vertical supports on the "œback", offset from center since plumbing from my external overflow will be routed through. I also added one vertical support in the "œfront" in the center, I'll be doing some sort of shelving on each side.


DDPF2Ms.jpg

I am curious how are you screwing the back center (2) vertical pieces & front vertical piece?
 
extra 1/4 inches for black rim

extra 1/4 inches for black rim

Looks like everyone added the extra 1/4 inches for black molding?

Correct?

75 gallon tank is 48 1/2 " Wide
 
I am curious how are you screwing the back center (2) vertical pieces & front vertical piece?


Going through the side of each 2x4 at a 45degree angle and lagging to the bottom and top horizontal boards. So each support has four screws. I’ll get a pic if you would like, just let me know...
 
Looks like everyone added the extra 1/4 inches for black molding?

Correct?

75 gallon tank is 48 1/2 " Wide

If your tank has black trim, then yes, I would make your stand long and wide enough to have all the trim resting on the stand.

In my case my tank has no trim, so my stand is exactly the size of my tank.
 
Yes please. Would love to visualize this.


Sent from my iPhone using Tapatalk

I did just a quick edit which was faster(I’m out in my barn), and probably easier to see than a head of a screw haha. The screws are going through the SIDE of each 2x4 at a 45degree angle. I made them a pretty tight fit to begin with, which should be the case anyways for proper construction. The screws are pretty much only there for safety essentially.

Hope this helps. If not let me know...


khty5iV.jpg
 
Hello everyone, I have been reading this massive thread last several days, and have one quick question.

I have a 4x2x2 tank, and am thinking about building a stand using template outlined in the original thread (before it split) My tank is glass and has plastic frame around it. I understand how tank is supported and so on, so my question is this: Can I somehow build a 5 foot wide stand for a 4 foot wide tank? It would be nice to have extra room for all the equipment, but not sure if it can be done safely due to the way tank is supported with original plans.

Thanks for the help

Bump the header up to 2x6 and you'll be fine
 
Stand for 125g. Had extra cedar 4x4s at the shop, so notched them for the frame to sit on. 2x6 head rails, 2x4 bottom rails, and 1/2" foam for the tank to sit on.
50c64d20b77f98bc51d6b36db1c129e0.jpg
e1cc3d544cf0d2cb1e7a3c3e2f7e8a67.jpg


Sent from my SM-G950U using Tapatalk
 
You've all made some nice looking stands. I'm planning a new build, based on what I've learned skimming through this thread. I'd like some input if anyone has. I've started my own thread over here.
 
Ok so my question is. The green screw strips. Do they go all the way to the ground. Also why not cut them full height of stand for extra support?
5afe774cbadaa2b1a5d4f2240b55d31c.jpg


Sent from my SM-N950U using Tapatalk
 
No, not all the way to the ground and not all the way to the top

The issue is that you want only the orange/blue and red/yellow providing support, and if you have to use a planer or shim to level out either the top of bottom plane, shaving off or sanding lumber with the grain is WAY EASIER than doing it across the grain, in the end of the member

TRUST ME. I had a stand built with this specifically pointed out (don't extend to floor/top with green members) and that request was blatantly ignored and it made doing these fine adjustments a total PITA.
Thank you very much

Sent from my SM-N950U using Tapatalk
 
With that said are the inner green even necessary? if i were to use pocket screws for the pink supports do I need to have the green in place at all?
 
Back
Top