Ghetto Rig

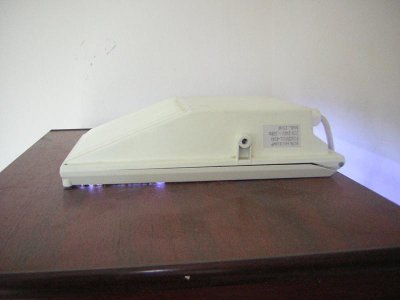
I made an "overflow box" with household items.
Tell me what you think.

31105_408643421168_507156168_4333996_719030_n.jpg


Used a water bottle for the overflow box. Made a siphon with a garden hose. Put the water bottle on a stand to get my water level where I wanted it (hard to tell from the pics but it's just above the wood trim in the tank and the water bottle). Drilled a hole in the water bottle just below the waterline and pressure fitted a hose. This hose drains into my sump. The sump can't flood because there is no siphon from the water bottle to the sump, just gravity feeds the sump.

31105_408643436168_507156168_4333998_8198867_n.jpg


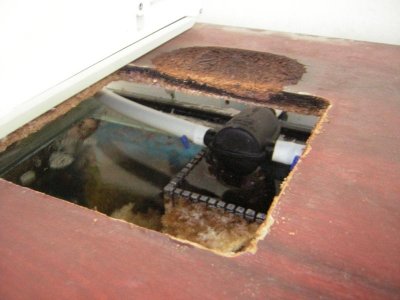
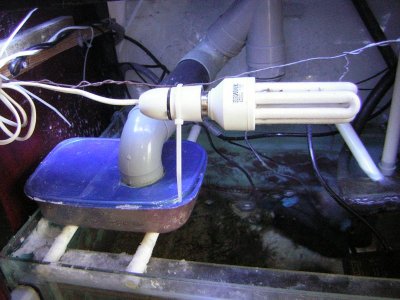
In the sump I put the return pump as high in the water as I could. This way if my overflow box breaks siphon I won't flood my tank. The pump will move about a gallon of water into the main tank before it runs dry and that's not enough to flood the main tank (I tested this theory out to be sure). If I've thought this through properly the only thing that could happen is the siphon breaks and the pump runs dry and might possibly burn up. $20 pump vs 10 gallon flood? I'll buy a new pump.

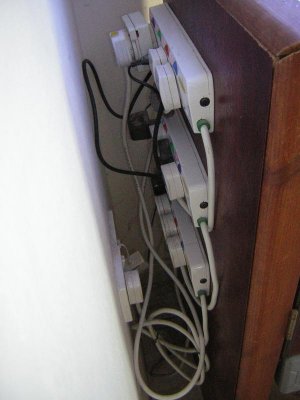
Here is what it looks like all together.

31105_408647486168_507156168_4334095_6546609_n.jpg
 
That would have been a solid entry with the sump below the tank, but then I scrolled down and saw that the sump was almost level with the tank and it has to make a horizontal run and you instantly upped the value of this entry. Well done.

Thats actually a pretty inventive overflow box.
 
hope this works... first time I've uploaded pictures...

The M/H is a shop fitting, but with a 20000k bulb. The hood was my old home made T5 hood, but with a hole cut in it for the M/H to shine through. It worked OK for a couple of years, then I forgot to slide it back exactly over the hole after feeding the fish... and went on holiday leaving a friend house-sitting! When we got back she said everything had been ok, but she smelt burning each evening!

The sump light is mounted on cable-tie and bent coat-hanger and has worked for 15 years like that!

ALL the pipework is from DIY stores, Above the bulkhead is imperial from the UK, below is 50mm metric from here in Cyprus! The adaptor between the two is the protective cover from a roll of PTFE tape, slipped over the end of the imperial pipe and fits perfectly...

The plastic food box is my polyfilter/carbon "reactor". It has a 1" standpipe, so the media never dries out, and nestling in the corner of the sump is a stainless-steel BBQ skewer, slipped into a length of airline, and bent over the edge of the sank wired to the earth pin of a spare plug... you've guessed it; grounding probe!

Believe it or not, the electrics are my best ever attempt at keeping them neat! all individually switched. thing is, we're moving house in a few weeks, and that side of the tank is going to be the side on full show
 

Attachments

  • 025.jpg
    025.jpg
    36.6 KB · Views: 5
  • 026.jpg
    026.jpg
    50.2 KB · Views: 6
  • 030.jpg
    030.jpg
    74.4 KB · Views: 6
  • 032.jpg
    032.jpg
    46 KB · Views: 5
  • 033.jpg
    033.jpg
    49.8 KB · Views: 5
wow ditto that. I am a new member here on reef central and had just put together my first marine tank :fish2: a few days ago. Then I ran into this awesome thread today! So i thought I share some of my noobie "ghetto" experience with everyone. =)

Day 1 - New Cycle<br>
IMG00137-20100605-1043.jpg
<br>

DIY ghetto LED hood! <br>
IMG00160-20100607-2021.jpg
<br>

Lit Hood. <br>
IMG00159-20100607-2020.jpg
<br>

Top of Hood.
<br>
IMG00162-20100607-2039.jpg
<br>

<br>
31788_909838020211_6008751_49120662_970733_n.jpg
<br>
 
Last edited:
loving that "hood"... are those ebay "hydroponics" lights? how bright are they, and more to the point; how hot are they? I was thinking of some for under the kitchen units!
 
loving that "hood"... are those ebay "hydroponics" lights? how bright are they, and more to the point; how hot are they? I was thinking of some for under the kitchen units!

yeah they are here are the specs...

Body material: Thermoplastic
Circuitry board material: Diecast Chrome
60 Blue light LEDs: 465nm (nanometer) wave length
165 Red light LEDs: 650nm (nanometer) wave length
165 + 60 = Total 225 LEDs
$40.00x2


and the tubes i got from a local friend for about $15 each x4.

198 LED
superbright 10,000K
11watts

Still experimenting with these. they only get a little bit warm. not sure how far up the coral lifeforms i can go with this lighting tho....if anyone would like to donate any frags for testing. I am more then happy to take them ;)
 
The back pack was splashing so I used part of defunct skimmer to re direct the water also used part of the same skimmer as a lid for the collection cup. The collection cup also set too low in the back pack so I looped together small clear silicone bands & put around the cup to make it adjustable. It has been like this for 2 years now.As you can see it needs a good scrubbing ick!

The glass top broke & fell in & the lights fried a few months ago. I now have part of the top of an eclipse hood & a florescent tank light bar hooked up sitting on top of a glass stereo case door sitting across the top :o You can see how far it hangs over the tank
The mushrooms are still doing fine as are the fish. Will be moving everything to a new tank VERY soon! I face palm when I think about this tank.:o
hope this is qualified as ghetto

gehto.jpg
 
Last edited:
2 part dosing pumps

2 part dosing pumps

Lovin this thread, just read it for the first time.

Here's my $34 2 part dosing system that delivers 147ml of Calcium and Alkalinity via an air pressure system.

The solution (recipe 2) is kept in 2, 2l juice bottles with 2 air hoses running into each lid. One hose all the way to the bottom, one only just in the lid to prevent solution syphoning back. The Air pump is operated for 1 minute per day via a digital timer which pressurises the containers pushing the solutions up into the dosing sections. Any more than 147mls runs out via the 'T' into the 2 overflows (approx 21mls).

The exact amount of solution is then dripped in via irrigation slow drippers into 2 different sections of the sump. This takes about 2 hours.

I've had this running for about a month and my Ca and Alk have maintained at 425ppm. My test kits only go in incriments of 25ppm so is +- a bit.

Anyway, stable enough for me and cheaper than dosing pumps which are F'n expensive here in Australia


09062010026.jpg


09062010029.jpg


09062010030.jpg
 
Last edited:
I'm normally pretty good at this DIY malarkey, but I really can't work that out!
love the accuracy though 147ml; not 146 or 148!
 
It just uses air pressure to lift the solutions into the pvc drippers. The long sections are the overflows because the timer only goes down to 1 minute increments so I can't be 100% sure how much solution goes into the drippers on any given day. The bottom of the 'T' is measured at 144mls with the remainder in the drip line.
 
wow ditto that. I am a new member here on reef central and had just put together my first marine tank :fish2: a few days ago. Then I ran into this awesome thread today! So i thought I share some of my noobie "ghetto" experience with everyone. =)

Day 1 - New Cycle<br>
IMG00137-20100605-1043.jpg
<br>

DIY ghetto LED hood! <br>
IMG00160-20100607-2021.jpg
<br>

Lit Hood. <br>
IMG00159-20100607-2020.jpg
<br>

Top of Hood.
<br>
IMG00162-20100607-2039.jpg
<br>

<br>
31788_909838020211_6008751_49120662_970733_n.jpg
<br>

Are those "light-brights" :)
 
It just uses air pressure to lift the solutions into the pvc drippers. The long sections are the overflows because the timer only goes down to 1 minute increments so I can't be 100% sure how much solution goes into the drippers on any given day. The bottom of the 'T' is measured at 144mls with the remainder in the drip line.

sussed it now... couldn't work out why you had that dirty great tube to the floor, when sitting it top of the tank would have worked... now it all makes TOTAL sense!
 
Back
Top