Must-haves for EASY DIY controller?

also have there been updates to the svn site or another version of hydra. svn log shows that the last change was made on october 4th. Seems like a pretty active project to go a month with no changes.
 
Confirmed it works with U11 mirrored.
thzHydra.png


A little sneak peak of what's coming to the web:
HydraStat3.png
 
I'm using the DS18B20 sensor, they have them at digi-key. I had some large long syringe needles that had some long caps just large enough to let the sensor slide in. (FYI - aiptasia don't like being injected with kalk and they spread everywhere) :uzi:

You can buy the sensors already waterproofed but they are about $15 more than DIY. I did find these from china: http://cgi.ebay.com/Digital-Thermal-probe-sensor-DS18B20-/350407896599#vi-desc

That's what I've been using the DS18B20 is very simple and the one-wire makes it a great choice. The china ones are what I've been using, i got mine for about 4$ each though.

I finished reading the diy driver thread for the 2nd time yesterday, and have just started reading this thread, and I have a question that would simplify things for me or anyone else that is new to diy electronics. Does anyone know a good website that can explain the basics in layman's terms? I pick up tidbits here and there, but it would be great if I could read an online "tutorial" that explains stuff rather than reading through 30 or so pages making reference to PCB before finally seeing someone say Printed Circuit Board! Things like PWM, pots, shield, header, firmware, I2C, One Wire, etc. I understand the concept and application, but I need to know what the terms mean and what the parts do in order to really grasp it, and I don't want to post "Hey, what is a _______ and what does it do?" everytime I see a new term. I think DWZM stated it perfectly "I want to make this as accessible as possible. People should be able to follow a standard set of instructions using commercially available parts and build this, without having to figure things out on their own.", I just need to be able to understand the discussion. Thanks!

Hey man, not knocking you or anything, and this is in no way in direct reference to you, but to everyone that stumbles on this thread or has been checking in.

These guys have done a great job at already putting as much as possible out there for us. Hell they're essentially GIVING us a controller, w/ no demands in return for their efforts or time.. The least you can do is learn to use Google. I can understand certain questions like "What's that [specific part] being utilized for in that [specific circuit]?" but when you're asking.. how does Microelectronics work? ... "Google".. take it as you will, This is an awsome project and yes 32 pages is a ton, but cleaning up some of the clutter, by removing questions that could be answered w/ a simple google search will definatly help out in the long run.

I would be willing to pony up for this order of boards if we can get them for the 30 bucks per DustinB recommendation. I will probably keep 4 of the boards. The others I could send out to some interested parties. Lets wait for DustinB to give the go ahead with the changes.

Fishman and Names will have dibs if I decide to go ahead with the order based on test results from Dustin. Once we are there will organize through PM.

Thanks for the display recommendation Dustin.

Seeliger, I was going to put an order in but if you want to organize it, please sign me up for 1.

Dustin what transisters did you use I should have my SR-8 Tuesday so I will need to be building that as well

I used the PN2222, and I think that's the same he used by looking at his picture.

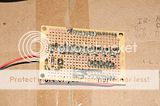
Here's the top of the transistor board, I really need to make the schematic:


And the bottom:

Dustin, looks like you came to a very similar setup that I arrived at. (although your board looks MUCH simpler then mine)

Here's a quick schematic of how mine is wired up.


and a quick pic of mine wired up.


I pretty much pinned two serial connectors for mine similar to what you did. I didn't have any straight-through cables, but I did have two ends laying around so I just cut up some wire and made my own real quick lol.

I've got my arduino w/ the SR-8 and controllboard controlling my lights at the moment w/ the DS1307, and a simple code to turn them on/off when I want. looks like mines a little bit larger, due to using LED's and resistors, I like being able to tell which one is on for some reason. The problem i run into is for some reason I think i'm overloading it somehow. with two lights plugged in.. operates fine.. but once I plug in a 3rd light it kicks off shortly after kicking on.. and I can't figure out why. The A/C shouldn't be affecting the D/C circuit so I don't know what the issue is. How has yours been working for you?

I'm curious about your 317, and the 7805, it also looks like you're driving yours with 7.2v vs the 5volts I'm running. Would be interested in comparing and contrasting notes via PM if you'd be willing, but I figured I'd at least share my schematics for everyone else to get an idea.
 
Been sick today so I'll just comment real quick on your schematic. You have A2 & A1 grounded on the mcp23008. They are +5v on mine, that may have something to do with it.

Here's a schematic I was working on yesterday:


Basically I wanted to have one power supply, I made my own wall wart putting out 12v regulated. When it comes into the relay board the LM317 switches it to 7.2v to power the hydra board and the 7805 for the transistors. 12v is also allowed to power the relay strip. I'll try to comment some more on it tomorrow.

Okay that sounds exactly where I was looking at going, I just didn't know enough to implement that properly. But I'm pretty sure I understand now.

btw the only reason ours differs on the MCP23008 is because A0,A1,A2 are used to set the addressing, all that affects is the coding.
 
Mouser Part: 810-FK14X5R0J106K

Would this be suitable through hole replacement to the SMD cap on C10?

Sounds like the current eagle files on the svn site are good to go. I will be putting the buy in for 10 boards tomorrow. TeraHz, DustinB or DWZM please confirm the subversion eagle files (revision 37) on the site are the best recommendation for build currently.

Here is the list of board requests I have so far:
Myself - 4 boards
Names - 1 board
5ft24 - 1 board
Fishman - 2 boards
snowman - 1 board
 
seeliger_00, The current files will work but as we mentioned before U11 is reversed. Other than that, there are some things that should be fixed but do not affect any functionality (C14 and C30 have been removed since the first board but the board caps have not been renamed; all resistor packages are 0204/7 but all resistors in the bom except R23 are 0204/5; C37 is a tad too close to C35... things like that). Also I will be testing the board with a through hole ferrite bead and if that part works we will eliminate the tiny SMD ferrite.

If you want to order, go ahead. You will have a working Hydra. If you can wait a few more days, the board will be ready.


EDIT: cap part number should do for C10 btw.
 
btw the only reason ours differs on the MCP23008 is because A0,A1,A2 are used to set the addressing, all that affects is the coding.

There is a potential for conflict with hard-wiring address pins on the MCP23008's since we're using them so prolifically on this project. On the mainboard, we've hard-wired an address of 111 (all three are high).

I would strongly suggest anyone making an "expansion board" to design the board with either jumpers or solder bridges to set the address pins. This way, we can mix and match address boards with zero concern for conflict, and we don't have to maintain a register of which expansion board has which hard-wired address.

This may be obvious, but I'd also suggest expansion boards be designed with communication header(s) pinout(s) (i.e. I2C) in the same order as the pinouts on the mainboard, so a "straight" cable or direct plugging can be used to connect. It would also be nice if expansion boards were made with a "spare" connector for whichever bus was used. This way, if you were using two or three I2C breakout boards, you could just use a few straight cables to connect them, instead of having to do a messy custom wiring harness.

These are just a few thoughts. We are probably getting near to the point where we need to come up with either a reference design for breakout boards, or at least some sort of informal guideline. I'd like the open spirit of the project to be carried through peoples' own customizations or expansion modules such that people can mix and match without worry of conflict.
 
Another note, seems lke the 7805 gets hot only when the board is connected both to my laptop via FTDI and to the PSU. If I use only the PSU or the FTDI cable everything is cool.

Put a diode in series with the power from the FTDI... if the laptop is less than the voltage from the 7805, then the 7805 is trying to pass current to the laptop via the FTDI.
 
DustinB

Been trying to learn eagle and get a board together for the relay setup. Did the schematic and working thru a few of the errors also had a fun time finding a few of the parts so had to download some libraries from Adafruit and Sparkfun.

Is there any easy way to go from schematic to the board without having to redrop all the components?
 
I wish I could tell you, I'm a little new to eagle myself. I have been unable to edit the schematic without having to do the board over. Maybe DWZM or TeraHz will comment on this. I didn't find much on google.

MA70Snowman, now that I can see straight again for the first time in 2 days, if your board is the same as your schematic, then I "may" see your problem. On the output pins of the port expander you have it going pin->resistor->LED->transistor. You are dropping the voltage going into the base of the transistor. Try having the base wired parallel to the LED instead of in series with it. You need a full 5v on base of the transistor.

IE: (LED) = EXP PIN -> Resistor -> LED
(Transistor) = EXP PIN -> Transistor
 
dustin, just a quick side comment as you and me are running similar setups. but wouldn't it be possible, instead of taking a 12V and stepping down, but taking a 5V and stepping UP? (I.E. use the exsting 5V comming off the Hydra/arduino and stepping it up to the 12v required for the relays?)

ah ha, I see what you're saying about the wiring. I believe I went that route but Can't remember why I didn't. I will try and resolder for parrallel. Actually I think I tried the LED in parallel with the transistor but STILL had the resistor before both of them. I'll give that a shot.

and DWZM, I totally understand where you're comming from and those are some GREAT suggestions/ideas and they would simplify things as well.
 
Last edited:
Put a diode in series with the power from the FTDI... if the laptop is less than the voltage from the 7805, then the 7805 is trying to pass current to the laptop via the FTDI.

I left any sort of "power select" logic out because I figured the FTDI header would only be for very occasional use once in "production" mode. Regardless of if you program your Hydra "in circuit" (i.e. installed on the fish tank) or take it out and bring it to a PC to program, IMHO it is very bad practice to program it while connected to anything "live" i.e. relays, sensors, or other hardware, as the behavior of these devices can be unpredictable during programming. In other words, I feel that it is good practice to pull the device when programming, hence I don't really think that "power select" hardware is strictly required.

Just my thoughts though, it would be easy to add if people wanted it there.

Is there any easy way to go from schematic to the board without having to redrop all the components?

I wish I could tell you, I'm a little new to eagle myself. I have been unable to edit the schematic without having to do the board over. Maybe DWZM or TeraHz will comment on this. I didn't find much on google.

Go through the sparkfun tutorials. It will give a good basic grasp. If you are starting from scratch with a new schematic, once you've drawn it up, all you have to do is switch to the board for that project and it'll put all the appropriate packages on the board with airwires (the thin yellow lines). Then you just move them around and connect the pins by routing the wires. There is an auto route function but it's "dumb" in the sense that it doesn't follow "good practice" unless you teach it to. And if you know enough to teach it good rules, you can probably route by hand faster than setting all the rules up.

As far as editing an existing project, you shouldn't need to re-do the board after tinkering with the schematic. If you're adding parts you'll just get those parts on the board with airwires that you have to replace with traces. If you're swapping parts you can use the "swap" tool (instead of removing the old one and adding the new one) and it'll connect it right back up on the board, assuming the package is the same. If you guys get stuck with something specific, post up here and I am sure someone will help.


MA70Snowman, now that I can see straight again for the first time in 2 days, if your board is the same as your schematic, then I "may" see your problem. On the output pins of the port expander you have it going pin->resistor->LED->transistor.

Also, You guys might want to put base load resistors between the MCP23008 output pins and the base of the transistors. I'd check current there when they're on and add a resistor if it looks too high. It's possible that you are exceeding the max current draw of the device and it's shutting off. You don't need THAT much current to turn those transistors on.
 
dustin, just a quick side comment as you and me are running similar setups. but wouldn't it be possible, instead of taking a 12V and stepping down, but taking a 5V and stepping UP?

There's no such thing as a dirt simple boost circuit. You're always talking switching (you can't use a linear device to step up) and that means you're going to have a diode and inductor and some noise to deal with. Cheap linear regs like the 7805 or LM317 are dirt simple to use. And, since we're all using 120v AC as a source (instead of a low voltage battery) it's a little simpler to feed your entire circuit via a a DC power source that's equal to or higher than your highest voltage requirement, and then step down from there with simple linear regs.

Plus, the 5v supply onboard the Hydra mainboard is certainly not without limits. We're all probably going to be pretty close to overloading it in fact. In other words, I don't think it's good practice to use the 5v "source" from the Hydra mainboard to power other stuff. Adding a 12v boost circuit to supply a bunch of 12v relays would almost certainly fry something.
 
When you're on the schematic view, the "switch to board" button is the 4th or 5th button over just under the menus. It looks like a little logic gate over a PDIP package. The very first time you switch on a new project, it'll prompt you that a board does not exist, and ask if you want to create one - just hit yes, and it'll drop all the packages, connected by airwires, on a blank canvas.

Note that the Lite version of Eagle has a board size restriction, so if any of your parts are outside this region it'll give you a cryptic error message. The sad part is that it often drops new parts outside the region, so you can't do anything with them until you move them to "safe" coordinates.

You'll also want to sketch a board outline on the appropriate layer(s) to give yourself a canvas to work on. After that, I typically group components according to purpose (put power supply stuff in one pile, ICs and related parts in other piles, and so on. Then I put the piles in appropriate spots on the board outline. Then I lay out each pile, adjusting position and orientation to get the best routing.
 
Also, You guys might want to put base load resistors between the MCP23008 output pins and the base of the transistors. I'd check current there when they're on and add a resistor if it looks too high. It's possible that you are exceeding the max current draw of the device and it's shutting off. You don't need THAT much current to turn those transistors on.

hey DWZM, not sure if I"m following you on this one. I AM running resistors in line to my transistors, very similar to what you're recommending. so not to sure where you're going with this. you also say "too high" of a current.. what would be too high?
 
Back
Top