I am having a new tank built. 72Lx30Dx25T. I am going to use either one center mounted overflow, (36 inches wide) or 2 mounted on the back wall (2 18 inch wide ones). (at this point I can have the tank manufacture build either one) Can this set up be used in either of these overflows? If so which would be better? Bean I have read your site on these and they look like this is the best setup., But, the reason I can not use your cafco/overflow design is space limitations. Thank you.
You are using an out of date browser. It may not display this or other websites correctly.
You should upgrade or use an alternative browser.
You should upgrade or use an alternative browser.
Silent and Failsafe Overflow System
- Thread starter JohnL
- Start date
jcolley
Member
Okay, well I've put mine off long enough. My tank room is done and I'm ready to move the tank and I still haven't nailed down my overflow...
220 Perfecto, initially planned for a hi flow sump with 2" drains through 1.5" bulkheads on an internal 60" overflow. Now, not wanting to lose inside real estate, I want a small internal overflow (I'm not routing 1/2" glass to slot it!) fed through 3-4 holes to an external overflow box measuring about 12"x 6".
Initially, I had planned horizontal bulkheads on internal overflow box, but now with the external box, they will be drilled for vertical placement. I literally have every piece bought and a cardboard mock-up made, but now I'm having second thoughts on using 1 1/2" bulkheads mounted vertically with 2" sanitary tees and 2" downstream piping. A recent post has me worrying about gurgling in the vertical arrangement through the restriction.
I'm ready to drill the tank, but too chicken without reassurance...
Thoughts?
Bean,
The oscillation in the overflow is back... Not sure how to correct. I ran the system for 2 weeks in my basement, cycled the power on and off daily. Always stabilized itself within seconds. The whole thing is build to your exact specs. I even drilled the open channel 1/4" higher, after reading some of the issues others have had, to help the siphon pipe get going. Before moving the tank upstairs, I opted to eliminate the split return from the return pump and ran a single line with a tee to feed the refugium. This worked perfect in the basement. The last thing I did when I moved the tank to the living room was to shorten the hight of the center elbow (siphon) in the overflow since it looked too close to the bottom of the overflow box. This is when it started, the water level keeps going up and down and will not stabilize. I switched it out with the open channel elbow and all seemed fine. However it started again. I then decided to cut down the other elbow thinking if they are identical I'll fix the problem. Unfortunately that hasn't helped.
The system runs perfect except when I power off to feed. That's when I have to take the siphon elbow out, let the pipe fill and put the elbow back, then it runs smooth.
Any ideas? Going to pick up a new pari of 1" street elbows later, hard to believe that's the problem.
Thanks
Gus
BeanAnimal
Premium Member
Except (at least from what I understood) that you have split the siphon standpipe to feed two sections. As I mentioned, they can interact with each other to cause oscillation in the flow in the form of a feedback loop.The whole thing is build to your exact specs.
Now I am confused as to how you have this setup.Before moving the tank upstairs, I opted to eliminate the split return from the return pump and ran a single line with a tee to feed the refugium.
Changing the depth of the elbow does nothing, as the flow dynamics are set by the height of the weirs formed by the bulkheads.The last thing I did when I moved the tank to the living room was to shorten the hight of the center elbow (siphon) in the overflow since it looked too close to the bottom of the overflow box. This is when it started, the water level keeps going up and down and will not stabilize. I switched it out with the open channel elbow and all seemed fine. However it started again. I then decided to cut down the other elbow thinking if they are identical I'll fix the problem. Unfortunately that hasn't helped.
[/quote]The system runs perfect except when I power off to feed. That's when I have to take the siphon elbow out, let the pipe fill and put the elbow back, then it runs smooth.[/quote]
Then your siphon standpipe has too much back pressure on it to fully purge the air.
- It is either terminted too deep into the sump
- It is leaking air (sucking it in)
- It is terminating in a section of the sump that does not have a constant water level
BeanAnimal
Premium Member
Hey guys, I got to run the tank today but having problems. Majority of the flow is going thru the open chanel rather than the siphon drain. After a while it gurgles up like a toilet flushing. Any suggestions?
See the reply above. It is critical that the siphon standpipe be configured as explained on my site and the first page of this thread. Almost 100% of the problems people have are due to air leaking into the siphon standpipe or the siphon standpipe being terminated far too deep into the sump.
Benson0219
Member
Great thread!
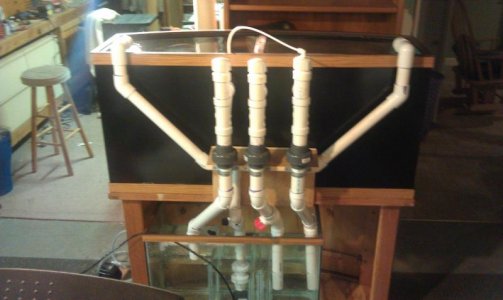
heres a pic of the set up before moving. only difference is this pic shows return lines (water back to the tank) split so I could have clean water returning on the far left and far right of the tank. I removed to tee and now the return is only on the left side of the tank.
Attachments
Last edited:
Without a an overflow box, you will get no surface skimming. I suggest reading the first page of this thread and visiting my website for details of how the overflow is constructed. Most of your questions will be answered in detail")
What is your webpage link that describes the design of your system?
Never mind, I web search found it.
Hope this is the one: http://www.beananimal.com/projects/silent-and-fail-safe-aquarium-overflow-system.aspx
Thanks
Last edited:
BeanAnimal
Premium Member
Great thread!
Post padding is against the rules here...
I am having a new tank built. 72Lx30Dx25T. I am going to use either one center mounted overflow, (36 inches wide) or 2 mounted on the back wall (2 18 inch wide ones). (at this point I can have the tank manufacture build either one) Can this set up be used in either of these overflows? If so which would be better? Bean I have read your site on these and they look like this is the best setup., But, the reason I can not use your cafco/overflow design is space limitations. Thank you.
Will this work on a standard RR tank?
jcolley
Member
Okay, well I've put mine off long enough. My tank room is done and I'm ready to move the tank and I still haven't nailed down my overflow...
220 Perfecto, initially planned for a hi flow sump with 2" drains through 1.5" bulkheads on an internal 60" overflow. Now, not wanting to lose inside real estate, I want a small internal overflow (I'm not routing 1/2" glass to slot it!) fed through 3-4 holes to an external overflow box measuring about 12"x 6".
Initially, I had planned horizontal bulkheads on internal overflow box, but now with the external box, they will be drilled for vertical placement. I literally have every piece bought and a cardboard mock-up made, but now I'm having second thoughts on using 1 1/2" bulkheads mounted vertically with 2" sanitary tees and 2" downstream piping. A recent post has me worrying about gurgling in the vertical arrangement through the restriction.
I'm ready to drill the tank, but too chicken without reassurance...
Thoughts?
Anyone? Anxious to drill, but worrying I need to up the bulkheads to 2"...
Question...if I had a normal overflow box that was large enough to hold three siphon tubes, would it work to drill the back out at the bottom of the tank rather than drilling in the top area and have most of the pipe on the inside of the box rather than exterior of the tank? Just trying to figure this out for my 72 Bowfront.
bad santa
SCRK member
I have my O/C & F/S about 1" down into the sumps water level. My E/L is 2" above the water level so I can hear if water is coming out that pipe.
I didnt split the standpipes. All three terminate 2 " below water. I split the return line so i could feed the refugium. On my way home from lowes with new elbows.
BrklynArch
New member
Quick dumb question.....i found most of the parts for the standpipes over at HD
im just a bit confused on a few pieces.....
1. What do you use to connect the sanitary T to the back of the bulkhead.(mine is threaded)...not much room so im trying to keep it as slim as possible
2. whats the piece that goes above the sanitary T between the threaded cap, cant seem to find it and the guy at HD is also stumped. i thought it was just a threaded adapter to accept the threaded cap but from what pictures ive seen the cap fits all the way down and mine would have a good 1" of threading left.
3. What parts do people glue? is the whole thing glued or are some parts left unglued incase it needs to be taken apart. like the 90 street elbows in the overflow that connect directly to the bulkhead
Thanks in advance guys / beananimal!
question
question
I am planning my first saltwater system and I'm thinking about going with the Bean method for the drain pipes. There's one thing that I don't understand, and it's probably because I'm dumb and it was already answered before, but still here it goes. If the full siphon pipe and the emergency pipes have caps that are NOT drilled, what is the advantage of having a T fitting and a cap above it for these two and not a regular knee fitting with the pipe below?
RocketSurgeon
New member
I am planning my first saltwater system and I'm thinking about going with the Bean method for the drain pipes. There's one thing that I don't understand, and it's probably because I'm dumb and it was already answered before, but still here it goes. If the full siphon pipe and the emergency pipes have caps that are NOT drilled, what is the advantage of having a T fitting and a cap above it for these two and not a regular knee fitting with the pipe below?
Ease of maintenance.
RocketSurgeon
New member
Quick dumb question.....i found most of the parts for the standpipes over at HD
im just a bit confused on a few pieces.....
1. What do you use to connect the sanitary T to the back of the bulkhead.(mine is threaded)...not much room so im trying to keep it as slim as possible
2. whats the piece that goes above the sanitary T between the threaded cap, cant seem to find it and the guy at HD is also stumped. i thought it was just a threaded adapter to accept the threaded cap but from what pictures ive seen the cap fits all the way down and mine would have a good 1" of threading left.
3. What parts do people glue? is the whole thing glued or are some parts left unglued incase it needs to be taken apart. like the 90 street elbows in the overflow that connect directly to the bulkhead
Thanks in advance guys / beananimal!
Everything outside the tank gets glued.
bad santa
SCRK member
I can only answer #3. You have to glue any fitting that is above the water during normal operation.
What I did with my set up was to use slip bulkheads on the inside of the overflow and glue the elbows and their related pieces together. I then only need to slide the "glued" elbows from the slip bulkhead if I need to.
What I did with my set up was to use slip bulkheads on the inside of the overflow and glue the elbows and their related pieces together. I then only need to slide the "glued" elbows from the slip bulkhead if I need to.
Quick dumb question.....i found most of the parts for the standpipes over at HD
im just a bit confused on a few pieces.....
1. What do you use to connect the sanitary T to the back of the bulkhead.(mine is threaded)...not much room so im trying to keep it as slim as possible
2. whats the piece that goes above the sanitary T between the threaded cap, cant seem to find it and the guy at HD is also stumped. i thought it was just a threaded adapter to accept the threaded cap but from what pictures ive seen the cap fits all the way down and mine would have a good 1" of threading left.
3. What parts do people glue? is the whole thing glued or are some parts left unglued incase it needs to be taken apart. like the 90 street elbows in the overflow that connect directly to the bulkhead
Thanks in advance guys / beananimal!
Similar threads
- Replies
- 3
- Views
- 291
- Replies
- 2
- Views
- 2K
- Replies
- 4
- Views
- 1K