Silent and Failsafe Overflow System

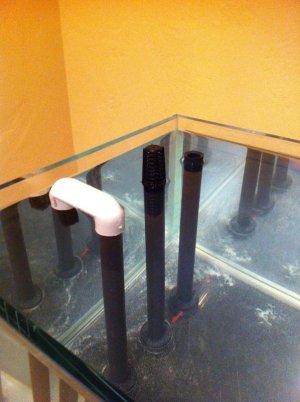
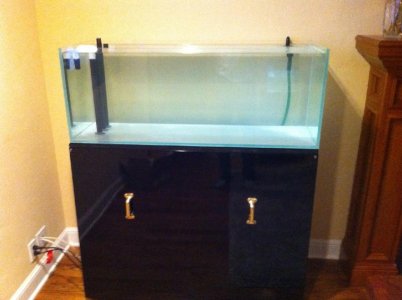
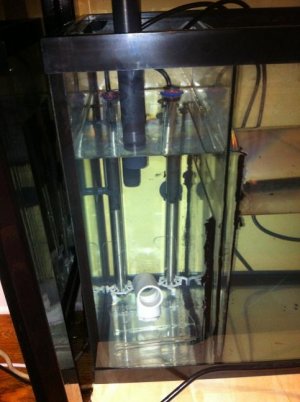
I also did a 48'' overflow in my 125g. I made my box as small as possible 3.75'' tall 2.75'' deep 48'' long all with .25'' glass with a black acrylic piece glued to the front. Once you make the box set the tank on its back and position overflow box in tank slightly above tank trim. My holes for my overflows ended up being .75'' down from tank trim. I also cut about .50'' off my street elbows to fit my box. All my holes are drilled for 1'' standard bulkheads I also drilled two return lines next to my overflow, it looks very clean. I then used a bushing to step the tube size up to 1.5'' pipe just like beans design.
 
OhioReef71, not sure if I got lucky, but I tapped the PVC and put a piece of airline about 12 inches long. I think as long as the airline is sucking air and is not in the water and is above the water line should do the trick.

When I ran it, I got one massive sucking sound and then dead silent.

rich


What do I need to get to tap the air tube into the top of the cap? I know I need teh John Gueist (sp?) or the Home Depot version that I think is Watts, but where does the tapping tool come from and what size or whatever do I need? I've never tapped anything. Can i just drill the hole and silicone the tube in???
 
What do I need to get to tap the air tube into the top of the cap? I know I need teh John Gueist (sp?) or the Home Depot version that I think is Watts, but where does the tapping tool come from and what size or whatever do I need? I've never tapped anything. Can i just drill the hole and silicone the tube in???

John Guest is a brand name, higher quality and higher price than the Chinese knockoff Watts. There are other brands as well.

The tap is a common NPT (tapered) tap. 1/4" or 3/8" depending on the size of the fitting you buy. For tapping a pvc cap, as long as the hole it the right size, you can use a steel nipple with the proper size threads on it, to tap the hole usually.

We are talking about a $5 item here, right? I like Chinese products. They offer more value than their overpriced american or german knock offs. :) Besides, whats the likely of failure here? This thing will sit in place with no movement and occassionally have some water splash on it. I'll happily go with whatever is avaialble, regardless of price since they are all cheap...and get the Watts. In fact, the fact that you told me its chinese makes me want it over the Guest even more. :)

So now down to brass tacks - I need steal nipples to tap that hole. I think I get it. If I cant figure it out with the help of the Home Depot guy (what do I do if he is not American?) something tells me the right size drill bit and some silicone will get me the desired results.

As usual, thanks for your help Uncle.

Incidentally, John Guest is neither American nor German: they are made in U.K. How one views value, differs from person to person, just as assembly methods vary as well. For me quality of materials wins every time, as does solid assembly of drain systems.

Silicone and a hole may get it done, but just remember silicone does not bond to plastic, the very reason that silicone is NOT recommended to seal pvc. Would be a shame if it came apart just when you need the trip line to prevent a flood. This drain system is designed to be fail safe--there is more than one way that failures can happen. I don't see any value in short cuts. :)

Happy reefing.
 
Best option: NTP tap and PTFE thread sealant

Second best option: Slightly undersized drill bit and use of a steel nipple as a tap. Liberal use of PTFE thread sealant, or better plastic epoxy.

Not really an option: Drill bit and silicone, though plastic epoxy may work.

Beware, that most of the plastic epoxy products are NOT uv protected and over time will brittle under the spill of your lights :)

I use the "Watts" brand fittings and "John Guest" brand fittings. Honestly, the Watts stuff really is garbage. For the overflow, it will likely be fine but I would not trust them behind my refrigerator, under my sink or any other place where a leak would cause serious damage or an unchecked flow of water for hours or days!

To that end, I am starting to avoid the asia import crap whenever possible. It just keep getting worse and worse. nearly 1/3 of the products I purchase from big box stores suffer from a defect, flaw or blemish and I have become a regular in the return line. I used to just shrug it off, but I figure if enough folks make the stores suffer, they will either source quality products (i will be happy to pay more) or flounder under the weight of unhappy customers.
 
Last edited:
Bean animal overflow not auto siphoning

Bean animal overflow not auto siphoning

OK, I made a Bean animal siphon for my rimless tank and have a few questions.

From what I read, you need one primary siphon, secondary drain, and an emergency drain.

My main siphon is the down turned siphon. my problem is that it isn't starting to siphon on its own. Why not? What am I missing?

photo.jpg
photo3.jpg
photo1.jpg
 
Welcome to DIY on RC. Please do not take this the wrong way, it is my desire that you succeed in making this system work as intended.

The system, when built as it was designed, works as it is supposed to. When you make major modifications to the design, the results usually will not be what you expect.

The siphon is too close to the top of the tank. The "open channel" will not function as per the design, and the dry emergency is too low in relation to the siphon.

The sum total of the above, is you are not getting sufficient head pressure (water level) above the weir in the elbows, (bottom inside of the elbow) to start the main siphon. The emergency will take most of the flow, (as well as the open channel) before the siphon starts, preventing the siphon from starting. Were the inlet to the dry emergency an upturned elbow, per design, it would be above the top of the tank, and the tank would flood the floor before the siphon started. Finally, there is no "trip" for the open channel, and no possibility that it would become a siphon as intended if both the main siphon and dry emergency became plugged. When the system is adjusted and running properly, the water level will be around the top of the siphon elbow.

Perhaps just as important, is you have no overflow, so even if this system did work properly, you would get no surface skimming, other than the small amount that would go down the "open channel".

If you study the first page of the original thread, or the article on bean's website, you will see what needs to be done. It is not that it has to look identical, it just has to work the same, using the same logic. Sorry, just the way it is. :)

To "fix" it, you will have to cut the siphon line down, as well as the open channel, and setup the open channel with the elbows, air line etc. The water level in the tank, will probably end up at least 2" or so below the top of the tank. At that point the dry emergency could be shortened a bit, but not a great deal.
 
Last edited:
Is there a way to estimate my gph with this system or is it more just take a good guess and tune the valves as needed?

I am trying to decide if I want to use my mag 9.5 as the sump return or if I need to get something bigger? Either way it will be used externally and Im going to be running a 48 inch semi coast to coast on a 150 gal long tank with the standard 1 inch bulk to 1.5 pipe.

someone posted the numbers up here before, but a good safety margin would put you less than 1000gph with head(that 9.5 minus head could be around 700 on a typical set up) Thats for 1 inch. The larger the piping, the more you can flow.
For arguements sake, some say that you need a good fast rate through your sump for that big of tank(ie running a 1500gph return pump)
My boss and I agree that its not necessary. I run about 700gph with head loss on my 135. My flow for my tank is from my powerheads not my return.


When talking about the mag drive 9.5 and larger that would be in 1.5" pipe. Per directions, these pumps require 1.5" pipe.

As far as power heads vs. return, they are not the same, and are not truly additive. They perform different functions. A higher rate through the sump is desirable, however that discussion is out of the scope of this thread.
 
I am in the planning stages of a 500g 8'x4'x2.5', I am wanting to have 2" holes drilled in the external overflow mainly because you can always dial back the flow but never increase it. Anyone done this?? Would you go from a 2" bulkhead to 1.5" or just go 2" all the way to the sump?
 
my eyes are killing me from searching for these two answers on this thread and others....mostly this thread lol, so im just gonna ask. im setting up a standard 75, and going to do almost coast to coast, 40" centered. will 4" deep and 6" high work for the original design, with 3 1" drains, and using 1.25" street elbows in the box? and my other question is return pump sizing, i plan on splitting my returns via a 3/4 scwd, and coming over the top in the corners, to a split spray bar. horizontle towards the front, and vertical towards the bottom in the back. i know its gonna have a ton of head, so would a 1400 gph pump be feasable?
 
Not really much point in 1.25" elbows in the box with 1" drain lines.... with 1.5" drain lines, perhaps. Hole centers for 1" plumbing (elbows/drain lines) should be 2 3/4" - 3 3/4" down from the top of the glass. If that fits in the box, the box will work.

Best plan would be to run 750 - 800 gph through the sump, returning via a single line sized one size over the pump outlet size, all the way. Even with the SCWD, and the closed loop, spray bars, you are still going to need some power heads in there. The bottom line is power heads get it done, the rest is just thread topic, and complexity. :) EDIT *did not want to ruin your track record* lol.
 
Last edited:
Glass box "just above trim" ???

Glass box "just above trim" ???

As suggested, if i want to place the top edge of my glass overflow (semi c2c) just above the bottome of the trim, does that mean i need to cut a notch on the side of the box that goes against the back side to deal with the trim bulge coming out? Or can i have it uneven from bottom to top of the box and just fill it with silicone?
 
As suggested, if i want to place the top edge of my glass overflow (semi c2c) just above the bottome of the trim, does that mean i need to cut a notch on the side of the box that goes against the back side to deal with the trim bulge coming out? Or can i have it uneven from bottom to top of the box and just fill it with silicone?


I may have answered my own question by measuring the trim om mu sump tank ( my dt arrives tomorrow)... So the trim extrudes outside of the tank the full height of the trim, but not so on the inside....so planning for the overflow slightly above the bottom of the trim will keep the glass snug from top to bottom of the overflow.....correct me if im misunderstanding...
 
Should I only surface skim from the front side of the overflow or is it ok to have the sidewalls the same height, allowing water to cascade over from front and side(s). ...i am really only considering noise ? Does it matter?
 
Back
Top