You are using an out of date browser. It may not display this or other websites correctly.
You should upgrade or use an alternative browser.
You should upgrade or use an alternative browser.
Silent and Failsafe Overflow System
- Thread starter JohnL
- Start date
Kingfisher1980
New member
That is the guide I will use to keep the bit in place. It will be clamped to the back of the tank right against the trim.
Kingfisher1980
New member
Kingfisher1980
New member
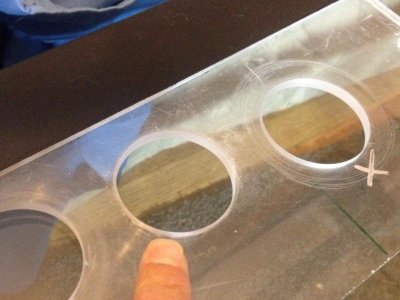
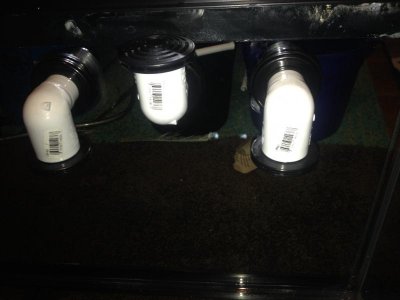
All done drilling! What do you think?
Couple more questions regarding this setup.
1. How tall do the stand pipes above the T fittings need to be?
2. Do I even need a T fitting on the emergency pipe?
3. Should I use these low profile strainers or do you think they will interfere with the BAs operation?
Couple more questions regarding this setup.
1. How tall do the stand pipes above the T fittings need to be?
2. Do I even need a T fitting on the emergency pipe?
3. Should I use these low profile strainers or do you think they will interfere with the BAs operation?
Attachments
sleepydoc
Team RC
All done drilling! What do you think?
Couple more questions regarding this setup.
1. How tall do the stand pipes above the T fittings need to be?
2. Do I even need a T fitting on the emergency pipe?
3. Should I use these low profile strainers or do you think they will interfere with the BAs operation?
Looks good, but it ultimately depends on the overflow box. How much flow are you aiming for?
1. The standpipes can be as tall or short as you want them, the only purpose the Tee serves is to serve as access to clean the pipes.
2. See #1
3. Those strainers very well may cause problems. I would take them off.
Kingfisher1980
New member
Thanks everyone for the help!
One final question. All of the plumbing is slip fit..... Do I need to glue everything together? I mean if I glue the T fittings into the bulkheads.... That's it I can never take it apart again. Seems risky!
One final question. All of the plumbing is slip fit..... Do I need to glue everything together? I mean if I glue the T fittings into the bulkheads.... That's it I can never take it apart again. Seems risky!
sleepydoc
Team RC
What's riskier - never being able to take it apart, or the Tee coming off of the bulkhead one morning right after you leave for work?
The only fittings that don't need to be glued are those that can come loose and/or leak without a problem. If you truly want t he ability to take apart the plumbing, get threaded bulkheads. IME, you rarely need to take apart your plumbing unless you are moving the tank completely. In that case, you generally need to replumb the tank anyway. PVC and bulkheads are relatively cheap, and glued fittings are more secure and less prone to leaking than threaded fittings.
Unions are a great option if there are specific areas you want to be able to disassemble or need the ability to rotate/adjust.
Re: the elbows inside the overflow, those potentially can be fit snugly without gluing. Some people have reported problems with air bubbles getting sucked into the siphon line, so I would consider gluing this one at a minimum. It doesn't really matter if a bit of air leaks into the open channel and emergency drains.
Twistofer
New member
what's riskier - never being able to take it apart, or the tee coming off of the bulkhead one morning right after you leave for work?
The only fittings that don't need to be glued are those that can come loose and/or leak without a problem. If you truly want t he ability to take apart the plumbing, get threaded bulkheads. Ime, you rarely need to take apart your plumbing unless you are moving the tank completely. In that case, you generally need to replumb the tank anyway. Pvc and bulkheads are relatively cheap, and glued fittings are more secure and less prone to leaking than threaded fittings.
Unions are a great option if there are specific areas you want to be able to disassemble or need the ability to rotate/adjust.
Re: The elbows inside the overflow, those potentially can be fit snugly without gluing. Some people have reported problems with air bubbles getting sucked into the siphon line, so i would consider gluing this one at a minimum. It doesn't really matter if a bit of air leaks into the open channel and emergency drains.
+1
Kingfisher1980
New member
Thanks again.
I failed to answer your question about flow though.
I will be using an eco plus 633 for my return pump. It is rated at just under 600 gph. So I expect to see closer to 400. Which would be 10x turnover. It's a 40B with a 20L sump. My overflow box I haven't quite decided on just yet. I was thinking coast to coast, however..... Once assembled they are nearly impossible to get into place. So I may just do 30"L x 3"D x 4"T.
If that helps at all.
dickwhitehead
New member
Re: the elbows inside the overflow, those potentially can be fit snugly without gluing. Some people have reported problems with air bubbles getting sucked into the siphon line, so I would consider gluing this one at a minimum. It doesn't really matter if a bit of air leaks into the open channel and emergency drains.
I have an internal coast to coast and then went the bean animal route. I did not glue the elbows inside the overflow and have not had any issues with air bubbles. If you did develop air bubbles, you could always use tape and twist the elbow into place tightly.
sleepydoc
Team RC
I have an internal coast to coast and then went the bean animal route. I did not glue the elbows inside the overflow and have not had any issues with air bubbles. If you did develop air bubbles, you could always use tape and twist the elbow into place tightly.
It depends on how snugly the elbows fit into the bulkhead, what the flow is, how big of a drop there is on the siphon to create a negative suction at the top, etc.
You could also use pipe thread sealant to get a better seal; it might work, might not. Either way, the worst that will happen is you get some bubbles in your siphon from air entrainment making it less-than-silent.
Realistically, after it's set up and running you don't need to take them out, so it's probably worth gluing the siphon elbow up front.
adova
Premium Member
Hey guys -
My BeanAnimal setup has been running for about a month and a half. I shut the system down last night for a few hours and when I started back up, the overflow water level was about 2 - 3 inches lower than normal. I have shut down the system before several times and it always stabilized at a particular level.
No big deal to adjust again, but I was wondering what factors could cause the change?
Thanks...
w.vreeswijk
New member
Here some photos from the building progress of my mew tank with this system.


Greets wesley
Greets wesley
w.vreeswijk
New member
Why such a large gap between the top of the tank and the top of the overflow?
That is for the lights..
This is how the tank be in fihnesed result.

Greets wesley
Similar threads
- Replies
- 3
- Views
- 262
- Replies
- 2
- Views
- 1K
- Replies
- 4
- Views
- 1K