- Forum
- More Forums
- Reef Club Forums
- SouthWest Region-Reef Club Forums
- Arizona - Fish & Reef Aquarium Group (FRAG)
You are using an out of date browser. It may not display this or other websites correctly.
You should upgrade or use an alternative browser.
You should upgrade or use an alternative browser.
Teaser pic
- Thread starter m-six hundred
- Start date
m-six hundred
The Most Diabolical Hater
Plumbing looks super clean dude nice job
Great job.
Thanks guys, the plumbing design was taken from Evolved's tank. It was not easy to put the two drain lines in place.
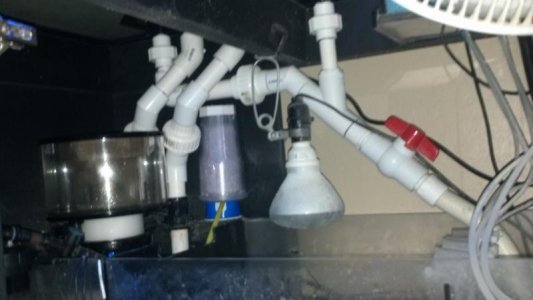
Here is a pic of the drains inside the overflow box. The full siphon is the lowest drain at the bottom of the picture. The top of the drain screen is about 1.5" under water. The screen its self is about 6" tall. The primary emergency drain is in the center under the brace. It is approximately .75" above the water line and the last emergency drain is 1.25 inches above the water line.


m-six hundred
The Most Diabolical Hater
What are the dimensions of the tank that thing looks smooth.
Thanks, the tank is 60"x27"x27"
The plumbing would have looked really trick with some of the new colored PVC pipe. Great job and can't wait to see the tank with livestock. JP
yes but I would just mess it up with pipe glue.
Must have been a really tight squeeze getting the drains in. Will it be possible to service them if the need arises?
There are six unions below the tank. Everything would come apart rather quickly if I needed to dislodge something.
m-six hundred
The Most Diabolical Hater
oh and the drains in the overflow box will unscrew.
Last edited:
evolved
Wrasse Nut
Yeah, he asked me how I did mine, but he didn't ask how hard it was to do!Thanks guys, the plumbing design was taken from Evolved's tank. It was not easy to put the two drain lines in place.

That's what the unions are for; it all comes apart.Must have been a really tight squeeze getting the drains in. Will it be possible to service them if the need arises?
Attachments
m-six hundred
The Most Diabolical Hater
The tank is starting to clear up. I used 100% dead dry rock and dry sand. I am planning on having to wait a full two months before I can place any livestock in it.
I also installed my ATB 840 v2 skimmer last night. Pics of that to come.

I also installed my ATB 840 v2 skimmer last night. Pics of that to come.
woodwrangler
New member
WOW Mark, looking great man!
rioshilo
New member
The tank is starting to clear up. I used 100% dead dry rock and dry sand. I am planning on having to wait a full two months before I can place any livestock in it.
I also installed my ATB 840 v2 skimmer last night. Pics of that to come.
You may have changed it already, or you may like it as is. But, I liked it better before. With 5 small rocks on the sand it seems cluttered. Before with only one additional rock on the sand, it made your tank look much deeper front to back.
We are on the same time frame right now, I am also starting a new tank. Added water the same time as you. All dry rock, and dry sand, syphon drain, minimal scape, etc.
What are you going to run for powerheads? For my tank, I'm thinking 3 rw-8's on the back wall. But maybe I should get the rw-15's instead. Haven't decided yet, and I don't want to get 15's, and have them blow this sand around even on the lowest setting.
m-six hundred
The Most Diabolical Hater
Thanks for the feedback guys. For flow I am using two MP40's one on the left and right side connected to my apex. On the back wall I have a Tunze 6105 and a 6055 connected to my apex through the variable speed ports.
m-six hundred
The Most Diabolical Hater
Teaser pic
Here is a picture of the sump, skimmer and the refugium light. The refugium light is a Wave Point high output 16-watt led light.

Here is a picture of the sump, skimmer and the refugium light. The refugium light is a Wave Point high output 16-watt led light.
m-six hundred
The Most Diabolical Hater
Cycle Day 11
Ammonia .6
Nitrite 3.3
Nitrate 50
Ammonia .6
Nitrite 3.3
Nitrate 50
m-six hundred
The Most Diabolical Hater
Moving right along.
Yeah, Jeff told me I should put my most expensive corals in now. lol
Similar threads
- Replies
- 0
- Views
- 276