You are using an out of date browser. It may not display this or other websites correctly.
You should upgrade or use an alternative browser.
You should upgrade or use an alternative browser.
Triple-S Fish Ranch - 1700gal 164†x 48†x 56†SPS peninsula build
- Thread starter pmrogers
- Start date
JanVelazquez
New member
Thread looks great. Best of luck. Reminds me of when I used a crane as well. I plant to retake my project soon so I will keep looking at your progress.
http://www.reefcentral.com/forums/showthread.php?t=2032111
http://www.reefcentral.com/forums/showthread.php?t=2032111
Thread looks great. Best of luck. Reminds me of when I used a crane as well. I plant to retake my project soon so I will keep looking at your progress.
http://www.reefcentral.com/forums/showthread.php?t=2032111
I just read it.. Yeah you need to post in it!
One detail got lost in my order with Waterdog: rails for holding an egg crate grill in front of the weir. I'll have to make my own and find an adhesive that is good for bonding PVC to FRP.

Obviously amazing build like others have said!!
Might I offer a suggestion of instead of placing the egg crate in front of your weir to placing it behind the weir. It will be like on long horizontal tooth instead of many vertical ones. The water draining should be designed not to touch the egg crate or teeth it'll be placed above the water flowing out. It'll still be there to stop escape's from escaping. Any blockages will still let the water flow past.
Not having the overflow water touching any part of the egg crate strip you'll have better surface tension meaning no friction losses due to the teeth. Tanks with teeth can loose 50% of there surface area skimming due to teeth and surface tension they create.
Crazy_Beaver
New member
I was redirected here by a post of ching at FB!If he says its cool, it will definitely be!
Very inspiring build thread.
Look forward to seeing the progress.
Very inspiring build thread.
Look forward to seeing the progress.
Paul. Very inspired build thread.
Thank you for sharing.
Look forward to seeing the progress.
All the best.
Chingchai, it is an absolute honor to have you join the thread! Your beautiful system is for me, as for so many others, one of the most inspiring in the world. I can only hope to ever achieve even a small part of your success.
Yrema, cretko, coral_lagoon, jester and everyone else who's joined in, thank you for the warm welcome.
Monstrous tank. Are you a member of austinreefclub.com
If not you should be. I'm sure the folks would love to meet you!
Hi Bpb, Timfish, Robb, other fellow Austinites! I'm not in ARC-- I'll check it out. And I will definitely have an open house or 3 as things progress.
Wow. This looks like it is going to be incredible. If you ever need a hand I am sure myself and fellow Houston reefers would be up for making the drive to help and check this monster out in person. I am sure this is stressful trying to get the tank and house completed while still having to work to pay for it all. Good luck and I will be following along closely for ideas for my upgrade.
Thank you, jhill! So far, not too bad on the stress front. I'm taking my time with the build and enjoying the process. I hope to be running this system for 30+ years, so a few months more or less on the build isn't going to hurt anything. The only time pressure is on the aquascaping and in-tank closed loop plumbing work that must precede it. I should probably try to get these done in the next 6 or 8 weeks, before the canopy framing goes in and limits access.
I can't conceptualize size, I need a baby/animal/Mermaid inside the tank for scale purposes.
Is that going to be the resting place it is in now where it will be displayed? Or will it be further into the room?
")
Hah! I'm the only one willing to climb into the tank, and it would be a disservice to mermaid pics everywhere to add my ugly carcass to their ranks.
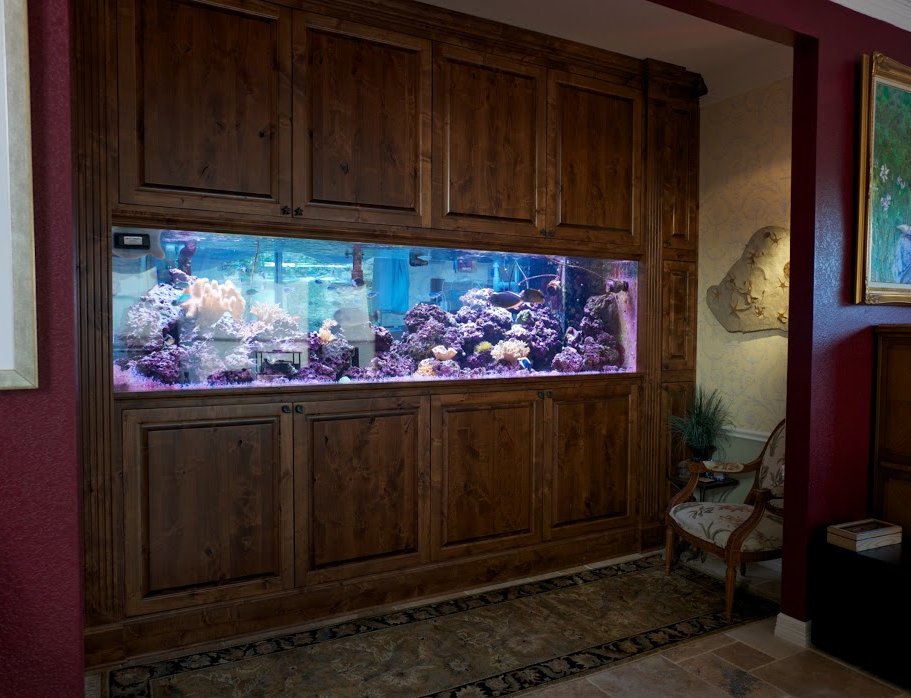
That is the final location. At 3500 pounds empty, 4800 with stand, it's not going anywhere. I wanted plenty of room to walk around the end of the peninsula and access the back side. The entrance will be framed by an arched casement that visually centers the viewing panel in the opening. It will end up looking something like the 750 in our previous house, just scaled up:
Last edited:
dave.m
Active member
The purpose of the teeth is to deliberately disrupt the surface tension. Without this the oily layer on the surface does not dissipate and drain well. The teeth break up the layer so that it can be dealt with by the skimmer. People who do not have turbulence at the edge of the overflow (e.g. Calfo style) must aim a pump or CL outlet towards the overflow to duplicate the turbulence the crenelations give you naturally.vair said:Not having the overflow water touching any part of the egg crate strip you'll have better surface tension meaning no friction losses due to the teeth. Tanks with teeth can loose 50% of there surface area skimming due to teeth and surface tension they create.
Sorry to highjack your thread, Paul.
Dave.M
Nice dimensions, it's always cool when you need a crane to move a tank. I saw your planning on 120w cannons but only 8 of them. I would recomend more to reduce spotting. I've used them on a few tanks and alternating blue and 10k every foot turns into a nice even 12-14k or so. 10k alone isnt bad either. This is mounted around 18-24" above the tank 4 10k and 3 blues on an 8' tank. You could always mount them higher and penetration won't be an issue, I've seen them bleach out lps at 6', but you may not have the room. They are nice lights but the distribution of light isn't even.
Epicreefer, many thanks for the feedback. Nice to hear from someone with experience using the 120s. Current plan calls for the bottom ends of the cannons to be 30" above the water. Do you think this extra height would provide enough spread to get away with 9 lights, roughly 18" between each?
Also, I'm considering discarding the integrated drivers and using meanwell dimmables so that I can better control the blue/white mix. Have you done something similar on any of your installs?
Obviously amazing build like others have said!!
Might I offer a suggestion of instead of placing the egg crate in front of your weir to placing it behind the weir. It will be like on long horizontal tooth instead of many vertical ones. The water draining should be designed not to touch the egg crate or teeth it'll be placed above the water flowing out. It'll still be there to stop escape's from escaping. Any blockages will still let the water flow past.
Not having the overflow water touching any part of the egg crate strip you'll have better surface tension meaning no friction losses due to the teeth. Tanks with teeth can loose 50% of there surface area skimming due to teeth and surface tension they create.
Thank you, vair, and thanks for your thoughts on the overflow. With the relatively small 40" wide overflow on this tank, the water level flowing over it will be between 1" and 2" high. I may be wrong, but my understanding of the toothless calfo style overflow is that one must run with a very thin layer of water going over the weir to get the benefit. With a tall wall of water going over the edge the proteins stay on the surface and don't drain effectively.
The purpose of the teeth is to deliberately disrupt the surface tension. Without this the oily layer on the surface does not dissipate and drain well. The teeth break up the layer so that it can be dealt with by the skimmer. People who do not have turbulence at the edge of the overflow (e.g. Calfo style) must aim a pump or CL outlet towards the overflow to duplicate the turbulence the crenelations give you naturally.
Sorry to highjack your thread, Paul.
Dave.M
Thanks, Dave.M. No worries about hijacking. I welcome on-topic discussions in this thread. If sub topics start to take on a life of their own I may want to move them to other threads, but reasonably contained side discusions are welcome.
. . . One detail got lost in my order with Waterdog: rails for holding an egg crate grill in front of the weir. I'll have to make my own and find an adhesive that is good for bonding PVC to FRP.
Just doing a little more armchair engineering here but another option you have since the side wall is FRP is to drill and tap it and make an adjustable wier with a slotted piece either in front or behind. Considering it's thickness if mounted on the drain side the bolt holes would not have to go all the way through. 3/8 - 16 nylon bolts would work well and not snap as easily as 1/4 - 20.
Water Purification
Water Purification
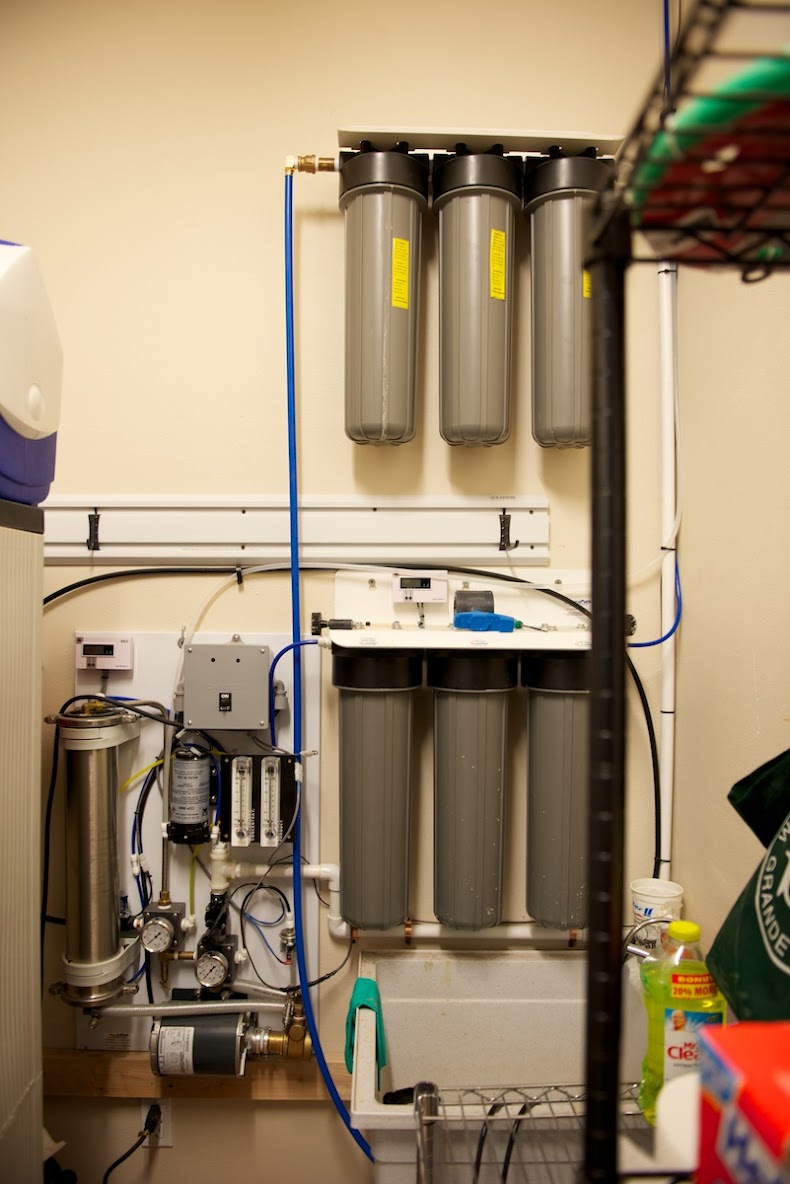
Water purification is provided by a 1000gpd Spectrapure commercial unit. The primary selection driver for this unit was not output rate, which is far higher than I need, but reduced maintenance.
On the previous 750gal tank I ran a 100gpd unit to support bi-weekly 200gal water changes and top-off. This required changing out the sediment, carbon, and DI filters every 3 months, membrane every 6 months.
With the new commercial unit I should be able to go 12 to 15 months between cartridges, 3 full years on the membrane. A nice bit of engineering that attracted me to this unit, and is in part responsible for the long membrane life, is that it auto flushes the membrane for 6 minutes after each run using water from the output reservoir. Another nice feature is that it generates much less waste water per gallon of product water than the smaller unit.
1000gpd RO/DI
The top right bank of 20" cartridges are sediment and carbon prefliters. Lower bank of cartridges are DI, with a purity meter for input and output. Starting from the top left on the white mounting board:
Water Purification
Water purification is provided by a 1000gpd Spectrapure commercial unit. The primary selection driver for this unit was not output rate, which is far higher than I need, but reduced maintenance.
On the previous 750gal tank I ran a 100gpd unit to support bi-weekly 200gal water changes and top-off. This required changing out the sediment, carbon, and DI filters every 3 months, membrane every 6 months.
With the new commercial unit I should be able to go 12 to 15 months between cartridges, 3 full years on the membrane. A nice bit of engineering that attracted me to this unit, and is in part responsible for the long membrane life, is that it auto flushes the membrane for 6 minutes after each run using water from the output reservoir. Another nice feature is that it generates much less waste water per gallon of product water than the smaller unit.
1000gpd RO/DI
The top right bank of 20" cartridges are sediment and carbon prefliters. Lower bank of cartridges are DI, with a purity meter for input and output. Starting from the top left on the white mounting board:
- Purity meter - Probes for pre- and post- membrane. Typically runs 165ppm pre-, and anywhere from 2 to 11 post.
- Controller - Gray box contains the controller board and relays
- Flow meters - below the controller are flow meters for waste water and product water. Typically run 0.9gpm waste, .65gpm product.
- Flush pump - to the left of the flow meters is the flush pump which draws water back from the reservoir to rinse the membrane
- Pressure Gauges - below the flush pump are pressure gauges for source water, and membrane (post booster pump). When input pressure drops below 50 it is time to change the sediment filter.
- Booster Pump - Below the pressure guages is the booster pump, which takes the water pressure up to 100psi before the membrane
- RO Membrane - Silver tube on the far left contains the reverse osmosis membrane.
Last edited:
Epicreefer
New member
30" is quite a bit so you should get even distribution, with very little shadowing at the top of the tank between lights. It's not necessarily a shadow but while they spread light 45 degrees left and right, a ~90degree optic, 90% is within 30 degrees of vertical and so bright you knowtice the less lit area. With 5 white and 4 blue you will have 3' between lights and possibly see alternating white and blue. The 10k white is pretty good and a roughly 50/50 is probably a bit on the blue side for most, the drivers with the 100s are dimmable, I haven't used dimming because it makes things more complicated for end users. I'll try to take some more pictures of this 12'x8'x10 6k gallon monster with 24 100s 50/50, on it with some different combos to give you an idea of spread and the shadow effect but it'll be a few days. Very bright all the way to the bottom but you can see the darkspot in the middle up top, 36" between light racks, lights are 6" from the surface tho. Two of the best tanks ive done were 4' deep 8 and 10' long and both had 4 white and 3 blue around 18" from the surface. I think you might get a bit of spotlight efect up top but 9 with 30" of height will blend well. You could always start with 9 and go to 11 if you need to.
Mysticalknight
New member
this build has barely begun and is breaking my brain lol. GL
Eauturquoise
New member
WOW ! Tagging along !
Similar threads
- Replies
- 8
- Views
- 2K
- Replies
- 97
- Views
- 11K
- Replies
- 44
- Views
- 15K