You are using an out of date browser. It may not display this or other websites correctly.
You should upgrade or use an alternative browser.
You should upgrade or use an alternative browser.
5.56 225 Peninsula reboot
- Thread starter five.five-six
- Start date
five.five-six
Well-known member
So, this is going to the powder coater's today. I think I'll Make it red. It's called snake tray and it will run along the length of the stand under the tank for cable and hose management.
https://imageshack.com/a/img923/9295/IpP5Wn.jpg
https://imageshack.com/a/img923/9295/IpP5Wn.jpg
five.five-six
Well-known member
If u can get a gyre pump get it. It's the best pump build for peninsula tank. It's thin provide great cross flow on the surface. I got 2xxf250 but should have gone to the xf280.
6105's are pretty awesome at gyre. This is 2 of them in my 135, I have a third 6105 for the new build
BeanMachine
Active member
Looking good Mark. Did you have a weir cut into the glass?
I'm going to get one of these next. I've always liked them.
If u can get a gyre pump get it. It's the best pump build for peninsula tank. It's thin provide great cross flow on the surface. I got 2xxf250 but should have gone to the xf280.
I'm going to get one of these next. I've always liked them.
five.five-six
Well-known member
Looking good Mark. Did you have a weir cut into the glass?
I was planning to but after talking with Steve Garrett, who is smarter than me by an order of magnatude or more, I was convinced that the more breaking surface, the better for gas exchange and all sorts of other reasons. Just going to be 28-7/8" of waterfall.
I am a little conserned about fishes getting in there, but if Darwin strikes, that's just natural selection.
BeanMachine
Active member
I was planning to but after talking with Steve Garrett, who is smarter than me by an order of magnatude or more, I was convinced that the more breaking surface, the better for gas exchange and all sorts of other reasons. Just going to be 28-7/8" of waterfall.
I am a little conserned about fishes getting in there, but if Darwin strikes, that's just natural selection.
:reading::beer:
five.five-six
Well-known member
:reading::beer:
+ Steve Carroll convinced me to put an algae scrubber in my overflow, so the water level in my overflow box will be about 12" down and I'll have 28-7/8" X 12 of algae scrubber mesh and I'm adding fans on the scrubber so hopefully it doubles as a swamp cooler.
=
five.five-six
Well-known member
Steve was kind enough to let me (and he actually did most of the work) come over to his house, dip the rock I got from mikes junk sale in acid, then pressure wash it and then cure it in his 300gal saltwater pond.

This is "snake tray" it's getting powder coated red today and will be mounted up under the stand for cable and hose management. it's not as pretty as finger groove with a snap cover but it's about 1000X easier to service cables and hoses laying in it. Form fallows function.

I got my glass for the internal overflow installed (black silicone fingers today ) I used suction cups to hold it in place after I squared it and I pulled the pencils out after I laid the bottom silicone bead. I centered the side gap by stuffing 5 business cards in each side between the tank and the baffle. It was a bit of a task to get silicone all the way under the glass junction.
If I siliconed it last night, how long until I can fill it with water?

This is "snake tray" it's getting powder coated red today and will be mounted up under the stand for cable and hose management. it's not as pretty as finger groove with a snap cover but it's about 1000X easier to service cables and hoses laying in it. Form fallows function.
I got my glass for the internal overflow installed (black silicone fingers today
) I used suction cups to hold it in place after I squared it and I pulled the pencils out after I laid the bottom silicone bead. I centered the side gap by stuffing 5 business cards in each side between the tank and the baffle. It was a bit of a task to get silicone all the way under the glass junction. If I siliconed it last night, how long until I can fill it with water?
five.five-six
Well-known member
That's beautiful man.... So how the hell do u put that glass in last and still get the silicone bead perfect! Perfection!
The bottom was easy, I just propped it up with the 2 pencils and laid the bead and pulled the pencils. Then just smooth it over with your fingers, let it dry and cut the excess with a razor.
The sides were harder. You have to fill the gap from one side and push it through. If you try to fill from the other side, you will trap bubbles in the center of the glass. I just Laird a bead with the nozzle pressed hard against the glass which filled the gap 3/4 to all of the way and then went back with my fingers running up and down to push it the rest of the way through. Just ended up withe 2 small bubbles.
five.five-six
Well-known member
Give it at least couple days before any water.
There's gotta be a cure time for the silicone you used; maybe on the back of the tube, otherwise you can check the MDS of the product.
So, I should be able to fill it saturday night? Or sunday?
five.five-six
Well-known member
Dry to the touch and cured are very different things; check the product specs for cure time. I'd give it some days to be on the safe side.
You are probably right.
Germanwerks
New member
Are those 6105's @ full power?
Sent from my iPhone using Tapatalk
Sent from my iPhone using Tapatalk
five.five-six
Well-known member
Are those 6105's @ full power?
Sent from my iPhone using Tapatalk
I think in that video they were full power.
They will actually pull bigger bubbles down further back if they are trimmed just right to bounce of the top of the water but that's pretty noisy and it splashes a lot.
five.five-six
Well-known member
I'm such a dork. Thursday, I remembered that I had gotten distracted before I checked out from BRS with 2 little things I needed on a plumbing order I had made last Sunday. overnight shipping was $25 but I figured, I couldn't do any of the plumbing without those to things so I sucked it up and added a few things and paid for the overnight shipping. Then I tracked last Sunday's order and it will be here on Monday
I painted the wood parts of the stand and get them installed today, besides the snaketray won't be back from powder coating until next weekend. it would be best to have that for layout before I install plumbing.
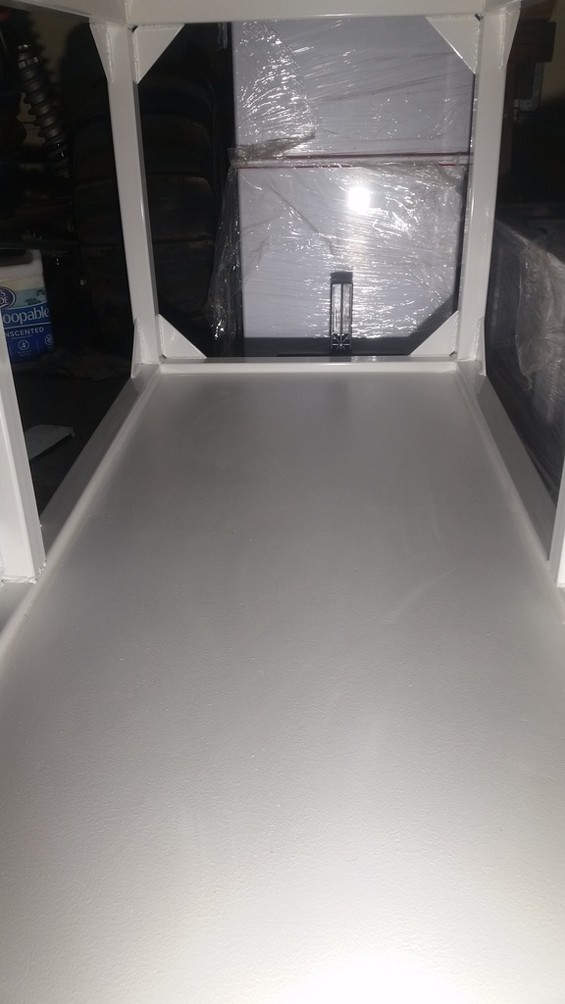
Bottom is in and sealed. Idea is that it can catch small spills before they get to the floor and the idea works.
I painted the wood parts of the stand and get them installed today, besides the snaketray won't be back from powder coating until next weekend. it would be best to have that for layout before I install plumbing.
Bottom is in and sealed. Idea is that it can catch small spills before they get to the floor and the idea works.
BeanMachine
Active member
What did you seal the deck with?
Sent from my iPhone using Tapatalk
Sent from my iPhone using Tapatalk
five.five-six
Well-known member
What did you seal the deck with?
Sent from my iPhone using Tapatalk
3 coats of exterior paint on the board and sealed the board to the stand with kitchen/bathroom caulking.
The idea is to catch incidental spells before they get to the floor. Worked just last week in the 135. The ATO hose came off the pump and was pumping kalkwasser into the stand. I got an email and a text and called 556wife who fixed the problem and cleaned it up in no time.
five.five-six
Well-known member
I think I want to put a frag rack in my skimmer section. I'd like to keep mounted frags out of the DT but that means I need a good enough light. Preferably something white becaus everything under the tank is white blue or red. I'll post a better pic of the sump later.
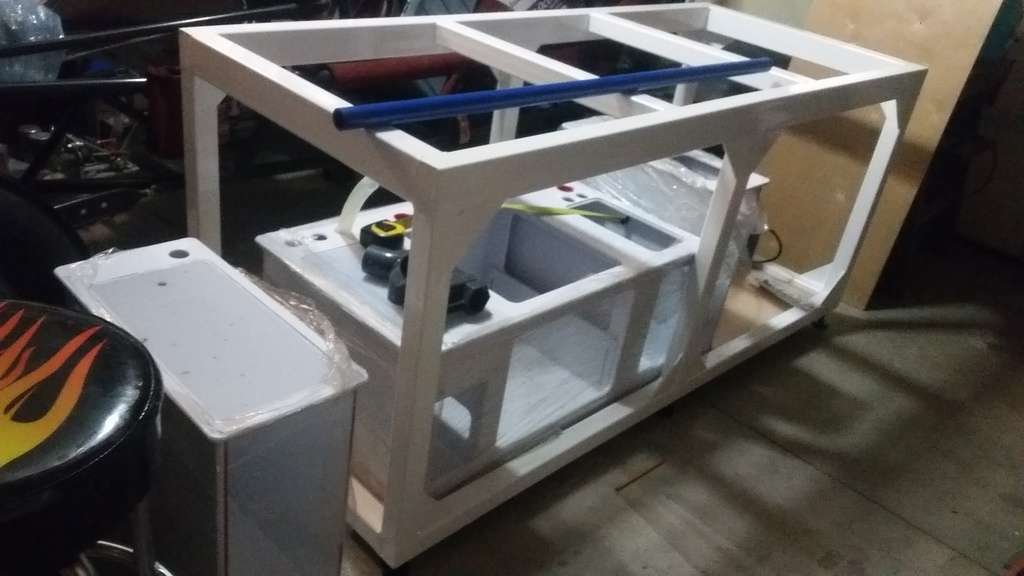
I got to plumbing. Completed the return and manifold and connected the refugium to the sump. That was a real trick because I chose to use 1-1/2 to connect the fuge to the sump and the holes in the sump are only 1".
Tank is about 2/3 full of water. No leaks!!!
I got to plumbing. Completed the return and manifold and connected the refugium to the sump. That was a real trick because I chose to use 1-1/2 to connect the fuge to the sump and the holes in the sump are only 1".
Tank is about 2/3 full of water. No leaks!!!
Similar threads
- Replies
- 0
- Views
- 186
- Replies
- 4
- Views
- 303