DIY Stands Template and Calculator

Not quite. With the addition of a central leg you don't need the 2X8. Given that the leg position isn't defined, I can't run the numbers on a 2X4 so I recommend staying with a 2X6. The 30" actually makes it worse because its more load on the long pieces. The center leg position drives the size of the top frame.

HTH,
RocketEngineer

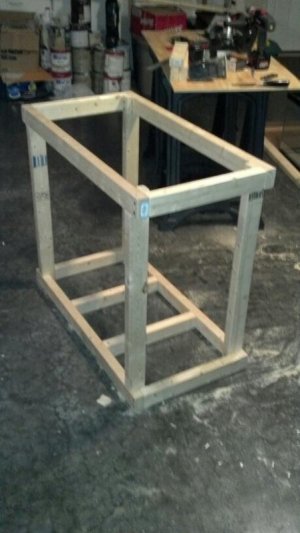
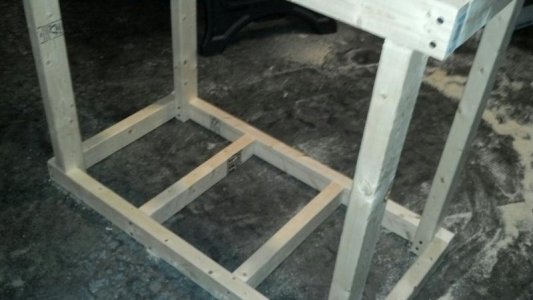
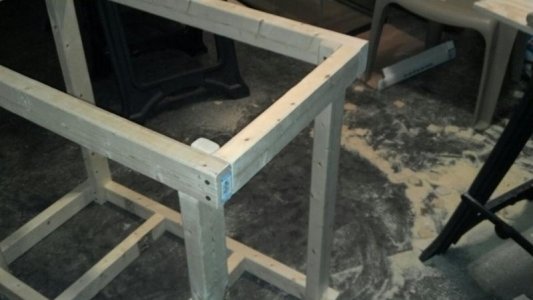
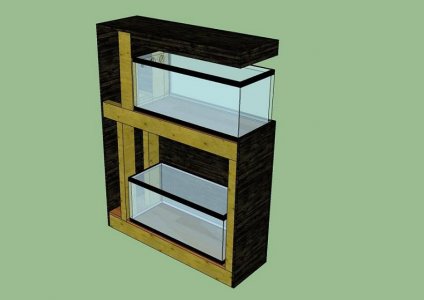
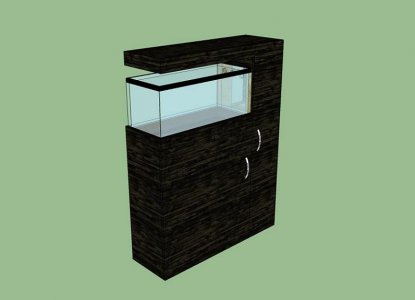
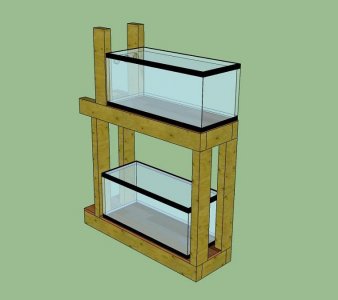
Rocket. So I built your design using all 2*4s even the top frame. Glued and screwed.
It has a 3/4" plywood top with cross supports underneath at 1.5, 3 and 4.5 feet.
I am going to add some angle bracing on the back and sides.

72*36*41 stand with a 72*36*27 tank 300 gallons. The tank is on the
Stand but not filled. I have a center leg on both long sides at 3ft.

Do I need to worry about beefing things up? Should I add legs at 1.5 and 4.5 on the long lengths?
 
For something that small, I would actually build the stand using the finish lumber for everything that is seen. Here is an example of a 40B stand I have planned:
Overall:
40BStand.jpg


Frame Only:
StandBare.jpg


The oak boards form the primary supports as well as the finished surfaces. To build this type of stand, I would start by building four rectangular frames, a front, two ends, and a back. Each of these four frames is built using pocket screws much like a picture frame and then joined along the edges to form the stand proper. So that only oak is showing, the back frame is inset and the end frames are long enough to cover the back frame entirely. Next, I added some lumber around the inside at the bottom to help support the plywood under the sump. Another piece supports the back edge of the tank. The doors are simply 1/2" plywood with a 3/4" thick oak surround attached to the plywood with biscuits and pocket screws between the pieces of oak.

Overall its a very simple design, easy to build for a small stand but doesn't necessarily translate well to supporting a larger tank. It also requires a little more skill.

HTH,
RocketEngineer


Thank you so much for the response. That idea looks great with perfect details on how to do it. Thanks! One problem though, it requires a little more skill. I'm not very confident doing pocket screws and biscuits. :-(. Plus, I already purchased the 2x4s... I hate to ask because your initial response was perfect for anybody else but you think I can make it look as good with the original plan?

Thanks again for your devotion to helping people out!

If you haven't cut the 2X4s I would take them back and exchange them. I've done that plenty of times because I changed my mind after I bought everything I thought I needed. If that's not an option, you could always surround the 2X4 frame with finished lumber using the same method I described with just the front and end frames.

Pocket screws are incredibly simple. I own the Kreg Jig Mini which has the added convenience of being specifically for 3/4" thick material (FYI, a 1X board is actually 3/4" thick so using this jig is perfect). All you have to do is clamp this with the edge of the jig along the edge of the board where you want the hole and drill using the provided bit. A clamp and a drill are all you need.

You could even use pocket screws instead of biscuits if you're careful with the screw length. I would caution you that you need to use screws that are flat under the head. If you use screws with a cone shape, they will split the wood instead of seating on the flat bottom of the hole.

HTH,
RocketEngineer
 
Hi Rocket,
Do you think that I can get away with 2x6 for the take size 84x24x24?

With legs only in the corners, a 2X6 deflects about 5/16" (0.314" for a 77" span). A 2X8 gets you down to 0.13" which is slightly over my 1/8" recommendation. Only at a 2X10 do you get into what I consider safe.

However, a single center leg under the long boards lets you use a 2X4 top frame because the span would only be 36.75" on either side of the center leg.

Lots of options.

RocketEngineer
 
When it comes to mounting equipment inside of the stand (power strips, controllers, etc.) am I wrong in thinking you can't mount these kinds of things directly into the load-bearing upper beams as it would destroy the integrity of the wood and cause it to possibly splinter? On my design a page back, I'm referring to the 2"x8" on which my tank would sit.
 
When it comes to mounting equipment inside of the stand (power strips, controllers, etc.) am I wrong in thinking you can't mount these kinds of things directly into the load-bearing upper beams as it would destroy the integrity of the wood and cause it to possibly splinter? On my design a page back, I'm referring to the 2"x8" on which my tank would sit.

That's correct, you don't want to put any holes in the structural members, especially the upper beams.
 
Roughly on average what's the height most are using under their stands? My skimmer will have a height of 23in and I was looking at building my stand 30in tall. Do you think this will end up being enough room?
 
For something that small, I would actually build the stand using the finish lumber for everything that is seen. Here is an example of a 40B stand I have planned:
Overall:
40BStand.jpg


Frame Only:
StandBare.jpg


The oak boards form the primary supports as well as the finished surfaces. To build this type of stand, I would start by building four rectangular frames, a front, two ends, and a back. Each of these four frames is built using pocket screws much like a picture frame and then joined along the edges to form the stand proper. So that only oak is showing, the back frame is inset and the end frames are long enough to cover the back frame entirely. Next, I added some lumber around the inside at the bottom to help support the plywood under the sump. Another piece supports the back edge of the tank. The doors are simply 1/2" plywood with a 3/4" thick oak surround attached to the plywood with biscuits and pocket screws between the pieces of oak.

Overall its a very simple design, easy to build for a small stand but doesn't necessarily translate well to supporting a larger tank. It also requires a little more skill.

HTH,
RocketEngineer


Okay, I think I might put your idea around the 2x4 frame for the "skin" of the stand. Couple questions. How would you suggest attaching the boards to the frame. I was thinking glue, finishing nails or both. I'm assuming they're 1x4's, is that correct? Also, with the doors, I see that the "middle" of the doors in thinner than the border. I like that look. How can I achieve that without using the biscuits. You mentioned it was possible to do with pocket screws if I were careful with the screw length.

Thanks so much for your guidance with this!!!
 
Here is my 40 breeder I built...


Mike :)
 

Attachments

  • uploadfromtaptalk1347384308779.jpg
    uploadfromtaptalk1347384308779.jpg
    44.5 KB · Views: 4
  • uploadfromtaptalk1347384324380.jpg
    uploadfromtaptalk1347384324380.jpg
    43.7 KB · Views: 5
  • uploadfromtaptalk1347384361207.jpg
    uploadfromtaptalk1347384361207.jpg
    39.2 KB · Views: 6
  • uploadfromtaptalk1347384560549.jpg
    uploadfromtaptalk1347384560549.jpg
    32.1 KB · Views: 8
Last edited by a moderator:
About to start my build, getting lots of great info from all of you. I will post pics along the way. Already need to make a few changes. One question? I see stands but no canopy builds. Any reason?
 
I was just about to order the wood for my stand but figured I should verify everything first. The tank is 72" X 25" X 25" . Are 2X4's ok for uprights? If I use 2X6's for the upper frame do I need a center support? What if I went with a 2X8 upper frame?
 
For something that small, I would actually build the stand using the finish lumber for everything that is seen. Here is an example of a 40B stand I have planned:
Overall:
40BStand.jpg


Frame Only:
StandBare.jpg


The oak boards form the primary supports as well as the finished surfaces. To build this type of stand, I would start by building four rectangular frames, a front, two ends, and a back. Each of these four frames is built using pocket screws much like a picture frame and then joined along the edges to form the stand proper. So that only oak is showing, the back frame is inset and the end frames are long enough to cover the back frame entirely. Next, I added some lumber around the inside at the bottom to help support the plywood under the sump. Another piece supports the back edge of the tank. The doors are simply 1/2" plywood with a 3/4" thick oak surround attached to the plywood with biscuits and pocket screws between the pieces of oak.

Overall its a very simple design, easy to build for a small stand but doesn't necessarily translate well to supporting a larger tank. It also requires a little more skill.

HTH,
RocketEngineer

If you haven't cut the 2X4s I would take them back and exchange them. I've done that plenty of times because I changed my mind after I bought everything I thought I needed. If that's not an option, you could always surround the 2X4 frame with finished lumber using the same method I described with just the front and end frames.

Pocket screws are incredibly simple. I own the Kreg Jig Mini which has the added convenience of being specifically for 3/4" thick material (FYI, a 1X board is actually 3/4" thick so using this jig is perfect). All you have to do is clamp this with the edge of the jig along the edge of the board where you want the hole and drill using the provided bit. A clamp and a drill are all you need.

You could even use pocket screws instead of biscuits if you're careful with the screw length. I would caution you that you need to use screws that are flat under the head. If you use screws with a cone shape, they will split the wood instead of seating on the flat bottom of the hole.

HTH,
RocketEngineer

Okay, I think I might put your idea around the 2x4 frame for the "skin" of the stand. Couple questions. How would you suggest attaching the boards to the frame. I was thinking glue, finishing nails or both. I'm assuming they're 1x4's, is that correct? Also, with the doors, I see that the "middle" of the doors is thinner than the border. I like that look. How can I achieve that without using the biscuits. You mentioned it was possible to do with pocket screws if I were careful with the screw length.

Thanks so much for your guidance with this!!!
 
I was just about to order the wood for my stand but figured I should verify everything first. The tank is 72" X 25" X 25" . Are 2X4's ok for uprights? If I use 2X6's for the upper frame do I need a center support? What if I went with a 2X8 upper frame?

2X4 uprights are all you need. Given that size tank, for the top frame I normally suggest a 2X8 unsupported and a 2X6 if there is a center leg.

Okay, I think I might put your idea around the 2x4 frame for the "skin" of the stand. Couple questions. How would you suggest attaching the boards to the frame. I was thinking glue, finishing nails or both. I'm assuming they're 1x4's, is that correct? Also, with the doors, I see that the "middle" of the doors is thinner than the border. I like that look. How can I achieve that without using the biscuits. You mentioned it was possible to do with pocket screws if I were careful with the screw length.

Thanks so much for your guidance with this!!!

The skin around the frame is the method I used for my stand. The skin was made in three pieces (front and two ends) and then I screwed from the inside out to mount it. Make sure the screws are the proper length and you can hide all the screw holes. I used 1X4 oak to build the skin as it was easy to get and work with.

To get a recessed door look with only pocket screws, you use a 1/2" plywood core surrounded by 1X boards which are actually 3/4" thick. This gives you a recess door look but the inside of the door is flat. The trick with this method is when you go to install the screws you have to do it from underneath OR use a 1/4" spacer. In a regular picture frame, there is a pair of pocket holes at each joint. To attach the center panel, we put pocket holes along the inside edge pointed into the edge of the plywood. You don't want a lot of screws, just enough to secure the panel. I would think two per side is plenty.

One last word of advice: BUILD A PROTOTYPE. That way you can verify that the screws don't break through the front of the plywood.

HTH,
RocketEngineer
 
Here's a design I've been working on for a 20 gallon long tank with a 20 gallon long sump.

The idea is to keep the stand relatively simple yet functional. I was hoping to go for a more modern and clean look for the stand. I'll probably skin the thing with 5/8" plywood and stain it black.

The frame was originally going to be built with 1x4 lumber but I decided to go with 2x4 since I'd rather it be way overbuilt than risk anything. Strong-ties will be used to attach the vertical posts. I was thinking of using pocket holes but those jigs are way too expensive. The Strong-ties should be strong enough right?

The hood above the tank will be on hinges so the entire thing can be lifted. I originally had it so the hood sat on the tank but I like the look of the floating hood more. A gas spring will be installed on the hood to support it when it's open.

Lemme know what you guys think!
 

Attachments

  • Tank stand back.jpg
    Tank stand back.jpg
    33.6 KB · Views: 5
  • Tank stand front.jpg
    Tank stand front.jpg
    27.8 KB · Views: 5
  • Tank stand unskinned iso.jpg
    Tank stand unskinned iso.jpg
    37.2 KB · Views: 5
The skin around the frame is the method I used for my stand. The skin was made in three pieces (front and two ends) and then I screwed from the inside out to mount it. Make sure the screws are the proper length and you can hide all the screw holes. I used 1X4 oak to build the skin as it was easy to get and work with.

To get a recessed door look with only pocket screws, you use a 1/2" plywood core surrounded by 1X boards which are actually 3/4" thick. This gives you a recess door look but the inside of the door is flat. The trick with this method is when you go to install the screws you have to do it from underneath OR use a 1/4" spacer. In a regular picture frame, there is a pair of pocket holes at each joint. To attach the center panel, we put pocket holes along the inside edge pointed into the edge of the plywood. You don't want a lot of screws, just enough to secure the panel. I would think two per side is plenty.

One last word of advice: BUILD A PROTOTYPE. That way you can verify that the screws don't break through the front of the plywood.

HTH,
RocketEngineer

Thank you for all your help! I'll let you know how it goes. I'm still a little confused about the recessed doors but that's okay, I'll figure something out. You can say yes but would it look bad if I just glued a thinner piece of ply to the back of the 1x4 frame of the door? I know you would be able to tell when the door was open but if I didn't care about that, would it be okay?

Here's a design I've been working on for a 20 gallon long tank with a 20 gallon long sump.

The idea is to keep the stand relatively simple yet functional. I was hoping to go for a more modern and clean look for the stand. I'll probably skin the thing with 5/8" plywood and stain it black.

The frame was originally going to be built with 1x4 lumber but I decided to go with 2x4 since I'd rather it be way overbuilt than risk anything. Strong-ties will be used to attach the vertical posts. I was thinking of using pocket holes but those jigs are way too expensive. The Strong-ties should be strong enough right?

The hood above the tank will be on hinges so the entire thing can be lifted. I originally had it so the hood sat on the tank but I like the look of the floating hood more. A gas spring will be installed on the hood to support it when it's open.

Lemme know what you guys think!

Thanks! That looks really cool! I've tried the google sketch up thing and can never get anything like everyone else on here does!!!
 
Back
Top