O3reefer
New member
I am trying to finish my tank to start the hobby and I am in need of some help if anyone can chime. Here is the link to the thread I started. http://www.reefcentral.com/forums/showthread.php?t=1947264 Thanks
AJ
AJ
Since my tank is 36 long I will probably go with the herbie. Has anyone ever added a float solonoid to shut of pump as a back up to the overflow ?
")
Hello:
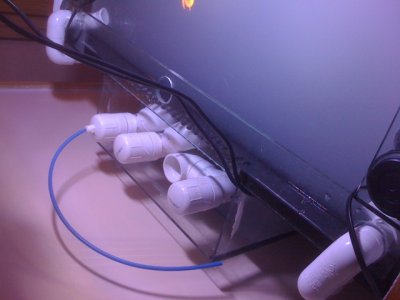
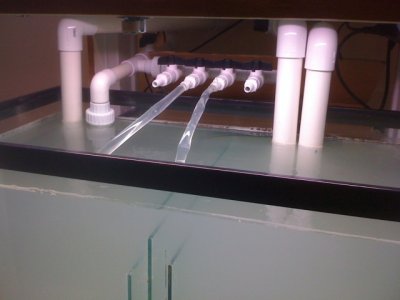
Great work on the threads, all. Regarding BeanAnimal's design, I have a basic question about the plumbing components at the bulkhead of the tank.
How is the elbow-bulkhead-pvc-pipe assembly connected? For example, the slip-by-slip bulkhead allows the elbow simply to be pushed into the flange or head of the bulkhead for a somewhat snug fit. Conversely, on the nut side, the pvc pipe also can simply be pushed into the nut side of the flange for a similar snug fit. When pushing these two components into the bulkhead, one hears a sort of "click," further suggesting that the assembly is snug. However, is that correct? Is that all that is required, or does one need to consider using adhesive? I have read that one should avoid adhesive on the waterside of the bulkhead.
In my layout, I am using a 1" bulkhead design, and I am not certain whether I want to size up to the 1.5" pipe design at the location outside the bulkhead. Please recall that BeanAnimal's design uses a 1.5" slip bushing (which bushing covers the 1" pvc pipe that is connected to the flange) to lead into a 1.5" sanitary "tee."
Therefore, if I opt to go with using just an ordinary "tee," not a sanitary "tee," can simply extend the 1" pvc pipe that clicked into the slip side of the bulkhead (at the nut side) all the way into that ordinary "tee" without using adhesive at the bulkhead? If so, how? (I will be using a slip-by-slip bulkhead.) Should I use adhesive to connect that 1" pvc piping to the outside nut of the flange? As well, I presume I will need to use adhesive on the other end--at the "tee." Am I incorrect about using adhesive at the "tee"?)
It seems a bit strange that simply snapping the 1" pvc pipe into the slip side of the bulkhead on the outside of the tank would be sufficient to prevent water leakage. This seems more true given that I would not be using the slip pvc bushing to envelope the pvc piping that is connected to the bulkhead, as BeanAnimal did. On this note, I presume he used adhesive to adhere the 1" pvc piping to the slip pvc bushing?
I don't have a clear picture of how I must assemble the elbow-bulkhead-pvc pipe components. So, please, any help figuring this out would be greatly appreciated!
Just as a general comment, all slip joints outside of water MUST be glued. Otherwise, they will leak. Slip joints inside water do not need to be glued, but can if you like. They will leak, but since the water has nowhere to go (since it is submerged), you do not see a leak outside of the tank. I believe those who say not to glue slip joints that are submerged say this because it makes it easy to disassemble or reconfigure if the need arises.
You will be more than ok with 1".
I use 1" on my 125 and the valve is more than half closed.
Hey, all:
Has anyone done BeanAnimal's design painted black at the street elbows in the CoasttoCoast overflow box? The back of my tank is painted black (on the outside of the glass), and it seems like the PVC Elbows affixed to bulkheads would look better blending in with the black background, by being black, rather than sticking out as their natural PVC-white. Has anyone ever done that? If so, how? I suspect that Krylon Fusion paint would bond to the PVC (it reads "bonds to plastic" on the label). But would that be safe for the inhabitants and life on the coral reef inside the aquarium? Would it work? Or does it not really show up or matter that the elbows are white--that they are not an eyesore--because of some other reason? Perhaps the glass overflow box sufficiently obscures the elbows? Perhaps black elbows would not improve the sightliness at all? Your thoughts most appreciated.
Thanks.