Floyd R Turbo
Either busy or sleeping
What's with the mass of silicone around the bulkhead there?
What's with the mass of silicone around the bulkhead there?

iv had my tank set up since October last year and its really bugging me with the water going down the pipes noise.
so iv been thinking about using the bean animal overflow and doing a coast to coats weir as iv got 4 holes drilled already. so my question is could i use 3 of the holes for the bean animal and use 1 for my return pipework and would it matter that 2 holes are together and 1 will be at the other end of the tank?
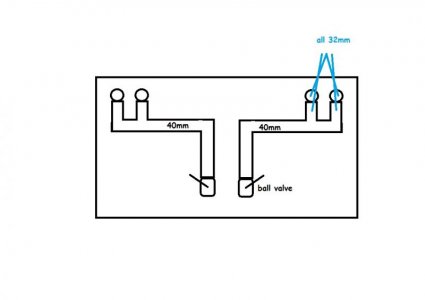
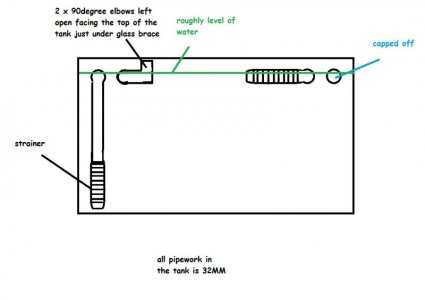
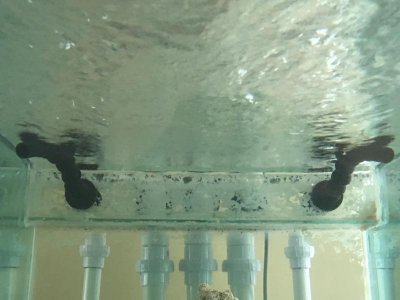
the pictures are from when i first got the tank (it was second hand) the drawing shows how the plumbing is as of now.
REAR VIEW
http://www.reefcentral.com/forums/attachment.php?attachmentid=353364&stc=1&d=1467222880
FRONT VIEW
http://www.reefcentral.com/forums/attachment.php?attachmentid=353365&stc=1&d=1467222885
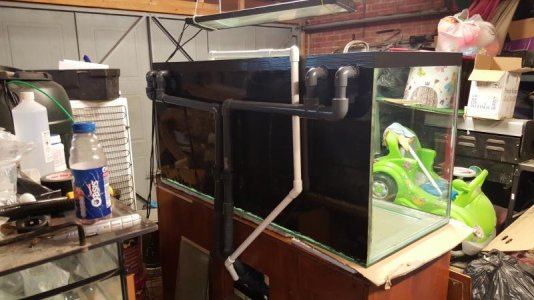
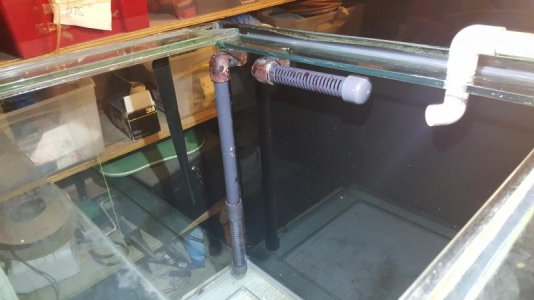
some pictures of the tank when i was working on it in the garage back in october.....the tank is currently stocked
http://www.reefcentral.com/forums/attachment.php?attachmentid=353367&stc=1&d=1467222911
http://www.reefcentral.com/forums/attachment.php?attachmentid=353366&stc=1&d=1467222899

Depends on how long the down tube is after the bulkhead. No siphon 1" bulkhead will do 600/650gph.
How do I rig up this 300G marineland DD tank I am setting up?
It has TWO corner overflows, each with 1" bulk heads.
Also, what will be maximum flow I can achieve?
If too much flow from return, then I can go over the top of tank for return flow.
Depends on how long the down tube is after the bulkhead. No siphon 1" bulkhead will do 600/650gph.
A 1" pipe will run in excess of 1000 GPH at full siphon, depending on the drop.
The bigger problem is using this setup for a bean overflow. You need 3 pipes plus a return for the bean overflow and to function properly, they need to be in the same body of water. (When water flows over a weir the water in the overflow is separate from that in the tank for our purposes, making 2 bodies of water. In a dual corner flow setup there are 3 bodies of water until the levels in the overflows rise up above the overflow.) There are 3 ways of doing a bean with this setup that I know of:
1. Have the siphon and the open channel in one corner and the return and dry emergency in the other. This will only work if the dry emergency is above the level of the overflows. It limits the overflow area to one corner, far from ideal in a large tank, and creates a stagnant area in the second overflow that has the emergency and the return.
-I could make the return point 5% flow into the stagnant chamber and remainder into tank. The emergency is only 1" pipe, not sure if that is enough or maybe make both as emergency pipes? How much flow could I get from the 1" siphon and 1" standpipe in that case? (5' from top to floor, or 4' worst case)
2. Modify the overflows to connect them together- I have seen people cut a notch in the overflows and put a weir between them. This gives improved surface skimming from the longer overflow area and lets you use the existing bulkhead holes but is quite a bit of work and difficult to make look good.
-I am planning a great stuff black foam background w/ rock pieces ziptied to egg crate, so this is possible. It would not really be noticeable I think, and I do have 36" depth to work with.
3. Remove the corner flows and replace with a coast to coast internal or external overflow. Realistically, this is the best solution but also involves modifying the tank and potentially drilling holes .
-I am not sure if the marineland 300G DD is able to be drilled on bottom pane or not... If I can safely drill the bottom I can do it, I've drilled small tanks before.
I can't help on if a 300 dd is tempered or not, but on a bean animal the siphon will take most of the flow. With option #1 or option #2 u will be somewhat limited with the 1" bulkheads for drains. I believe u will be maxing out at about 1,200 to maybe 1,500 gph with the 1" drains.
If u go with option #3 u can cap your existing bulkheads or use a couple for your returns & drill out of the back of the tank for 1.5" bulkheads for drains. A 1.5" siphon can handle 2,500 to 3,000 gph (My flow rates aren't exact but they should be close). This way you wouldn't lose the 5" or so from the back of the tank.
If u don't want to come out the back u can still come out the bottom, your c2c overflow would just have to go all the way to the bottom. U may be able to incorporate your foam wall to act as the overflow box. If u go this route I would use two of your existing 1" bulkheads for your returns & drill 3 holes for 1.5" bulkheads for the drains. This way u will be able to handle twice the flow & not be limited by the 1" syphon.
Whatever route u choose to go make sure your 3 drains are the same size or your siphon is the smaller drain. U don't want your syphon to be bigger then your emergency drains.