Silent and Failsafe Overflow System

1 1/4" pvc isn't very common, i'd go with 1.5" that's what I did on my 120G in the photos above.

you can get bushings to reduce the bulkhead size, though. I'd sooner just make it 4x 1.5" bulkheads and call it a day, and you can reduce the 1.5" down to 1" with a bushing.

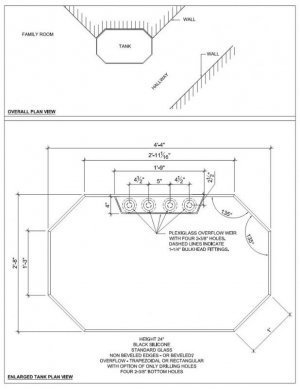
You probably don't find much about internal weir bean animal setups because you can't actually drill the bottom of most tanks, the bottom is tempered glass and it would shatter. On "reef ready" tanks, they drill the holes before they temper the glass, that's why you hear people talking about existing holes.

Only on custom built tanks can you have bottom holes drilled wherever/however you want, and that's why it's not a very common thing to see people doing, as many people are drilling an existing tank and not having one built from scratch.

The other thing about that is, most of those reef ready tanks have 2 separate weirs, usually with 1" and 3/4" bulkheads in each weir, so people will use the 1" for the emergency/trickle and the 3/4" for siphon and return, but you have to have this balancing act of putting the trickle on the opposing weir from the siphon, and then dialing the siphon back so that you still get water into the 2nd weir with the trickle line - to keep both weirs going at once....

If you're going custom, then you can put all 3 drains inside of a single, larger weir. That would make the whole thing much easier to tune and setup in general. However, you're pretty much talking custom all the way now, since nothing like that is really "off the shelf"
 
New Tank

New Tank

LXXero,
Thanks for the reply, your explanation makes me feel better about the BA in an internal weir.

I decided on the 1.25" size because from what I've read, it allows 1.5 times the flow as a 1" but the fittings and the pipe for that matter are not so large and bulky. I am trying to save as much real estate in the tank as I can while trying to keep functionality up as well. The pipe size isn't so large but a even a 1-1/4" bulkhead requires a 2-3/8" hole, and the widest part of the fitting really pushes my weir out into the tank. You did convince me to upsize all of the holes to the same 1 1/4" size though.

Wanted to mention that only one of your uploaded photo's are showing, at least on my computer.

I think I uploaded the plan view of the aquarium just in case you or someone sees something I should be aware of before I get pricing. Not sure how to get the photo to show in the text area. Looks like it will be an attachment.

Best,
 

Attachments

  • Built-in Aquarium.jpg
    Built-in Aquarium.jpg
    46.6 KB · Views: 9
my 1.5" bulkheads required a 62mm drillbit which is like 2.44", we just used 2.5", but the actual 62mm bits are not much bigger than 2 3/8 (2.375" vs 2.44"/62mm) so the difference to go to 1.5" isn't as big as you think, well, not unless you want to use schedule 80 bulkheads, then you need like a 3" bit, but that's totally unnecessary for the pressure levels we deal with, i wouldn't bother.

difference seems minor enough that it might not matter, but if you can find 1 1/4" pvc stuff, then by all means go for that, it's still better than 1" for sure. I'd have considered it for my 120 but i couldn't find any place to get 1 1/4" PVC other than ordering it online, dont think home depot or lowes has 1 1/4"

after looking at your plan, i do wonder if your bulkheads are actually too close together. I'd almost consider making the weir wider and adding more space between the bulkheads. Enough space that you can fit either a sideways T plus a 90, or a double 90, in between one or two of the pipes.

Like this basically, if your standpipes are too close, you wont be able to do this without it hitting them:
http://www.saltcorner.com/Articles/ArticlePics/durso1.jpg

Remember, you're gonna want some kinda double 90 setup or T+90 setup for the trickle line, you basically want the trickle line to be a durso standpipe like the one above. The full siphon you could cheat and just make the standpipe really short and put a strainer on it. You might even be able to fit the durso on top of the strainer if you get it all just right, that's like what I did:
http://www.xero.cc/fish/120_overflow_exterior2.jpg

see the double 90 is literally sitting on top of the strainer. that strainer on the bottom is my full siphon and the double-90 is my durso/trickle line, there's a tiny hole drilled in the corner of the other 90 that you can't see in this photo. this acts as the "air hose" or whatever that you'll often see people put on there.

the emergency needs the least room since it can be a straight pipe with nothing else.

i used a low profile strainer because my external weir is only 5" deep, but your weir is nearly tank height so if you make the siphon line sit pretty low in the weir, then you can use something like this even:

http://www.aquariumspecialty.com/me...39433887a97daa66f/s/l/slip-scree-strainer.jpg

then have the durso sit on top.

otherwise, you need to leave enough room so you can do something like this
https://i.ytimg.com/vi/tWMzmiU3wDY/maxresdefault.jpg
 
Last edited:
Thanks again for the input LXXero.

I am planning on going with schedule 80 fitting for the bulkheads. I read that the schedule 40 has a record of occasional breakdowns over time, where the schedule 80 basically never breaks in these situations. I'll take the never having the experience of that happening.

I was planning on ordering the parts online, I do that a lot anyway. I'm thinking after reading your comments though that it would be a good idea to go ahead and order the parts and do a dry set up to make sure that the spacing of the holes works.

You mentioned that the primary siphon drain doesn't need the u shape on top and it would be just fine to leave it pointed upward with a screen. That makes sense, I wondered if the down turn was needed in this situation.

I seen this strainer on the Durso Standpipes site . It looks like it would be hard to plug up accidentally. Was thinking since I have so much height I would use this one.

strainer-125-side-500x500.png


Best,
 
yeah, if you don't have enough space to do the "U" on both the siphon and the trickle, just do it on the trickle, and stick the trickle above the siphon (which, the siphon should then have a strainer on it). just dial the siphon back so you get a slight trickle and that should also hopefully be enough to prevent any venturi into it. This is not a very frequently discussed method to do the full siphon on a bean, but i've had great success with it, not sure why we don't see it more often (the double-U's with the 2nd having an airhose/being a durso is seen in most photos by far...)

i've read similar here or there, but i think it's mostly subjective. The real truth is, rubber seals can wear out over time. schedule 80 nor 40 are impervious to this. however, bottom drilled holes are definitely going to be taking more pressure than side drilled holes, it certainly can't hurt.

From what i've seen in practice, if you're going to get failures from anything on bulkheads, it's going to be from either over/under-tightening (not just the bulkhead itself, but also the fittings into the bulkhead, in the case of slipxthread or threadxthread bulkheads), or from badly drilled holes resulting in bad chips/gouges in the glass, in that case, using a schedule 80 bulkhead might help because they have a bigger flange, and so it might cover up a big chip around the hole, covering up the mistake, essentially.

yes you should try to dry fit for sure. and if you're using 1 1/4" make sure you can get all the fittings you need in that size. also if you're using thread, check all the correct threaded fittings are available in that exact size. i can tell you in my experience finding threading PVC fittings much above 3/4" in most local hardware stores is pretty uncommon, so i've ordered a fair amount of larger threaded stuff online.

that strainer looks awfully long is my only concern. as long as you dry fit it should be OK. Those ones from lifegard are pretty nice and they aren't as big, they even make the super slim flush ones that I went with, but you just need the regular ones.
 
I've had a BA overflow on my 40 breeder for about 9 months now, and it is fantastic. I went with the original plans as outlined on the BeanAnimal.com site (so I've got the ball valves and 3 of them). No biggie.

The one issue I'm having, and I'm wondering if it's common, is that upon restart, I never get a true full siphon through the full siphon line. I have to open it up all the way, then dial it back, which is a bit of a PITA. I'm wondering if this is because the full siphon and open channel (the one with the airline) are drilled at the same level in the back of the tank as shown in the original plans.

Has anyone else run into this, and if so, what have you done to make the system restart more hands-off? Obviously, I can't "undrill" the tank to bump the level of the open channel up. I don't think that drilling a small (or not so small) hole in the top of the open channel's elbow would do any good...it's already got an airline. Similarly, I don't think that shortening the length of the downturned portion of the elbow would do any good either.

Edit to add...I'll have to double check how far below the waterline the full siphon and open channel pipes are in the sump. Should they be the same depth, or should the full siphon be "just below" (1/4 inch maybe?) with the open channel a little deeper?

Thanks in advance for any suggestions.
 
Last edited:
check out some of the discussion over in this therad, we're talking about nearly the same thing:

http://reefcentral.com/forums/showthread.php?t=2583363

I'd try to extend the siphon line further down the water using a small piece of PVC or etc....also you can drill the full siphon line to break the bubble in there, but it has to be drilled low as opposed to higher up as on the trickle line. i have a picture i attached in that other thread demonstrating what i mean....

another thing to double check is the depth of the pvc in the sump, you only want the pipes 1 - 2" under water max

Thanks for the pointer here. Just to wrap my issue in this thread (I'll followup in the other if needed)...my open channel ends higher up than the full siphon, so I'll make a quick fix this weekend and hopefully that resolves it.
 
I'm currently in the planning stages for a new nano tank - the Mr. Aqua 12 gallon long bookshelf tank with a 20 gallon sump. Is it ridiculous to consider doing a ghost overflow style internal coast to coast/external overflow with the 3 bean animal pipes? My original plan was to do this on the 60 gallon cube build I was working on, but I've recently decided to downsize and I'm not sure if my original plan will be overkill on this nano. If not, what diameter pipes would be best? Thanks a bunch for any feedback!
 
I'm currently in the planning stages for a new nano tank - the Mr. Aqua 12 gallon long bookshelf tank with a 20 gallon sump. Is it ridiculous to consider doing a ghost overflow style internal coast to coast/external overflow with the 3 bean animal pipes? My original plan was to do this on the 60 gallon cube build I was working on, but I've recently decided to downsize and I'm not sure if my original plan will be overkill on this nano. If not, what diameter pipes would be best? Thanks a bunch for any feedback!

i mean, it'd work, but you could downsize the pipes big time. honestly the flow rate of a 12 gal tank is not going to be high enough to be that noisy in the first place. it might be overkill. i'm actually doing a 60 cube myself, i may or may not do a herbie/bean on it....its got 2x1" holes so i could totally do a herbie but may just use the tank's factory setup since the amount of flow i'd get from a 1" durso is probably enough for a 60g anyway....and the sump space and all that is much more limited on a smaller tank. it's really just about what you're trying to achieve flow wise / noise wise.
 
I'm currently in the planning stages for a new nano tank - the Mr. Aqua 12 gallon long bookshelf tank with a 20 gallon sump. Is it ridiculous to consider doing a ghost overflow style internal coast to coast/external overflow with the 3 bean animal pipes? My original plan was to do this on the 60 gallon cube build I was working on, but I've recently decided to downsize and I'm not sure if my original plan will be overkill on this nano. If not, what diameter pipes would be best? Thanks a bunch for any feedback!
I did similar with my 6gal nano but my return pump didn't have enough flow. The box kept draining too quickly resulting in a flushing noise. I ended up blocking the open channel and running it as a herbie type drain.
 
As good as it is, a beananimal system is really overkill for a nano tank. A herbie, or even a durso system will work quite well
 
As good as it is, a beananimal system is really overkill for a nano tank. A herbie, or even a durso system will work quite well

I would recommend a Durso type standpipe, with a decent flat weir overflow box. A nano just does not have the flow rates to require a high performance overflow/standpipe system. So good advice here. The herbie is overkill as well though.
 
I would recommend a Durso type standpipe, with a decent flat weir overflow box. A nano just does not have the flow rates to require a high performance overflow/standpipe system. So good advice here. The herbie is overkill as well though.
I decided to go with safety, even the relatively small volumes involved with a nano can still make a divorce inducing mess. ;)
 
Within the couple hundred pages here I think someone has shared whereabouts the bulkheads are drilled for this setup. I am drilling for 1" bulkheads on a 6' 125 gallon. From what I understand, 2.5" down from the inside lip of the trim?

The top of coast to coast overflow box should line up with the bottom of the trim around the outside of the tank?

The siphon elbow should be 3/4" from the bottom of the coast to coast box?

The top of the upturned emergency elbow should be 1" underneath the top of the coast to coast box?


The diameter of the hole u are drilling is what decides how far from the top or edge of the glass u want to drill. Most 1" bulkheads call for a 45mm hole which is 1 3/4",So u would be 1 3/4" from the top of the tank to the top of your hole. So it will be 2 5/8" from the top of tank to center of your hole. U also want to have a minimum of 1 3/4" of glass between the holes. It can be more but not less. This is assuming your bulkheads call for 1 3/4" holes. If yours are different just do the math but I wanted to give a example incase I didn't explain it well.

Your emergency is going to be what it is. It doesn't have to be 1" below your overflow & it probably won't. If it ends up 1/4" or 1/2" u will be fine. Drill all your holes for the bulkheads the same height & let the emergency just be what it is.

The syphon elbow being 3/4" off the bottom will be fine. But that will be determined by how tall u build the overflow box. Mine is about 1/2" off the bottom & it works fine.
 
Within the couple hundred pages here I think someone has shared whereabouts the bulkheads are drilled for this setup. I am drilling for 1" bulkheads on a 6' 125 gallon. From what I understand, 2.5" down from the inside lip of the trim?

The top of coast to coast overflow box should line up with the bottom of the trim around the outside of the tank?

The siphon elbow should be 3/4" from the bottom of the coast to coast box?

The top of the upturned emergency elbow should be 1" underneath the top of the coast to coast box?

Here is a link with general tips on drilling. Post 7 in this thread has a diagram showing the minimum recommended clearances.
 
Hey guys,

I have a 225 72x30x24 with a center overflow. The bulk heads are 1.5 inch and the full siphon is 1.5, open siphon 1.25 and the emergency is 1 inch when inside the overflow.

Everything below the overflow reduces to 1 inch.

My issues:

1. I have a dc12000 pump that is maxed out and I have to close the Full siphon gate valve to almost closed to get the perfect height in the center overflow.

Should I get a bigger pump to solve this issue?

2. The full and open siphon are the same height inside the center overflow.
Should I make the Full Siphon pipe a little lower than the open siphon?

Ive noticed that when I have the full siphon gate valve closed too much, the open siphon starts to suck up much more water than it should. This leads to think that I need a valve on the open siphon as well. Never had one before on an open siphon bean animal drain.

Would making the closed siphon pipe lower solve this problem?


Thanks!
 
Why did you downsize the plumbing?

General comments:
  • If you downsize, it creates a stricture where snails will tend to get stuck - they crawl in the larger pipe and get stuck at the reducing bushing
  • If the siphon channel can handle the flow and isn't all the way open, you should be fine. In general perturbations in return flow will cause less rather than more flow. Even if you go up a bit, you have overhead to handle it by nature of the bean's design.
  • Smaller diameter pipe in the open channel can handle less flow quietly, so you have a smaller bandwidth, or range of quiet flows the system can handle.
  • What you describe with the open channel becoming noisy as you close the siphon gate is expected behavior. Closing the gate increases the flow in the open channel above the point where it operates quietly.

Is the gate valve closed at all or completely open? Unless it's completely open, you should be fine. It's probably too late, but if you have a section where you downsize the pipe, it's a good idea to have it removable for the reason mentioned above.

Increasing the open channel diameter will give you more headroom before you get noise; that may not be necessary, though.

I would increase the diameter of the dry emergency to ensure that it can handle the required flow since it generally won't operate as a full siphon even if the other two are clogged due to it's proximity to the surface of the water.
 
Why did you downsize the plumbing?

Agreed, if anything, he should have did the exact opposite of what he did.

Emergency 1.5", open channel/trickle 1.25, and full siphon 1", would make a lot more sense to me, than the opposite. With the emergency being 1" and the siphon and trickle being larger, this basically means the emergency is way undersized.

I always suggest the largest emergency possible. Or the largest pipe to be used as the emergency...

Short of that, I'd suggest lowering the full siphon.

Don't put a gate on the open channel - you're essentially defeating the safety mechanisms if you do that. You may as well run a herbie! (OK it still might be better than a herbie, but not with a single 1" emergency for 2x over 1" tuned siphons!!!)
 
Last edited:
Back
Top