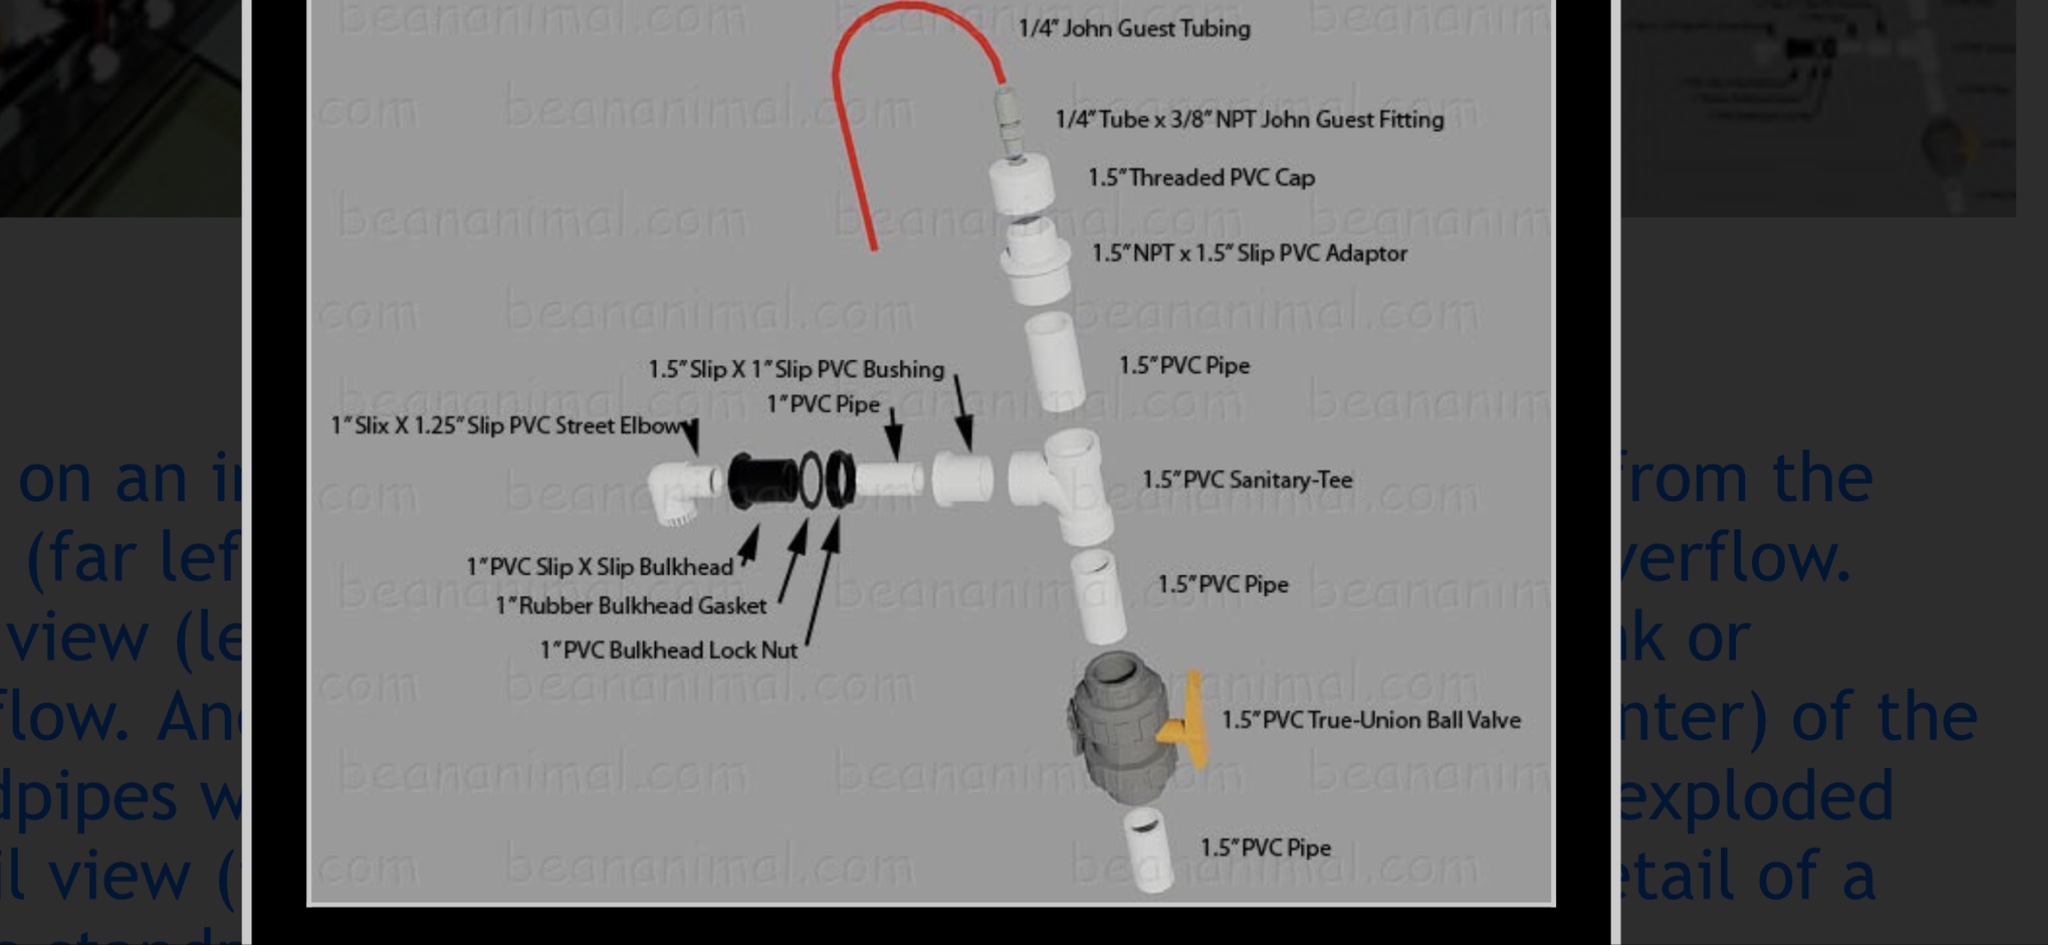
Silent and Failsafe Overflow System

They can be even but being u have a exterior box I would place the open channel atleast 1/2" to 1" higher then the syphon. With them the same hieght u can have a issue with the syphon purging it's air. What happens is the open channel takes on water before the water builds up enough to purge the air from the syphon, making it take longer to purge if it does at all. So by placing the open channel higher it eliminates the possibility of that issue.

When I have a interior box & the 90's go straight into the bulkhead in the back of the tank then I drill the holes the same height & the open channel & syphon are even. With a exterior box where the bulkhead is in the bottom I always place the open channel higher then the syphon

Awesome,

Thanks LSU, You're saving me a lot of headaches!!!
 
Can someone point me to the discussion about the height of the various drains relative to either the bottom or the tank, height of the weir, and/or height of the tank?

Alternately, here's my thoughts:

1. Siphon pipe: the height of the siphon drain doesn't really matter. You can tune the water level in the overflow box using a gate valve on the siphon line so the water level in the overflow box is just below the bottom of the teeth of the weir to minimize the height that the water falls, and therefore minimize the noise of the falling water. But really the gate valve is just to match the siphon drain to the flow rate of your return pump. Then you can manually add or subtract water to the overflow box to get it to the height where there is just a trickle in Emergency drain #1.

2. Emergency drain pipe #1 (Durso): Set the height of the first emergency drain (elbow down, with the airline, aka a durso) so that the bottom of the inside of the upside down U formed by the elbow pointing down (aka the height at which water begines to flow into this drain) is just below the height of the bottom of the teeth of the weir. This, combined with the water height set by the siphon gate valve, ensures that only a trickle of water flows down this emergency drain. Airline is optional but recommended to create a true Durso that will operate in non-siphon mode. Note that this drain will also function in siphon mode whenever the water level reaches the height of the airline input. Ideally, this should occur before Emergency drain #2 kicks in if you set the height of Emergency drain #2 as described below.

3. Emergency drain pipe #2 (the open pipe): set this higher than the Emergency drain pipe #1. Ideally higher than the top of the inside of the upside down U in Emergency drain pipe #1 (or the height of the air line input to Emergency drain #1 if using an airline) so as to allow Emergency drain pipe #1 to enter full siphon mode before Emergency drain pipe #2 kicks in. ALSO, the height of this open channel should be at least 1/2 to 1 inch below the height of the top of your tank!!! Lower is better. Otherwise you may not get the flow you need in Emergency drain #2 to handle the flow from your return pump if the siphon and emergency drain #1 both fail. It may be a good idea to upsize this drain pipe compared to the size of the siphon drain and Emergency drain #1 because this pipe, when used, will rarely be in siphon mode. So, for example, if my siphon drain is 1 inch pipe, I set my Emergency drain #1 as 1 inch pipe and Emergency drain #2 as 1.5 inch pipe.

So ideally there is a relationship between the heights of Emergency drain #1, Emergency drain #2, the height of the teeth in the weir, and the total height of the tank.

I welcome any comments or (constructive) criticism of the above; we're all trying to design the safest, quietest solution possible. :)
 
Last edited:
Can someone point me to the discussion about the height of the various drains relative to either the bottom or the tank, height of the weir, and/or height of the tank?

Alternately, here's my thoughts:

1. Siphon pipe: the height of the siphon drain doesn't really matter. You tune the water level in the overflow box using a gate valve on the siphon line so the water level in the overflow box is just below the bottom of the teeth of the weir to minimize the height that the water falls, and therefore minimize the noise of the falling water.

2. Emergency drain pipe #1: Set the height of the first emergency drain (elbow down, with the airline, aka a durso) so that the top of the upside down U formed by the elbow pointing down (aka the height at which water begines to flow into this drain) is just below the height of the bottom of the teeth of the weir. This, combined with the water height set by the siphon gate valve, ensures that only a trickle of water flows down this emergency drain. Airline is optional but recommended to create a true Durso that will operate in non-siphon mode.

3. Emergency drain pipe #2 (the open pipe): set this higher than the Emergency drain pipe #1. Ideally higher than the top of the upside down U in Emergency drain pipe #1 (or the height of the air line input to Emergency drain #1 if using an airline) so as to allow Emergency drain pipe #1 to enter full siphon mode before Emergency drain pipe #2 kicks in. ALSO, the height of this open channel should be at least 1/2 to 1 inch below the height of the top of your tank!!! Lower is better. Otherwise you may not get the flow you need in Emergency drain #2 if the siphon and emergency drain #1 both fail.

So ideally there is a relationship between the heights of Emergency drain #1, Emergency drain #2, the height of the teeth in the weir, and the total height of the tank.

I welcome any comments or criticism of the above; we're all trying to design the safest, quietest solution possible. :)
What you are calling Emergency Drain #2 is actually the open Channel and it is responsible for determining the height of the water in your overflow box. The concept is that the siphon handles the majority of the flow while a minimal amount flows through the open channel. Siphons are silent, and since the open channel has a very low flow and low turbulence, it will be nearly silent also. The Emergency Drain should be set at your maximum level for tank water. The end of the airline tube from the top of the open channel should be attached just below the level of the Emergency Drain, so that when it is covered, it turns the open channel into a siphon also in the event that the designed siphon should clog. At this point, your overflow should start making noise to alert you to an issue with the drains.

Sent from my SM-G930V using Tapatalk
Sorry, I appear to have confused the terminology. You are correct in that Bean labels the open channel as having the airline tubing. I have added the label of "Durso" in my post above to try to clarify. So my "Durso" is Bean's "open channel". Although I find this confusing as I tend to think of "open" as not having any junk (e.g., Durso) on top of the pipe.

I also agree that one of the non-siphon drains should set the water level in the overflow box.

So are Emergency drain #1 and #2 both set at the same height? Meaning that both will have a trickle of water during "normal" operation? Based on the directions of the elbows, it looks to me like the Durso kicks in (starts to drain water in non-siphon mode) before the non-Durso sees any water. Whether the non-Durso kicks in before the Durso goes into siphon mode is still a question to me.
 
Last edited:
Sorry, but I'm confused on the terminology. I'm saying that Emergency drain #1 has the airline tubing. You say that the "open channel" is Emergency drain #2, but then you also say that the open channel has the airline. That seems to be mutually exclusive.
There are three pipes. The siphon, the open channel, and the Emergency Drain. The open channel has the airline and under normal operation only allows a small amount of water to pass through maintaining the silent function. When the water level rises to cover the end of the airline it turns the open channel into a siphon. Under normal operation, there is no water flowing in the Emergency Drain, a small amount in the open Channel, and the majority in the siphon line

Sent from my SM-G930V using Tapatalk
 
I agree with Doug on everything except the hieght of the airline. It is best to have the end of the airline just above the emergency, not below it. So the open channel making a syphon is really supposed to be the last line of defense, Incase both the syphon & emergency get clogged. On some setups it doesn’t really matter, especially with exterior boxes because of the height differences between the standpipes. On other setups it can cause issues on startup. What can happen is the airline gets covered & empties the overflow box before there is enough pressure to purge the air from the syphon. It is better if the emergency takes a little water on startup because it won’t empty the overflow box & gives the syphon a chance to purge its air. Like I said, it isn’t a issue on all setups but it can be on others.

I think we tend to overthink things at times. Like Doug mentioned, the valve on the syphon is what sets the water level inside of the box but it is actually the open channel that determines the water level. On ghost type overflows with the pass thru holes & exterior box u usually want the water level 1/4 to halfway on the pass thru holes. There isn’t a point in being any higher & if u get it lower then the pass thru holes the waterfall entering the box makes noise. So set the open channel 1/4 to halfway up on the pass thru holes & set the emergency 1” to 1.5” above that as long as it is still 1” to 1.5” below the top of the box. It’s really pretty simple
 
Last edited:
I saw beans original design and it looks like all bulkheads were drilled at the same height. Now I see other people putting the full siphon lower than the open channel. They are drilling my tank now with the picture below. Is this going to work with the bulkheads being at the same height?


8d23ce312fb22f8c475aeb22c161dc37.png


Sent from my iPhone using Tapatalk
 
You can simply turn the elbow down on the siphon as opposed to up so that the opening is lower and it is more likely 2 start prior to the open channel taking in water

Sent from my SM-G930V using Tapatalk
 
Drilling them the same hieght is fine as long as u don’t do other things in the plumbing that make it harder for the syphon tonpurge its air. So don’t place a bunch of 90’s or have horizontal runs in the plumbing & don’t submerge the end of the drain to far into the sump & u will be fine.

The reason for drilling the open channel 1/2” or so above the syphon is so the open channel doesn’t take a bunch of water before there’s enough pressure to purge the air from the syphon. It won’t be a issue if it’s plumbed how bean designed.

U can drill them the same hieght & It won’t be a issue if u plumb it correctly. If u have no choice & have to use a few 90’s or u have to run a section horizontal then it may be a good idea to drill the open channel & emergency 1/2” or so above the syphon.

Something to consider on your hole spacing is where they will be entering the sump. U want as straight of a shot as possible to the sump. The emergency can enter the sump anywhere so it doesn’t really matter, but depending how your sump will be laid out u may consider drilling the first hole more to the end of the box & having the open channel & syphon closer together then 135mm. So drill the first hole 67mm from the edge of the tank to center of the hole, then 90mm from center of the first hole to center of the second. Doing it that way the syphon & open channel would be as far to the end of the overflow box as possible & gives u the straightest shot to the sump if u are using a conventional sump. U want to do everything possible where the only fittings u use in each drain line is 2- 45’s.
 
Last edited:
That may just be a picture from before u where complete but make sure u add the airline to the open channel. It is a very important piece to the overall drain setup
 
That may just be a picture from before u where complete but make sure u add the airline to the open channel. It is a very important piece to the overall drain setup


Right! I did add the airline after I put water in it. I had to have the airline right at the emergency overflow level otherwise it would drain the overflow before the full siphon had a chance to kick in.


Sent from my iPhone using Tapatalk
 
I thought that pic may have been from before u where finished. It didn’t look like it was in its permanent place yet. Yes,that is why the airline is supposed to be just above the emergency. Its ok if the emergency takes a little water on startup it won’t drain the box, so it gives the syphon a chance to purge the air. If the airline is below the emergency then the open channel will syphon & empty the box before the pressure is enough to purge the air from the syphon.
 
Last edited:
Yea, I thought that pic may have been from before u where finished. It didn't look like it was in its permanent & yes, that is why the airline is supposed to be just above the emergency. If the emergency takes a little water on startup it won't drain the box, so it gives the syphon a chance to purge the air. If the airline is below the emergency then the open channel will syphon & empty the box before the pressure is enough to purge the air from the syphon.


I am so happy with this overflow! It's ridiculously quiet


Sent from my iPhone using Tapatalk
 
Can anyone direct me to a chart/ calculator for siphon rates of pipe/ bulkhead sizes?

I know I saw one in this thread, but I don't really want to have to search through all the pages

Sent from my SM-G930V using Tapatalk
 
Quick question.

First of many most likely as I'm about to place an order for a 300+ us Gall tank and I want to get it right.

How much space do I need behind the tank for the plumbing if using an internal overflow box?

I'm thinking 6" but may get away with less if I place the valve(s) down at the sump end of the plumbing.

This will be my first ever set up for marine although we intend to use it as a tropical planted for a number of years first.

6" is a good starting estimate.. Once you have all the plumbing mocked up then you can determine the exact distance based on the plumbing selections you have made and how you cut everything...
 
Thanks mcgyvr.

Anyone got a page number for the parts list? I ran a search and only came up with people talking about the parts list lol?

Also at 314 us gallons should I be going bigger than 1"?
 
Back
Top