DIY Stands Template and Calculator

Ok need some feedback on a stand.

Tank is 72" x 60" x 20"(tall) acrylic, 3 side viewable, 1-60" side the "front" and 2-72" sides.
Under will be a refugium that I want visible via two sides, approximately a 36" viewing window in the "Front" and 60" on one of the sides, approximately 12-16 inches tall. I also want to get away with not putting a beam in front, so there will be some asymmetry to the legs.
Top with 2x6s, and across as well so the entire bottom of the tank is supported, 3/4" ply on the top.
I would like a bar/counter top around the whole thing too, so I'm looking for the top of the stand probably at 42"
Here's the kicker, I want all the openings to be removable panels, so no plywood screwed into the sides. I realize this will really hurt for strength in the lateral directions, so I'll throw in some gussets instead to hopefully add enough strength.

I plan on using some reclaimed 2x4s that are pushing 50 years old, these things are old growth, have nice sharp corners, and can't ask for any more dryness to them :D 
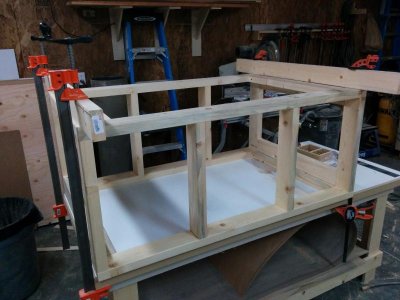
I haven't put a tape on them yet but I wouldn't be surprised if they're larger than existing 2x4 material you buy at the big-box.

Here's a quick sketch up I did by hand, I swear the two sides are parallel, guess the camera fisheyed it a bit :D I notice I didn't draw gussets on it.
y18q.jpg

Thoughts?

Also what's the fastener of choice? Pocket screws? Deck screws? Gold screws? I did one stand with no screws, nothing but biscuits, dowels and glue, and it's holding quite fine (don't want to do that again though, way more work)
 
Hey guys. Quick question, I'm building my stand for the 190, 60"x27"x27". My floor is out of level from left to right.over the 5' span 3/8".its a concrete slab. Should I rip my bottom of stand at an angle to accomidate slope and keep top level? Or should I build square and shim to level right before I nail baseboard? Thanks guys!
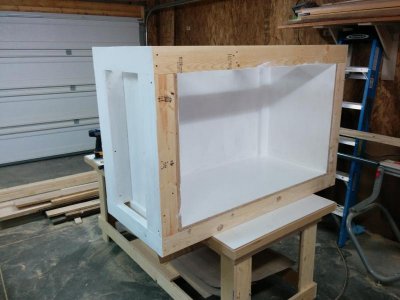
Build the stand true and square. Use leveling compound to create a pad where the stand will sit. If you might move the stand some day, put landscape cloth under the compound, It will hold it in place now and act as a release if needed in the future. With an acrylic tank you want solid support everywhere possible under the tank bottom and sand or plane away the imperfections of the surface the tanks rests on.
 
The plans do say:
These will be sized according to length: 2X4 for 48" or less for smaller tanks (Rule of thumb is 75g-90g); 2X6 up to 72" with 125g-150g being acceptable

It looks like you can maybe get away with 2x4's but you are in-between and using 2x6 is VERY small amount of money so, why not just use them.
They are just for the top and can still use 2x4's on the bottom.
 
Ya they say 2x4 for 48" span but doesn't directly state for a 4' 120 which is wider and weighs more. That's what I was thinking, 2*6 up top and 2*4 down low
 
Ya they say 2x4 for 48" span but doesn't directly state for a 4' 120 which is wider and weighs more. That's what I was thinking, 2*6 up top and 2*4 down low
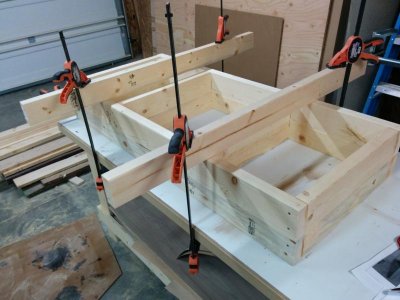
I just double them, putting a half inch plywood piece between. I drop the inner 2x4 by 3/4" which creates a lip for a plywood shelf.

 
Stain

Stain

I used a Gel stain to get darker to match my furniture. It isn't as dark as the photo but still dark as the rest of my stuff.
I still need to touch up a side tomorrow, then 2 coats of poly.
 
This is the start of my stand. This shown is the core and will have additional cabinets on each end with maybe drawers but not sure. I cut all the pieces on my table saw so the lengths would be exact. I assembled using PL Premium Glue and Water Resistant Carpenters glue and 3" screws. I lined it with exterior grade 3/4 G1S plywood and covered it all with two coats of mold/mildew resistant pain. The top with be 3/4" Meddex covered with plastic laminate and trimmed in solid Maple. I will paint the underside of the top with the same paint so all wood surfaces will be sealed. I will end up trimming the whole stand in Maple and Purpleheart for the color contrast.

The pics show the pieces I started with, clamping them square until the glue dries, the lining before paint with the seams caulked with silicone, and finally painted. I will cover the finished wood with several coats of laquer and I'm set up to spray it and I like natural, unstained wood. When I do the plumbing I will use a hole saw to cut through the plywood as I prefer a nice clean look. I will hopefully get it finished this weekend or close to it.
 

Attachments

  • IMG_20140209_125625.jpg
    IMG_20140209_125625.jpg
    53.3 KB · Views: 3
  • IMG_20140208_110143.jpg
    IMG_20140208_110143.jpg
    58.4 KB · Views: 3
  • IMG_20140208_184844.jpg
    IMG_20140208_184844.jpg
    58.6 KB · Views: 3
  • IMG_20140209_113333.jpg
    IMG_20140209_113333.jpg
    51.3 KB · Views: 3
Quick question. Forgive me for not reading all 300+ pages. This may have been mentioned.

My tank is a standard 55 gallon. I want to build a new stand. I will want to upgrade to a 90 gallon in the future. I'd like this new stand to accommodate a 90 gallon. Stand will come before the tank though. I understand it's best to have the 4 corners of the tank directly over the 4 vertical supports. I can't do that with this new stand design. Is that a problem? The stand frame will be too deep front to back. I don't want to put in additional vertical supports because I want a door on the ends as well to enable easier access to stuff and enable me to slide a sump into the stand which a center vertical support would prohibit.

You can make a bigger stand and build a flat top to spread the load. I have a pic of an entertainment center I built which explains what I'm talking about. Although this is not built for a tank it would likely support a 90 gallon tank due to the fact the top distributes the load over the gables as opposed to a point load of the corner of the tank over the corner of the stand. It's basically built like a kitchen cabinet in most respects only with a stronger counter top substrate that will support the load.

I am currently building a stand that emulates this to a point as they are going in the same room. The top will end up being 24" x 84" but the tank will be sitting in the middle of the strongest part of the cabinet. I wanted to have the extra counter top for when I do water testing or whatever, I like lots of room. although the core of the cabinet is meant for a 90 gal I could easily go to a 120 and the stand would support it np.
 

Attachments

  • IMG_20131229_105806.jpg
    IMG_20131229_105806.jpg
    57.6 KB · Views: 3
I used a Gel stain to get darker to match my furniture. It isn't as dark as the photo but still dark as the rest of my stuff.
I still need to touch up a side tomorrow, then 2 coats of poly.

Thanks. I was thinking just black on the exterior and white inside. I thought I read about people using that killz stuff or whatever ? Not looking to stain. I want paint/sealer
 
There is plenty of primer and sealing, moisture paint out there. You can also do gel stain in black to show some wood grain and I believe it would soak and seal into the wood better.
That is "NOT" coming from a paint expert LOL
There is nothing worse then looking at a mint reef tank and seeing paint peeling and wood rotting on a stand. I see it all the time...

IMG_0884_zps44132b2f.jpg
[/URL][/IMG]
 
Thanks, Will most likely just do 2x6 top frame :) Overkill is ok. Also what are you guys using to paint/seal the wood?
I prefer the doubled 2x4's because they are less likely to bow or twist than a 2x6, and will flex less under load.


I use a stain followed by two or three coats of polyurethane on the outside and black or white two phase epoxy on the inside and hidden surfaces.


I can leave the frame as is for top and bottom tanks, or put on a shell for a cabinet.
 
I have looked through hundreds and hundreds of posts but haven't seen this one covered. My issue is that tank and sump are same length.

Tank - 48 x 24 x 24
Sump - 48 x 13 x 21

I would like to be able to slide my sump in without a center support so I plan to use 2 x 6 on top following the main design used in this thread. In order to do so I need to frame at least a 50" opening. I was thinking of extending the stand at least 6" on each side of the tank. Basically a 4' tank on a 5' stand. Following the accepted design the vertical support will be out past the ends of the tank. So, even if I put a cross brace in order to support the 24'' ends of the tank I would have nothing to support it from below. Sliding the sump in from either end won't work either because the whole unit fits in a 7' nook.

I am at a bit of a loss as to how to make this work or if the ends can go unsupported.

On option might be to build a 4' stand and angle the 13" wide sump into the 24" space but it might be tight with the 2x4 verticals on the ends..

Any ideas welcome! TIA
 
If you have a flat top the weight should be distributed enough that you can make a stand with a 50" opening. Using 2x6 for the top rail will be enough to carry the weight. see my post on the previous page, the opening is 46" which fits my sump and a 48" tank on top. I used 2x6 ripped down to 4" on the top and it would probably support a 120 gallon easy. if you used 2x4 with L shaped corners it should work. The biggest thing is to brace for shear load so the stand won't rack.
 
I have looked through hundreds and hundreds of posts but haven't seen this one covered. My issue is that tank and sump are same length.

Tank - 48 x 24 x 24
Sump - 48 x 13 x 21

I would like to be able to slide my sump in without a center support so I plan to use 2 x 6 on top following the main design used in this thread. In order to do so I need to frame at least a 50" opening. I was thinking of extending the stand at least 6" on each side of the tank. Basically a 4' tank on a 5' stand. Following the accepted design the vertical support will be out past the ends of the tank. So, even if I put a cross brace in order to support the 24'' ends of the tank I would have nothing to support it from below. Sliding the sump in from either end won't work either because the whole unit fits in a 7' nook.

I am at a bit of a loss as to how to make this work or if the ends can go unsupported.

On option might be to build a 4' stand and angle the 13" wide sump into the 24" space but it might be tight with the 2x4 verticals on the ends..

Any ideas welcome! TIA

Over sizing the stand should not be an issue If a 3/4" plywood panel is let in as a shelf. Diagonal bracing inside the top corners or trimming down wider stock verticals to a 2x4 near the bottom would help support.

Alternatively, build the sump in place as part of the stand. That way it does not have to be slid in. If it's glass, you silicone it in a piece at a time, or the 45 mill pond liner can be used if you don't mind losing "transparency".

I still like one old pro at the marine tank game did for his sump. He had a big rectangle cut out of the concrete slab floor and had room to build about a thousand gallons in the subterranean sump which had a wood floor and trapdoor built over it with multiple saltwater tanks above it.
 
I'd like to avoid building the sump in permanently - commitment issues on my end..

I think I might build it as if it were a 60" tank, but put additional vertical braces on the back about 5 inches in to support the tank corners or maybe just one in the middle. I could also screw one into the front once I have the sump in. At least the front vertical would be moveable in case I ever had to remove the sump. In either case the 2x6 60" long boards will be taking the load and distributing to the verticals. I guess I could plywood the top as well to help distribute the load at each short end of the tank but I'm not sure that would help all that much..
 
I am somewhat new the hobby except for a few years with a Nano. So, I haven't considered much more than a Skimmer, ATO, and good lighting as well as keeping my costs in check. My plan is to start mixed reef. I picked up the 55 gal for a DIY sump at a 1$ sale so trying to make that work. If your point is that I should think about extra room under there then maybe I should go with a 6' stand leaving 2' of play area underneath for when the full addiction sets in???
 
Back
Top