DIY Stands Template and Calculator

The stand for my 120 with external overflow. It is just the structural part.

image-L.jpg


image-L.jpg
 
Thank you RocketEngineer. Building to the plans you originally posted would work with just swapping the upper frame to 2x8.
As far as the plywood top goes, I'm going to use two sheets of 3/4 ply. Is it fine to drive the screws from the top as long as they're countersunk?

Why do you need two sheets? As long as they are below the surface they should be fine. Another option would be pocket screws from the bottom which is my personal preference.
 
I guess two sheets would be overkill. One sheet fastened with pocket screws works for me.
I will post pics when completed. Thank you for the help!
 
This is not a steel stand thread. :hammer:
Awe :( "Don't be hatin" :D

In any event I had my engineer buddy check out my design, for those who were curious, anyways the design is good (again overkill but that is a moot point). The only reason I am going with steel over wood is the additional clearance I gain for access.

My sump is an 100g acrylic sump with a SWC 250 1A Cone skimmer, it needs approx 30" of clearance to remove the collection cup cleanly. With the amount of times I'll be under the stand I want to make sure its somewhat accessible. Wood reduced that clearance.

Thanks RE for your help.
 
I'm designing a new in-wall aquarium setup for the basement of my new house I'm building.

RocketEngineer - thank you for starting this thread, the initial post helped me tremendously. I'd appreciate your input/feedback on my design.

A little bit of background on the overall setup: the tank will be in-wall with a large fish room behind it. As you look at the front of the tank, both the front and left side will be exposed and visible. Here's a rough layout of the room:
FishRoom Layout 800x800.png

The tank will be 72"x30"x30". The top of the stand will be 40" above the floor.

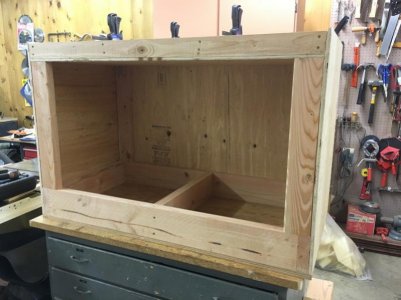
Here's the design of the stand:

Aquarium 800x800.png

This view is looking at the front of the tank, as if you were looking into the fish room. The top will be covered by plywood.

The stand is primarily 2x8 - the blue, red, and green are all 2x8. The brown lateral supports at the top are 2x4s.

What aren't shown are the supports that will go in each corner. I am planning to use a 4x4 in each corner.

Because the tank is in wall, I kept the stand on top of the 2x4 that will be used for the walls on either side of the tank. That necessitated adding 2x4s around the rest of the stand.

A few questions:
1) Is this sturdy enough and structured well enough to support the weight of the tank, rock, and water?
2) are 4x4s in each corner overkill?
3) Is 1/2" plywood sufficient for the top or should I increase to 3/4" or 1"?


Thanks in advance for your help!
 
A few questions:
1) Is this sturdy enough and structured well enough to support the weight of the tank, rock, and water?
2) are 4x4s in each corner overkill?
3) Is 1/2" plywood sufficient for the top or should I increase to 3/4" or 1"?

Thanks in advance for your help!

1) Go back to the first page. You need 2X8s for the top frame but everything else can be 2X4s. You don't need anything larger in the corners and you don't even need a center brace.
2) 4X4s are some of the worse lumber available. Two 2X4s are significantly stronger as well as much more dimensionally stable.
3) The plywood top depends on the type of tank. Is this an acrylic tank? Does the manufacturer require full support? I can't answer this without knowing more first.
 
I've been reading and asking questions for a while... finally took the plunge. Not 100% done, going to put a poly on it tonight and over the next few days, but I'm really happy with how it came out.

It has 2 dry sides, one will have shelves, the other will house all of the electronics. I have the doors on order and they will match our kitchen cabinets along with the stain color. It was built with 1/2 maple board, and ifor I had to do it all over again I would have went a different route. The maple was very hard to work with...


Last edited:
1) Go back to the first page. You need 2X8s for the top frame but everything else can be 2X4s. You don't need anything larger in the corners and you don't even need a center brace.
2) 4X4s are some of the worse lumber available. Two 2X4s are significantly stronger as well as much more dimensionally stable.
3) The plywood top depends on the type of tank. Is this an acrylic tank? Does the manufacturer require full support? I can't answer this without knowing more first.

Thanks for the quick reply and information!

The tank will be full glass - I don't have it yet nor have I ordered it, so I don't have any manufacturer information
 
Hows this its about 60 inches tall bolted to the wall and the 3/4 Birch plywood is screw to the top plate of the wall, I Used 2x10s 8ft x 20inches plus 4 sitting directly on top of the wall
 
RocketEngineer. Can you help me interpret the information you posted.


Looking at the tables in the document indicates yellow pine has a compression strength parallel to the wood grain of 16,800 kPa or 2,436 psi. Does this mean a 2x4 on end can carry a load of 8,526 lbs if supported properly? Sounds like an awful lot to me.

I'd like to use 4 single 2x4's legs to support the weight of a 180 gallon aquarium.

Thank you.

I like this site:
https://courses.cit.cornell.edu/arch264/calculators/example7.1/

2x4s on end are very strong, especially at the short lengths we're talking about for these stands. When you then add additional support like plywood sheeting they are 'hella strong' <-- official technical term. I'll be adding pics of mine just completed (for 120G) at end of this thread.
 
So mine's finally built. Did some painting tonight, more tomorrow.
Thanks to Rocket and everyone on this thread - so many great inspirations shared!

Even tho my 120G is framed glass, I wanted a 3/4" top to provide a 'ceiling' inside the stand to attach things to, and overall it stabilizes things well.

Lumber selection is critical. I went through at least 15 2x4s in the stack before I found enough that were true. Got luckier with the 2x6s, only had to pick through 7 or 8.

Structure is single 2x4s at each corner, 2x6 top frame, 2x3 bottom. 1/2" sheathing ply on three sides. I ripped 2x4s to make the 2x3s, effectively jointing and truing the edges in the process. I liked the result so much better than raw lumber that I took 1/8" off each edge of the 2x6s as well. Made them dead straight. Kinda wish I'd done the same for the vertical 2x4s.

Wherever plywood meets lumber I glued with construction adhesive (Liquid Nails) and attached with screws and/or staples.

Had to be careful when assembling the top and bottom frames - despite perfectly square cuts they wanted to rack just a little bit out of square overall. Measure your opposing corners! Mine were out by about 3/16". So I pulled them into square and temporarily braced with scrap plywood on the bottom to hold it square, then added the plywood tops. Lots of glue and staples later they of course stayed square.

Pocket screws are just dreamy. Attaching the 2x4 verticals with them went beautifully. I did it upside down since the top frame is so much heavier than the bottom.

Now that it's done I'm rather stunned at how incredibly strong it feels.

Sketchup really helped with the planning and visualizing, as well as figuring out the lumber purchase. I even used it to figure out the most efficient cuts.

OK, enough blabbing. On to the pics! First pic of the stand it's still upside down on the bench, sorry!
 

Attachments

  • IMG_4728.jpg
    IMG_4728.jpg
    60.9 KB · Views: 0
  • IMG_4733.jpg
    IMG_4733.jpg
    38.9 KB · Views: 0
  • IMG_4734.jpg
    IMG_4734.jpg
    43.3 KB · Views: 0
  • IMG_4735.jpg
    IMG_4735.jpg
    61.5 KB · Views: 0
I've been reading and asking questions for a while... finally took the plunge. Not 100% done, going to put a poly on it tonight and over the next few days, but I'm really happy with how it came out.

It has 2 dry sides, one will have shelves, the other will house all of the electronics. I have the doors on order and they will match our kitchen cabinets along with the stain color. It was built with 1/2 maple board, and ifor I had to do it all over again I would have went a different route. The maple was very hard to work with...

Nice work! I think I like the maple better before staining, but hey that's just me!
Love the side compartment.
 
I'm planning on using this design for a 30 gallon long tank. 36" by 12" by 16". I was wondering what size boards would be sufficient. 2x4's may be an overkill? trying to create space under the stand as much as possible. Any guidance would be great as this will be my first attempt at this
 
Using plywood, jointed with pocket screws + adhesive is going to allow a good amount of usable space in the compartment. Basically build a box with plywood.
 
Yep, depending on your shop capabilities, pocket screws may be the easiest. Biscuit joints or even just dados and glue will work. If none of those are options then 1 x 2 pine as screw strips at the corners would help with assembly. Essentially, you don't need anything more than plywood for that stand - just a question of how you can put it together.
 
Back
Top