DIY Stands Template and Calculator

Hi RocketEngineer,

Is it a good pratice on a rimmed tank (with plastic trim, its a marineland tank), to put rubber where the aquarium will sit? Or should it just sit on the plywood? If rubber is recommended, what size?
 
Hi RocketEngineer,

Is it a good pratice on a rimmed tank (with plastic trim, its a marineland tank), to put rubber where the aquarium will sit? Or should it just sit on the plywood? If rubber is recommended, what size?

Best practice is what the the manufacturer recommends. In most cases this is to place the trim directly against the top of the stand.
 
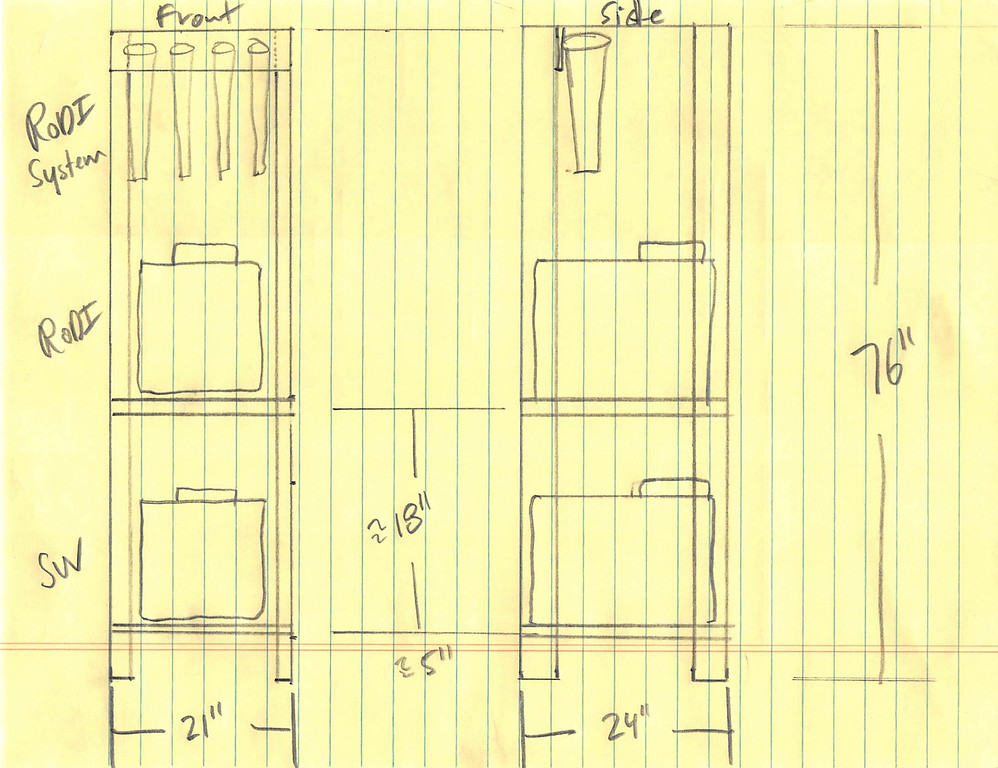
I have a question. I am gearing up to build a stand for a 22g Long tank. It is 36x12x12. However, I plan to add an overflow section on the side and need to accommodate for this as well. By my calculations, that would put my stand at roughly 42" in length. My question is, I have always built stands by way of RocketEngineer's specs. They have been overly done, but I have never had to second guess whether or not they were good enough. With this upcoming build, I'd like to keep the labor less intense and the costs fairly lower than my typical DIY $250-$300 wood stand range.

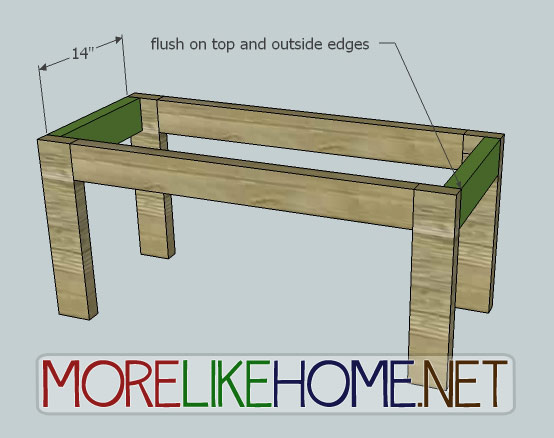
With that being said, I am aiming for making something similar to this (from Pottery Barn):
chatham-mahogany-buffet

Here's the link in case you can't view that pic.
http://www.potterybarn.com/products...&&coutdoor-bars-buffets#viewLargerHeroOverlay

Obviously I do not want all that front storage and such, but what I am looking at is the structure of the stand. I want to use posts like the ones pictured vertically here. I am not sure if these are 2"x2" wood pieces, but would like to use something similar. My goal is simply to have the uprights, the long run wood, which I think I may be able to get away with 1"x4" and I would use a Kreg Jig in order to maximize on the space inside the stand for sump and other stuff. I do not plan on having the whole thing as high off the ground as pictured, but would like it at least an inch or two off the ground.

I do not plan on fully skinning it. On the back-side, I plan on adding a cut out of a plywood sheet that would almost cover the whole back side. This would add structural integrity to the whole stand, but I am wondering if this alone will be enough to prevent racking. Keep in mind I live in California.

Any help will be greatly appreciated.
 
What is a relatively inexpensive thing to use to skin the stand?

I will most likely be painting my stand and canopy a white to match the furniture in the room but can't find anything reasonably priced at Home Depot or Lowes outside of basic plywood but may not be looking for the right thing!
 
What is a relatively inexpensive thing to use to skin the stand?

I will most likely be painting my stand and canopy a white to match the furniture in the room but can't find anything reasonably priced at Home Depot or Lowes outside of basic plywood but may not be looking for the right thing!
Most people use pine plywood if painting or 1/4in hardwood ply over pine plywood if staining. I used straight 1/2 in pine when I skinned my stand.

c0a7d4336bbe6771ed99264d3ea60bd5.jpg


4e88b5172b7e67b36465ab085a2f8153.jpg


2e36f1d53522555fd1158d8d356e7898.jpg
 
Salt Water Mixing Stand

Salt Water Mixing Stand

Hello,
I am working on a Salt Water Mixing Stand and I thought this would be a good place to post my question. I am trying to figure out the construction of my stand. I assume I will use 2x4s, maybe some 2x2s and then plywood for the shelves. However I am not sure how to construct the intersection points / joints. I am attaching a rough sketch of the stand I am planning. The footprint is 21" x 24" x 76" tall. At the top I will install my RODI system and then on each shelf I will install a 16 Gallon water container that when full should weigh about 145 pounds. This stand will also be installed in a shower so I would like to keep only the four legs touching the floor. (no runners on floor.) Even though this shower is not used and will only be used to make water, I could see myself using the drain in the floor so the legs will likely be exposed to some small amounts of water. I have also attached a link to the water containers I will use in case that is helpful.

So again, I am hoping to get input on how to join the materials and how I should support the shelves.

Thanks!

Rough Sketch of stand:
Salt%20Water%20Mixing%20Stand-XL.jpg


Container:
http://www.plastic-mart.com/product/10221/arlington-sp0016-mm
 
I am looking into building a new stand for my 75 to replace the stand I built using these plans a few years ago. The stand worked out great but when I upgraded to my 120 I decided to go taller and we will be setting this tank up next to the 120 so I want it to be the same height. My only question about the process is on leveling. The stand will be on an uneven brick floor and I used some leveling feet on my steel stand for the 120. I know leveling feet is not recommended on this stand based on an earlier post in this thread that stated shims were preferred but based on my flooring shims are not practical. Are there any issues with putting a leveling foot at each corner? I can put a plate under the corner to spread the load if needed. Also, the stand will be for FW turtles so it will not have a sump. I will be building cabinets under it to store all of my SW and FW equipment.
 
Hello,
I am working on a Salt Water Mixing Stand and I thought this would be a good place to post my question. I am trying to figure out the construction of my stand. I assume I will use 2x4s, maybe some 2x2s and then plywood for the shelves. However I am not sure how to construct the intersection points / joints. I am attaching a rough sketch of the stand I am planning. The footprint is 21" x 24" x 76" tall. At the top I will install my RODI system and then on each shelf I will install a 16 Gallon water container that when full should weigh about 145 pounds. This stand will also be installed in a shower so I would like to keep only the four legs touching the floor. (no runners on floor.) Even though this shower is not used and will only be used to make water, I could see myself using the drain in the floor so the legs will likely be exposed to some small amounts of water. I have also attached a link to the water containers I will use in case that is helpful.

So again, I am hoping to get input on how to join the materials and how I should support the shelves.

Thanks!

You want to do something like this:


I wouldn't go smaller than 2X4s. Remove the bottom platform and have all four legs go down to the floor. I recommend you place them on something that won't transfer moisture or rot such as the feet you can get to go on the bottom of posts. They are little plastic squares you screw on from underneath.

I am looking into building a new stand for my 75 to replace the stand I built using these plans a few years ago. The stand worked out great but when I upgraded to my 120 I decided to go taller and we will be setting this tank up next to the 120 so I want it to be the same height. My only question about the process is on leveling. The stand will be on an uneven brick floor and I used some leveling feet on my steel stand for the 120. I know leveling feet is not recommended on this stand based on an earlier post in this thread that stated shims were preferred but based on my flooring shims are not practical. Are there any issues with putting a leveling foot at each corner? I can put a plate under the corner to spread the load if needed. Also, the stand will be for FW turtles so it will not have a sump. I will be building cabinets under it to store all of my SW and FW equipment.

If the foot uses a large plate to transfer the load between the bottom surface of the leg and the floor, you should be alright. The main issue with feet is the large load in a small area damaging the floor it's sitting on. With a brick floor, I would think it can carry quite a lot without any issues.
 
No skin on 3 sides?

No skin on 3 sides?

Hi All,

Great thread, I've posted in the distant past but now have a new question:

Can I skip the skin on 3 sides if I put 2x4 pieces on the 45 in each of the top corners? That would be 8 total 45* pieces:

left side front(on the side of the stand, not the front)
Left side rear
Back wall left
Back wall center left (center vertical brace/leg)
Back wall center right
Back wall right
Right side rear
Right side front
 
If you have skins on two opposing sides, those two will provide all the lateral stiffness you need. Adding extra braces just makes the thing heavier, not stronger.
 
You want to do something like this:


I wouldn't go smaller than 2X4s. Remove the bottom platform and have all four legs go down to the floor. I recommend you place them on something that won't transfer moisture or rot such as the feet you can get to go on the bottom of posts. They are little plastic squares you screw on from underneath.

RocketEngineer,
Do I really need the extra interior (pink) 2x4s to support the rails? Just a reminder, this stand is intended to support two 16 Gallon water containers. One on each shelf. What if I eliminated the pink 2x4s and then joined the red and yellow 2x4 rails to the green 2x4 posts using Pocket joints? My first set of rails would be about 5-7" off of the ground and on these rails I would mount a plywood shelf for my lower water container and then my second set of rails and plywood shelf would be about 18" above that where I would set my 2nd water container.

So the construction I am proposing would be something like this... Thanks for further comments.

i-Ss7h52d.jpg
 
Just curious, would there be any benefit to using treated studs to build a stand, over normal studs? I do intend on finishing the inside of the stand too, just wasn't sure if there would be any benefit to treated since they aren't that much more expensive than normal quality studs.
There are three major deficits to using treated studs in a stand. 1. They are for outdoor use only because they give off chemicals like formaldehyde. This would be harmful to fish, pets, house plants, and oh yes humans. 2. After the wood has been dried, the process re-wets the wood under pressure. This disruption to the integrity of the wood causes treated wood to twist, warp, and bend out of shape much more than regular wood does. 3. Paint and stains do not adhere well or at all unless the wood has been well weathered and that will not happen indoors.
 
If you have skins on two opposing sides, those two will provide all the lateral stiffness you need. Adding extra braces just makes the thing heavier, not stronger.


Thank You RocketEngineer. I'm surprised. I thought that adding the gussets would cover it.

So what would you recommend for skinning? 1/2" plywood routed-out around the framing?

45563b516c6721fd50f7562f529da87e.jpg


e23cee31c666290e384da8a17a05b111.jpg
 
Just to follow up on my own question, I was continuing my research and I saw another post where someone was advised not to tie their stand into an existing wall as I suggested at the bottom as it could cause problems if the house shifted and part of the stand got pulled, so I guess that's out.

Now I'm wondering about using some self leveling compound to fill the void and get everything up to the same level as the tile. Good idea?

Leveling compound is a kind of concrete, so it will work well. You might as well make it an inch thick and cover the tile where the tank will stand, so that any variation in the tile level will be corrected too.

In making the opening in the wall, you will have to add full studs to the wall and shorter studs that support the header in position. The header is where the wall resumes above your tank. You do not need to tie in the stand to the walls, although if walls are floors are moving and swaying around, you have bigger concerns than the aquarium.
 
RocketEngineer,
Do I really need the extra interior (pink) 2x4s to support the rails? Just a reminder, this stand is intended to support two 16 Gallon water containers. One on each shelf. What if I eliminated the pink 2x4s and then joined the red and yellow 2x4 rails to the green 2x4 posts using Pocket joints? My first set of rails would be about 5-7" off of the ground and on these rails I would mount a plywood shelf for my lower water container and then my second set of rails and plywood shelf would be about 18" above that where I would set my 2nd water container.

So the construction I am proposing would be something like this... Thanks for further comments.

Without the pink pieces, the only thing holding up the box frames are the nails/screws and that's not something I would trust.

If you are going the pocket screw route, mount the pink pieces to the underside of the red and yellow ones that way and eliminate the green boards. If you have the room, you could run the green boards up the back to help tie everything together.
 
Thank You RocketEngineer. I'm surprised. I thought that adding the gussets would cover it.

So what would you recommend for skinning? 1/2" plywood routed-out around the framing?

Gussets help but a sheet of plywood is much more capable of handling shear loads. That's why its used on the outside of houses, to create shear strength in the timber walls. The gussets as you have them aren't really effective because they are still right at the corners which means any load has a long lever arm compared to where the gussets connect.

For plywood, I usually recommend 1/2" but done properly even 1/4" will significantly stiffen a stand. Like you mention, you want to cut out the center of the plywood, not dice up the plywood.

Good luck,
 
Back
Top