Hookup
New member
Well folks, the first "real" step has been taken. The tank has been ordered. It will be here in 4-6 weeks. It's a 180gallon tank, 4 sides will be viewable, and 4 sides are starfire. The starfire was an expensive option given it's all 4 sides, but the overall tank was much cheaper than I assumed so it nett'ed out well for me.
So, why did I want to change out my tank. I'm just cresting the one year mark with the corner tank that I've setup. And honestly, it's doing very well. I've had ups and downs with the tank, and with the equipment over the past year, learned a tonne from many, many people on this forum/club and from others as well as reading obsessive amounts of information. However, that still doesn't answer the question of "why upgrade?".
Well the simple reason is I do not like my aquascaping, and the stand/canopy is the wrong color to go with my family room. I would love to make up loads of technical reasons that make sense to everyone, but there you have it, i'm shallow and want things to look just right.
The 92gallon corner tank I have right now is actually thriving again, and I see the grow-out potential in the tank. It's heading in good directions. However, the form rock-walls I built are not my thing, they have to go... but I used an entire tube of sillycone to stick them to the glass... likely not going to come off without a major fight... They were only put on there because I did not want to try to maintain the clean-zen look in a corner tank, figureing it would require some advanced yoga skills to keep it clean.
Additional factors would be that the aquascaping itself is very open, but no where near "zen bonsai" that I wish to have. In all my research and reading, the tanks I'm drawn to have vast open spaces with full mature colonies grown out bursting with color. I just cannot achieve that look in my current system. Additionally, there are some fish that I would like to have in the tank which are unreasonable in a 90gallon system. I'm not saying which ones are for sure, as at this time there are no "for sure" fish... but there are many that I really like.
So a little about the new tank. First, the 4 sided viewable concept might have perked some interest. It's defiantly going to present several challenges. The main reason is that this tank will be a room divider of sorts. It will be in the wall, kind of, between my dinning room and my family room. Imagine looking into my dining room and instead of a hutch on the wall you'll see a fish tank. All 180 glorious gallons of it... but instead of it being pushed up against the wall, the wall will have a hole in it allowing the room on the other side a view of the fish tank as well. So from the Family room, there'll be a flush wall-mounted/trimmed 180 gallon tank.
For many reasons I did not want the tank to be "built in"... but rather to look like it's on a stand, and as such, look like it's easily removable from the house. I'm always thinking resale value, cause you never know... not that we're planning on selling ever...
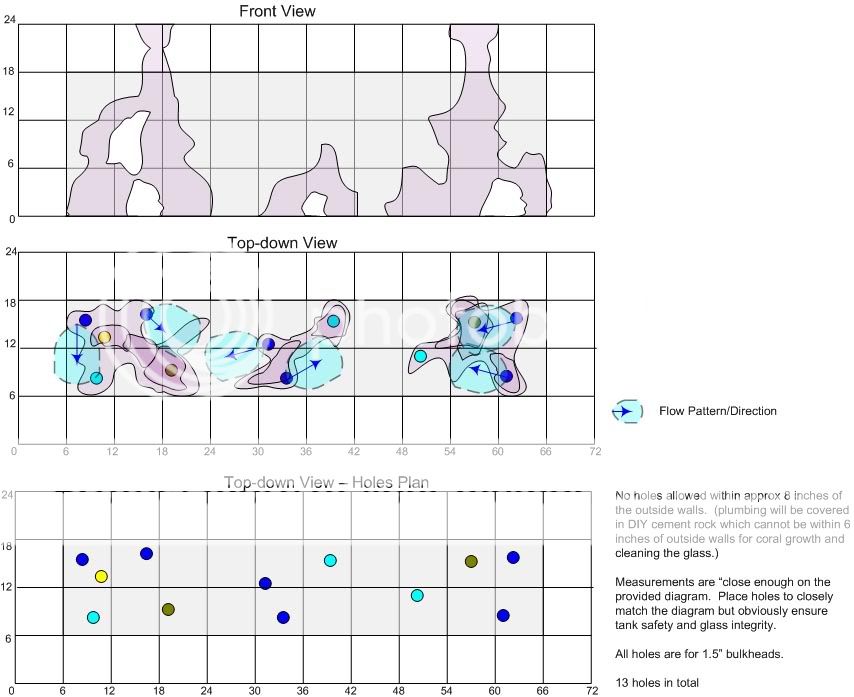
Now, to create the zen look and feel, I needed to find a way to handle the flow and plumbing without having any of it visible what so ever. The end product *must* look like a tank of coral, rock, sand and fish... that's it, that's all. I've done some research on overflow systems and have found a system to create a durso style drain without an overflow box. (more on that as that part of the project evolves). I've also got designs on a closed loop system, in fact the tank will come with 2 input holes and 4 output holes for a closed loop system, likely driven by a hammerhead pump (gold series for quite operation).
Additionally, the rock itself in the display will be 80% DIY rock. Of course the return lines and drain lines, as well as the closed loop system will be completely hidden in DIY rock, however even the rock structures themselves will be created from DIY rock. This gives me the control to ensure that no "extra's" get into the system. The rock I have now is covered in great hitchhikers...but they are getting in the way of stuff I actually want to grow. I've complained about the GSP and Zoa's before and this time I will not be bothered by them again. The existing rock will go into my sump as the fuge is being removed from the system, gaining a 40gallon tank of space that I can pack the rock into.
I'm pretty sure next week I'll open the wall and start the stand build, with photos. I want to get some sketchup drawings done of the stand, tank, overflows and what-not drawn up, but honestly that program frustrates me so do not hold you're breath. I'll be posting a bunch of photos as this build goes forward, but for now I figured I'd just formally let the cat out of the bag.
As always, thanks for reading
-Tim
So, why did I want to change out my tank. I'm just cresting the one year mark with the corner tank that I've setup. And honestly, it's doing very well. I've had ups and downs with the tank, and with the equipment over the past year, learned a tonne from many, many people on this forum/club and from others as well as reading obsessive amounts of information. However, that still doesn't answer the question of "why upgrade?".
Well the simple reason is I do not like my aquascaping, and the stand/canopy is the wrong color to go with my family room. I would love to make up loads of technical reasons that make sense to everyone, but there you have it, i'm shallow and want things to look just right.
The 92gallon corner tank I have right now is actually thriving again, and I see the grow-out potential in the tank. It's heading in good directions. However, the form rock-walls I built are not my thing, they have to go... but I used an entire tube of sillycone to stick them to the glass... likely not going to come off without a major fight... They were only put on there because I did not want to try to maintain the clean-zen look in a corner tank, figureing it would require some advanced yoga skills to keep it clean.
Additional factors would be that the aquascaping itself is very open, but no where near "zen bonsai" that I wish to have. In all my research and reading, the tanks I'm drawn to have vast open spaces with full mature colonies grown out bursting with color. I just cannot achieve that look in my current system. Additionally, there are some fish that I would like to have in the tank which are unreasonable in a 90gallon system. I'm not saying which ones are for sure, as at this time there are no "for sure" fish... but there are many that I really like.
So a little about the new tank. First, the 4 sided viewable concept might have perked some interest. It's defiantly going to present several challenges. The main reason is that this tank will be a room divider of sorts. It will be in the wall, kind of, between my dinning room and my family room. Imagine looking into my dining room and instead of a hutch on the wall you'll see a fish tank. All 180 glorious gallons of it... but instead of it being pushed up against the wall, the wall will have a hole in it allowing the room on the other side a view of the fish tank as well. So from the Family room, there'll be a flush wall-mounted/trimmed 180 gallon tank.
For many reasons I did not want the tank to be "built in"... but rather to look like it's on a stand, and as such, look like it's easily removable from the house. I'm always thinking resale value, cause you never know... not that we're planning on selling ever...
Now, to create the zen look and feel, I needed to find a way to handle the flow and plumbing without having any of it visible what so ever. The end product *must* look like a tank of coral, rock, sand and fish... that's it, that's all. I've done some research on overflow systems and have found a system to create a durso style drain without an overflow box. (more on that as that part of the project evolves). I've also got designs on a closed loop system, in fact the tank will come with 2 input holes and 4 output holes for a closed loop system, likely driven by a hammerhead pump (gold series for quite operation).
Additionally, the rock itself in the display will be 80% DIY rock. Of course the return lines and drain lines, as well as the closed loop system will be completely hidden in DIY rock, however even the rock structures themselves will be created from DIY rock. This gives me the control to ensure that no "extra's" get into the system. The rock I have now is covered in great hitchhikers...but they are getting in the way of stuff I actually want to grow. I've complained about the GSP and Zoa's before and this time I will not be bothered by them again. The existing rock will go into my sump as the fuge is being removed from the system, gaining a 40gallon tank of space that I can pack the rock into.
I'm pretty sure next week I'll open the wall and start the stand build, with photos. I want to get some sketchup drawings done of the stand, tank, overflows and what-not drawn up, but honestly that program frustrates me so do not hold you're breath. I'll be posting a bunch of photos as this build goes forward, but for now I figured I'd just formally let the cat out of the bag.
As always, thanks for reading
-Tim

")