Silent and Failsafe Overflow System

Uncle, I am baffled by the "break-in" period. What changes? My system has been up and running for about 6 weeks (plus a week running fresh water) and the first couple of weeks it had difficulty purging the air out of the siphon--it took a long time and I usually lost patience and "fixed" it myself. Then at some point it just started working perfectly. :D What are the physics (or magic) that account for the difference?
Make sure your drains are only submerged 1/2" to an inch below the water surface in the sump. Any deeper and you will see issues when purging the air out of the drains.
 
Two issues though come to mind. One is that to get the "silent" overflow effect you need to have the syphon standpipe 1/2" to 1" below water in sump and the second is that since as a sock gets dirty the water level in it will rise, you'll never get the system quite tuned as the depth in water will vary with time and grime.


earlier you clean the sock the better? :D that would depend on the amount of feeding and fish you have...bigger sock would help that too. Can't say about that noise level without a sock on full siphon since mines isn't. but with a custom sump i'm sure it's possible. :)
 
If the level in the sock is rising that much, you need to change it more often

Absolutely, but in the long run, terminating in a sock will amount to a varying depth for the standpipe and thus some variation in the associated back pressure/tuning, no?
 
Yes, but that's what the open channel standpipe is for - it will accommodate fluctuations in the flow through the full siphon standpipe, allowing the system to auto-adjust and stay silent/safe.
 
Uncle, I am baffled by the "break-in" period. What changes? My system has been up and running for about 6 weeks (plus a week running fresh water) and the first couple of weeks it had difficulty purging the air out of the siphon--it took a long time and I usually lost patience and "fixed" it myself. Then at some point it just started working perfectly. :D What are the physics (or magic) that account for the difference?

Bump to Uncle or Bean...
 
Major sump relocation

Major sump relocation

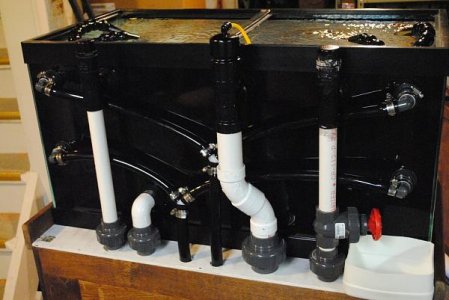
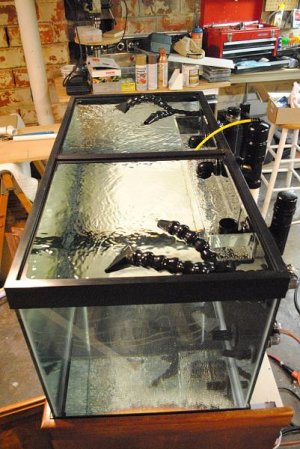
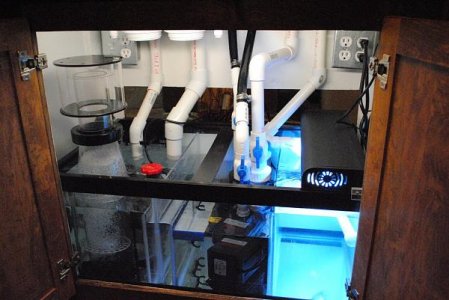
Want to say Kudos to Bean and Uncle for your endless work on this /thread/theory/system. A short history to the attached pics. I perfected (I think) your system on a 50 gal DT with a 35BR sump late in 2011. Thanks to this thread it worked flawlessly right of out of the gate. Thank You!!!

Then came the diagnosis of cancer and several surgeries and a set-back in life. The good news is I'm OK. Just took some time. Thank goodness the Cleveland Clinic is in my backyard. Anyhow......

I'm now going to place the sump and it's ancillaries in the basement. The question is the gate valve in the pic (red handle) ,should be moved farther down the the flow line? I have 8 feet of vertical drop in two 4 by 4 sections, and about 8 feet of horizontal that I can slope downward at 20 degrees the entire length. The vertical is measured from the lip of the CC.

Think it will work as it did before without moving the gate valve. BTW...I can move the gate valve without too much fuss. I would like to keep it within view of the DT so I can dial it in better.
 

Attachments

  • DSC_0039.JPG
    DSC_0039.JPG
    40.5 KB · Views: 1
  • DSC_0040.JPG
    DSC_0040.JPG
    59 KB · Views: 1
  • DSC_0041.JPG
    DSC_0041.JPG
    42.5 KB · Views: 1
Last edited:
Uncle, I am baffled by the "break-in" period. What changes? My system has been up and running for about 6 weeks (plus a week running fresh water) and the first couple of weeks it had difficulty purging the air out of the siphon--it took a long time and I usually lost patience and "fixed" it myself. Then at some point it just started working perfectly. :D What are the physics (or magic) that account for the difference?

The only thing I can think of is if you had a slight air leak that was allowing air to be entrained into the siphon pipe and that got sealed up by some salt crystals.
 
Want to say Kudos to Bean and Uncle for your endless work on this /thread/theory/system. A short history to the attached pics. I perfected (I think) your system on a 50 gal DT with a 35BR sump late in 2011. Thanks to this thread it worked flawlessly right of out of the gate. Thank You!!!

Then came the diagnosis of cancer and several surgeries and a set-back in life. The good news is I'm OK. Just took some time. Thank goodness the Cleveland Clinic is in my backyard. Anyhow......

I'm now going to place the sump and it's ancillaries in the basement. The question is the gate valve in the pic (red handle) ,should be moved farther down the the flow line? I have 8 feet of vertical drop in two 4 by 4 sections, and about 8 feet of horizontal that I can slope downward at 20 degrees the entire length. The vertical is measured from the lip of the CC.

Think it will work as it did before without moving the gate valve. BTW...I can move the gate valve without too much fuss. I would like to keep it within view of the DT so I can dial it in better.
From an outside perspective on the remote sump (I don't have one), I would probably leave the valves in their current location. Just seems to me like it would be easier to tune the system without having to run up and down the stairs.

I know when I time mine the first thing I look at is the overflow level.
 
The only thing I can think of is if you had a slight air leak that was allowing air to be entrained into the siphon pipe and that got sealed up by some salt crystals.

Thanks, Sleepydoc, makes sense. I'll think twice now about wiping off the salt creep on the siphon pipe!
 
If noise is a concern I would put the valves down by the sump. I have mine in the basement and having them down there wasn't that bad getting adjusted and I only had to do it once. Has been running a few years now with out having to touch it and running just as silent at the display tank as ever.
 
Thanks, Sleepydoc, makes sense. I'll think twice now about wiping off the salt creep on the siphon pipe!

You should have all the PVC connections external to the tank glued, or sealed so they are watertight if they are threaded connections. If you are getting salt creep on the pipes you have a bad connection that's leaking (assuming it's not originating from salt spray coming from the tank.)

Some people use an unglued slip fitting to connect the elbow to the bulkhead inside the tank (in the overflow box.) Sometimes you can get away with this, sometimes not. Even if it feels tight you can get a tiny leak that entrains air and keeps the system from running properly.
 
I have a couple of questions. I'm getting ready to set up a 140 gallon system with a reef ready, center overflow. I know that this is not the most efficient at surface skimming, but it's what I'm stuck with. The center overflow has 3 - 1" drains and 2 - 3/4" returns, so I'd like to set it up in Bean Animal fashion. I understand that I should plumb with inch and a half pipe below the 1" bulkhead, but what about above? Also, does anyone have any idea how much flow this type of setup will have? I'm wanting to pick my return pump soon. Thanks.
 
I have a couple of questions. I'm getting ready to set up a 140 gallon system with a reef ready, center overflow. I know that this is not the most efficient at surface skimming, but it's what I'm stuck with. The center overflow has 3 - 1" drains and 2 - 3/4" returns, so I'd like to set it up in Bean Animal fashion. I understand that I should plumb with inch and a half pipe below the 1" bulkhead, but what about above? Also, does anyone have any idea how much flow this type of setup will have? I'm wanting to pick my return pump soon. Thanks.

I think what you are wanting to do is convert to a Herbie. There are a lot of threads here on converting standard overflows to herbies.
 
I think what you are wanting to do is convert to a Herbie. There are a lot of threads here on converting standard overflows to herbies.
As I understand it, a Herbie type uses two pipes with no failsafe. A Bean type has three pipes, one full flow, one partial flow, and one emergency. I have three 1" return holes already drilled in the overflow from the factory, so I should be able to run a Bean type. The only difference should be what part of the pipe goes through the bulkhead. With a C2C style overflow, the bulkhead is at the street 90. On my center overflow, it should be further down the straight pipe.
 
Typically the three holes in the overflow you have would be 2 drains and a return. The setup you have would benefit the most from a Herbie. This is why the Herbie was made, to yield a quieter higher flow rate overflow in a standard durso overflow.
 
Typically the three holes in the overflow you have would be 2 drains and a return. The setup you have would benefit the most from a Herbie. This is why the Herbie was made, to yield a quieter higher flow rate overflow in a standard durso overflow.
There are 5 holes in my center overflow...3 - 1" drains and 2 - 3/4" returns.
 
There are 5 holes in my center overflow...3 - 1" drains and 2 - 3/4" returns.

In that case just use 1" pipe into a 90 then plug the street 90 into the 90. set the tops of the 90's so they are about 1.5" lower than the top of the weir on the overflow. If the overflow has teeth I'd suggest getting rid of them.
 
Got it plumbed

Got it plumbed

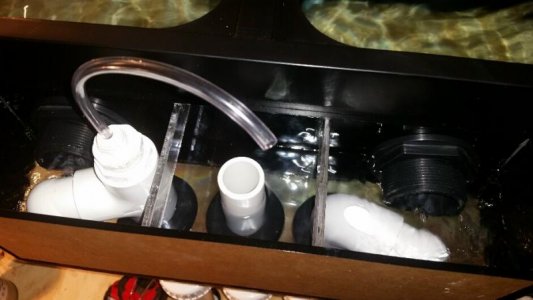
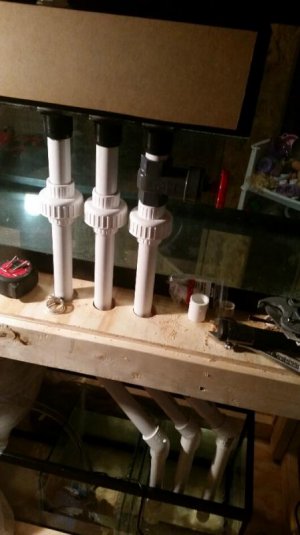
Well, I went ahead and plumbed my bean. I was given advice that it would not work properly and I would have floods. I had all the stuff to do it and thought that if it didn't work all I was out was time. If it does work I save time and money by not having to get all new parts to go a different way. This thing works like a dream. Take about 10 seconds if that for the syphon to kick in. Water level never reaches the emergency pipe at all in start up. No bubbles and no noise. I have ran different types of situations including power failure and restore as well as clogged pipes. It works perfectly on every one. Now I just need to figure out how much flow my pump is putting out. It's not in the list on the calculator. Running a Jebao dc-6000 at full blast.
 

Attachments

  • 2014-12-30 16.56.55.jpg
    2014-12-30 16.56.55.jpg
    41.4 KB · Views: 4
  • 2014-12-30 16.57.31.jpg
    2014-12-30 16.57.31.jpg
    40 KB · Views: 4
Back
Top