Silent and Failsafe Overflow System

Ok so ive done some reading and I want to make sure I have the measurements for my bean animal right. Im getting my glass cut on wednesday for an overflow. I wanted coast to coast but the trim on my tank dips inside like an inch, and it has two braces going across so I wont be able to fit the right size for a c2c. Instead im going with a 38"x4"x5" overflow and ill have 10" left over to make another hole for the return line.

I have a 70 gal tank 48"x16.5"x21.5". So I have to allow the overflow water to have atleast an inch of drop right?

The top of the weir should be at the bottom of the trim outside the tank, I don't see the problem...
 
2" or larger... target ~ 5kgph+. Don't fool about with the silly rules of thumb.

Thanks Uncle. Sounds good, is there a flow that is too slow to create a full siphon using a 2" bulkhead? I ask because I won't be able to afford a new pump right out of the gun and I'd bet I'm in the 3000 gph range or slightly less.

That said would you use 2" pvc or would you go bigger through through those bulkheads? I don't want to have to rework anything later.

Uncle can answer this better than I can, but I have heard of low flow causing issues with the siphon starting. If it does, you can use a bushing to downsize the plumbing on the siphon line until you upgrade the pump.

It would be a little bit of a pain to replace it with larger plumbing after the tank is up and running, but not too bad or too expensive. What I would probably do is plumb it with the 2" pipe and check the operation. If there are issues, replace everything with smaller plumbing and save the 2" plumbing. If you plan ahead you can plumb it so it's not too difficult to swap out once you upgrade the pump.
 
The top of the weir should be at the bottom of the trim outside the tank, I don't see the problem...

My question is not about the weir placement. I know to place it just below the trim looking from the outside, but about the hole placement of the drains. I need to place them so that they allow the water thats coming into the weir to have a 1" drop? Is this correct? Will I achieve this if I place all three centers of the holes to be an inch bellow the top of the weir?
 
My question is not about the weir placement. I know to place it just below the trim looking from the outside, but about the hole placement of the drains. I need to place them so that they allow the water thats coming into the weir to have a 1" drop? Is this correct? Will I achieve this if I place all three centers of the holes to be an inch bellow the top of the weir?

No, and actually your question was about the water fall height, but hole placement is the number 1 repetitive question in this thread and has been answered a couple hundred times, and it will be asked again within a week. A little reading will get you the answer.

I would rather invest my time in something that hasn't really been covered, and since the bulk of your post was about how you could not get a C2C into a rimmed tank, which has not really been covered, I offer you a hint: You need to use geometry and 3 dimensions...

Capture_zps2a412989.png

ill go dig around some more then. Thanks
 
I'm having trouble finding a 1" sanitary tee. Is it okay to use everything the same except with a regularly tee?
 
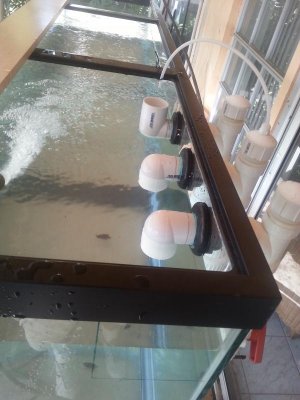
It is simple actually LOL... Measure down from the lip inside the trim, 3.25" mark the spot, and pop the hole. It sounds more complicated than it is. Water fall will be ~ 1" or so, up to around 1.5" depending on how far you have to go down past the minimum to clear the trim. Water level in the overflow will be in the top half of the down turned elbows, but can vary a little bit, depending on adjustment.

The water needs to rise on startup so it flows in the dry emergency, that is the upturned elbow. That is sufficient to provide enough pressure to start the siphon fully (assuming the bottom end is right.) Some place the bulkheads elbows too high, and getting the head height is risky in terms of overflowing the tank, some place them way too low, and getting the water level up to where the waterfall is not a noisy mess, is next to impossible without breaking the rest of the design.


The top of the weir should be even with the trim on the outside of the tank... hides the water line by ~ 1/4" give or take, depending on the length of the weir, and the flow rate...

The depth (top to bottom) is based on where the bottom of the elbows end up after all of the above is done. 3/4" below that...Start with the top and work down. That is what I am getting at with 'don't plan for smallest possible dimensions you will get in trouble.' It will be however high it needs to be.

It is based on the given dimension below the lip inside the trim. If you measure down that far, mock up the bulkhead, see if it clears the trim, if it does, golden, if not, drop it down until it does. The tank will talk to you, as I said, it is not horribly complicated...


Bush off the pump directly to 1". Don't pass go, do not collect two hundred dollars on the way... ;) Friction loss can vary with the number of fittings, types of fittings, and length of pipes between, it can be very significant. In 3/4" pipe/hose the friction loss is most often excessive.

Uncle, I know this ones redundant but I want to make sure I get it right. I couldn't find my exact situation. I want to make sure I drill the holes for the bulkheads in the right spot. I have no trim, the tank is acrylic. It has a 1" thick eurobrace. I'm going to build the overflow box to fit after the bulkheads with elbows are installed. Can you shed any light on where to drill the holes and then where to position the overflow box to allow for the highest tank water level? Thanks in advance.
 
The overflow box needs to be deep enough to allow the bulkheads and intakes. The top of the overflow box (the weir) sets that water level in the display. Depending on the width of the tank and weir and the flow rate, the water will rise slightly above the weir during normal operation, say from 1/8" to 1/2" on most system (with the preference on the thinner side). However, in a high flow system water may back up somewhat higher for 5-15 seconds while the system purges air. You need some headroom (I would say around 1") for this, but again that depends on pump size and tan and weir dimensions.

If you post your actual proposed tank dimensions and return pump spec, it will be easier to give you a more direct answer.

Thanks for the reply Bean. The tank is 144"x36"x24". I'm using 2" bulkheads. Due to my budget right now I'm stuck using the pump I have that should push somewhere in the 2500-3000gph although as soon as I can I'd like to bump that up. The fall into the sump is 42". There is 1/2" triangle acrylic bar under the eurobrace. My goal was to do a coast to coast but due to many reasons I'm stuck more in the 60" length for the overflow box. To get past the euro the width will be at least 10". I'm flexible on the box dimensions and will make it after the bulkheads are installed. I have someone coming to drill the holes tomorrow and just don't want to go to high or low. Let me know if you need any other info. I appreciate any thouights you have. Here are a couple pics. Thanks.

 
Last edited by a moderator:
Hi,

What is the position of the top of the upturned elbow in relation to the top of the weir?

cheers!

David
Your holes are all drilled at the same height. The main siphon should be far enough below the weir to give you a 1" - 1.5" waterfall in the overflow. The emergency is just that... It will end up somewhere near the top of the weir but is not exact. As long as it is not above the top of the tank lol.
 
Heh, well initially mine was going to be above the weir, which I'm guessing it shouldn't be.

'The main siphon should be far enough below the weir to give you a 1" - 1.5" waterfall in the overflow' - you mean from where to where? Top of the weir to water height in the weir? How do I calculate the water height or is that all dependent on flow rates?

cheers!

David
 
Hi,

What is the position of the top of the upturned elbow in relation to the top of the weir?

cheers!

David

I just finished mine. As said, all three holes are on the same line. The upturned (emergency) is about halfway between the top of the weir (bottom edge of the trim) to the top. The trim is 2 inches. The air line is about 1/2 inch or so above the emergency.
 

Attachments

  • 20141222_150401.jpg
    20141222_150401.jpg
    57.9 KB · Views: 1
Heh, well initially mine was going to be above the weir, which I'm guessing it shouldn't be.

'The main siphon should be far enough below the weir to give you a 1" - 1.5" waterfall in the overflow' - you mean from where to where? Top of the weir to water height in the weir? How do I calculate the water height or is that all dependent on flow rates?

cheers!

David

This seems to be one of the most confusing aspects of this design, at least from the number of times this question gets asked! :)

I've been trying to understand why since it is rather simple. Maybe it's because people try to do the overflow first and then do the holes. Anyway, here's what I did following what I read in this thread.

It's a C2C overflow and I knew the top of the weir should be at the bottom of the trim. I knew there was a minimum distance the holes should be from the top and from each other. I knew the flange on the bulkhead had to be below the trim. So I gave myself a 1/4" or between the flange and the trim and aligned the holes horizontally spacing them a 1/2" or so beyond the minimum distance (based on size of holes).

Now that the location of the holes is determined, I used the elbows and the bulkheads to figure how high and deep to make the weir. I wanted at least 1/2" between to bottom of the weir and the downturned elbow. That gave me the height of the weir. I wanted enough space to be able to get the bulkheads out if needed without removing the weir. That gave me the depth (front to back) dimension. And then I had a couple pieces of glass cut.

So you figure out where the holes are gonna be, size the weir accordingly and it works! You control the height of the water in the weir by the valve on the siphon and/or adjusting the flow.

Probably not any clearer, but I tried!
 
Heh, well initially mine was going to be above the weir, which I'm guessing it shouldn't be.

'The main siphon should be far enough below the weir to give you a 1" - 1.5" waterfall in the overflow' - you mean from where to where? Top of the weir to water height in the weir? How do I calculate the water height or is that all dependent on flow rates?

cheers!

David


On the average the water level in the overflow is about 1/4 to 1/2" lower than the top of the down turned elbows. So from the top of the weir to the proposed water level in the overflow should be about 1" to 1.5". Since the all run at different flow rates etc it's not exact.

e8c12e99c851475b6ecf793309e9eae4.jpg
 
Thanks for the info, Mike - very helpful!

I measured down from the bottom of the trim 1/4" and put the top of the flange at that level and marked the center of the hole.

My confusion was that the 1" x 1 1/4" elbow I have is 2" from middle of the pipe to top (when it's turned up) which put it above the top of the weir!

I'm going to move everything down so that there's still a 1/4" gap above the upturned elbow. And then put the bottom of the overflow box 3/4" under the downturned elbows. Does that sound right?

I'm assuming that the elbows in the overflow are NOT glued? And that everything on the other side outside the tank IS glued?

cheers

David

Well fortunately, this does not need to be rocket science. Just lower your holes on the back so the elbow is at or just below the top of the weir. You have the parts, we don't. Measurements I give are minimum's for safety and nothing more. I generally tell folks a bit further down is not going to hurt anything.

Because a siphon requires the drains to be airtight, (all three need to be capable of "siphon" mode) the elbows need to be solvent welded in place (because the tops are exposed to air.) If you want replaceable elbows, you need to use threaded bulkheads and threaded street ells, sealed with a non-hardening thread sealant.
 
Back
Top