You are using an out of date browser. It may not display this or other websites correctly.
You should upgrade or use an alternative browser.
You should upgrade or use an alternative browser.
Silent and Failsafe Overflow System
- Thread starter JohnL
- Start date
woodnaquanut
Active member
Glass. Can you buy it separately?
I have no idea. Contact Reef Savvy.
Reef savvy got back to my inquiry about purchasing their ghost overflow simply to say that "The final details on the Ghost Overflow are being ironed out and will be released in the next couple of months." What does that even mean? This is already released to the market. Are they having issues with them? Changing the design? This makes no sense and needless to say I was not satisfied by their response.
uncleof6
Active member
Reef savvy got back to my inquiry about purchasing their ghost overflow simply to say that "The final details on the Ghost Overflow are being ironed out and will be released in the next couple of months." What does that even mean? This is already released to the market. Are they having issues with them? Changing the design? This makes no sense and needless to say I was not satisfied by their response.
Would it be possible to simply say, latest advice I have seen on it is "don't hold your breath?" (last month.) Some of it is certainly production cost/profit margin. Much more than that is speculation. What the message means is: it is not currently available.
At the 2013 MACNA it was touted as a game changer, however the only thing game changing was the inclusion of a BA system in the external box, and BA's system came years before "the Ghost" was shown at MACNA. BA's drain system is certainly game changing at the very least. The rest is simply an adaptation of glass-holes' overflow design.
In your original post, you were looking for "best methods," and quite frankly the Ghost Overflow, and other "knock-offs"/similar set ups are flawed. They pretty much line up with what we have been dealing with all along: small, toothed inefficient weirs, that are not really capable of handling the rated flows, without a great deal of noise; with very "low" surface skimming/renewal rates.
There is a rather solid science behind weirs, how they work, and how that impacts our endeavor. The physics get a bit tricky, and the chemistry aspects concerning the skimmer, gas exchange, and overall system health, can get even more tricky—moving far beyond the oft spoken myth: "my parameters are fine." (Eric Bourneman, 2003)
Rather than re-iterate words that have already been written, take a browse to Bean's website and read the sections: "Overflow Basics," and the sidebar entitled "Surface Renewal."
http://www.beananimal.com/projects/silent-and-fail-safe-aquarium-overflow-system.aspx
Bean chose to use Anthony Calfo's overflow concepts (the Coast to Coast,) to use in conjunction with his drain system. As Bean states, there has been sufficient observation and evidence to support the logical conclusion that this is what is wanted. My experience and observations support the logical conclusion. If we are to use a "game changing" drain system, there is little logic to using an overflow that is not game changing, just more of the same. In terms of progress, it makes little sense to get up to the C2C, and then step backwards into the same old same old for reasons of aesthetics. Function should come first.
A fish tank is always going to be a fish tank. Until there is enough progress that we can free ourselves from power heads (we are not there yet) it is always going to look "cluttered" like a fish tank, and even without the power heads, it will still look like a fish tank. Speaking of small home aquaria, not large public displays.
Anyway, anyone having trouble with their BA drain system?
") :wave:
:wave:Thanks Uncle. I am running a c2c system with the BA drain now, on my current setup. I am very much a proponent of them both and want them on my next build. The problem I'm running into is finding a mfg for a tank who will build the c2c and BA setup in an external box. I want to preserve as much space as I can inside the tank for the obvious reasons. I'm finding that it's going to increase the cost 50% and will have to be built out of state. So naturally I have begun to at least explore options.
uncleof6
Active member
Thanks Uncle. I am running a c2c system with the BA drain now, on my current setup. I am very much a proponent of them both and want them on my next build. The problem I'm running into is finding a mfg for a tank who will build the c2c and BA setup in an external box. I want to preserve as much space as I can inside the tank for the obvious reasons. I'm finding that it's going to increase the cost 50% and will have to be built out of state. So naturally I have begun to at least explore options.
What obvious reasons? The commercial options all take the function backwards, the reasons simply cannot be compelling enough to sacrifice function... ...considering you know the score, the logic, and reasoning behind the long efficient weir of the simple L shaped shelf, up in a non-useable area of the tank.
Considering the cost, having a custom tank built is often impractical, unless you are strategically located. On the other hand, this is DIY, not really a sounding board for commercial products, and the solution for function is going to be DIY. Although sometimes, such as in the case of the "DIY PVC Overflow," the commercial product (HOB) will be the better option, this is the exception, not the rule.
Drain Depth for Aquaponics Application
Drain Depth for Aquaponics Application
Hey Bean and Uncle,
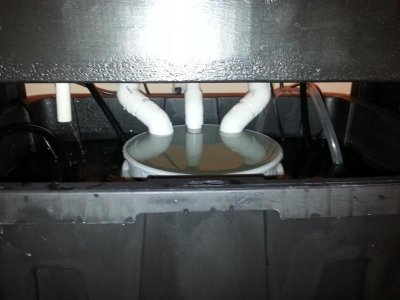
I got my system all set up. Tank drilled. Internal Bean Animal installed. I am super excited. I got tank dead plumb and everything works perfectly. It took me a minute to tune it but now it works great. I decided to have my biological filter dump into tank instead of the sump to increase flow. I now have a 633 eco pump and a 340 gph pump going into tank. This really helped, as I now have enough flow with the 1-1/4" bulkheads for the siphon and secondary to work together. No bubbles or sound.
Thank you Bean for the idea of a constant height for my tank so that my sump can fluctuate for aquaponics plants and not affect the aquarium. I put a 3 gallon bucket in sump and ran all drains to it. It is super quiet. I could not be more happy. I know that my setup is different than what most on this forum are doing but I wanted to highlight the versatility of this system. My aquaponics system is now ready to go. Water tests are good. Water is clean and at temp. I am picking up fish tomorrow and plants will be ready to be transplanted as soon as the system is cycled.
I really appreciate your willingness to give me advice on this. There is something very satisfying about putting a bunch of time and effort into a build and then seeing it come to fruition. Watching the water flow evenly over the overflow and being completely silent gave me a big smile. So thank you Bean and Uncle.
Drain Depth for Aquaponics Application
Hey Bean and Uncle,
I got my system all set up. Tank drilled. Internal Bean Animal installed. I am super excited. I got tank dead plumb and everything works perfectly. It took me a minute to tune it but now it works great. I decided to have my biological filter dump into tank instead of the sump to increase flow. I now have a 633 eco pump and a 340 gph pump going into tank. This really helped, as I now have enough flow with the 1-1/4" bulkheads for the siphon and secondary to work together. No bubbles or sound.
Thank you Bean for the idea of a constant height for my tank so that my sump can fluctuate for aquaponics plants and not affect the aquarium. I put a 3 gallon bucket in sump and ran all drains to it. It is super quiet. I could not be more happy. I know that my setup is different than what most on this forum are doing but I wanted to highlight the versatility of this system. My aquaponics system is now ready to go. Water tests are good. Water is clean and at temp. I am picking up fish tomorrow and plants will be ready to be transplanted as soon as the system is cycled.
I really appreciate your willingness to give me advice on this. There is something very satisfying about putting a bunch of time and effort into a build and then seeing it come to fruition. Watching the water flow evenly over the overflow and being completely silent gave me a big smile. So thank you Bean and Uncle.
Attachments
Drain Depth for Aquaponics Application
Drain Depth for Aquaponics Application
In case you all have questions,
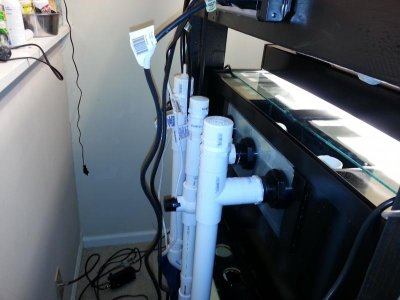
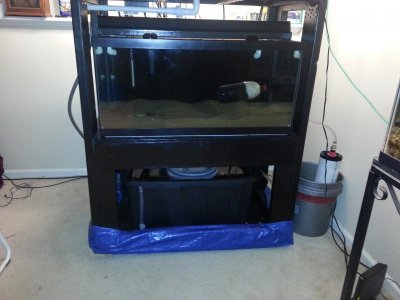
I do have the airline that I still need to attach to the secondary drain. Also, I laminated a 1/4" piece of glass on to the back of aquarium where I drilled for my bulkheads. This made all drilled area 1/2" thick (cured for a week). Tank is a 40B with no center support and it bows a bit when filled, so for safety's sake, I decided to beef up glass so that I did not risk a full tank blowout.
Drain Depth for Aquaponics Application
In case you all have questions,
I do have the airline that I still need to attach to the secondary drain. Also, I laminated a 1/4" piece of glass on to the back of aquarium where I drilled for my bulkheads. This made all drilled area 1/2" thick (cured for a week). Tank is a 40B with no center support and it bows a bit when filled, so for safety's sake, I decided to beef up glass so that I did not risk a full tank blowout.
shellsea
Member
Thanks to all that have shared their knowledge with others here. Too many to mention but you know who you are. I have tried to follow this and many threads on plumbing design as I have never been happy w/ commercial standard designs and need the guidance of those here that are experienced and know what’s best. In my latest tank, a marineland 120 gal RR corner overflow I have begun the conversion to a Herbie design since I have only two bottom holes drilled in tank. I say “begun” because I just tried the idea to get a feel for the benefit which I see already, but I have not plumbed a gate valve in main drain line. I used a ball valve I had and see that the gate valve will be required to fine tune the drain. I plan on oversizing the gate valve to 1 ½ in. on a 1 in pipe.
So my question now, is after reading uncleof6 posts and bean’s article on surface renewal, can I convert my cornerflow weir to coast to coast weir and where might I look for a design idea or build thread? Any thoughts appreciated.
So my question now, is after reading uncleof6 posts and bean’s article on surface renewal, can I convert my cornerflow weir to coast to coast weir and where might I look for a design idea or build thread? Any thoughts appreciated.
uncleof6
Active member
Thanks to all that have shared their knowledge with others here. Too many to mention but you know who you are. I have tried to follow this and many threads on plumbing design as I have never been happy w/ commercial standard designs and need the guidance of those here that are experienced and know what's best. In my latest tank, a marineland 120 gal RR corner overflow I have begun the conversion to a Herbie design since I have only two bottom holes drilled in tank. I say "œbegun" because I just tried the idea to get a feel for the benefit which I see already, but I have not plumbed a gate valve in main drain line. I used a ball valve I had and see that the gate valve will be required to fine tune the drain. I plan on oversizing the gate valve to 1 ½ in. on a 1 in pipe.
So my question now, is after reading uncleof6 posts and bean's article on surface renewal, can I convert my cornerflow weir to coast to coast weir and where might I look for a design idea or build thread? Any thoughts appreciated.
The, can be converted, however it is a lot of work, with many design criteria in order for it to work right, without water falls, and friction losses. Basically this would be an L shaped shelf attached to the far end of the tank, and notched into the overflow so it is all one body of water (no water fall.)
A better solution is to remove the corner overflow, plug the holes with capped bulkheads, build an L shaped shelf in the upper part of the back of the tank, drill three holes out the back, and be done with it.
I really don't think a larger valve on the siphon is going to be worth much, you will simply have to close it more, to get a similar water level rise in the overflow. Net benefit: 0.
Hey RC friends. So I am planning to buy my plumbing soon for my ba but I am still working on my plumbing setup. I drew some pretty bad diagrams of what I am planning but I am seeking advice or corrections on the system. The plumbing will all be 1" diameter. Please excuse the sloppy drawings, unfortunately I don't have a software to do a better sketch.
I have a 70 gallon tank dimensions 48"x16.5"x21.5"
I made a glass weir 38"x4"x5"
Here are the drains
http://s634.photobucket.com/user/black_keys09/media/tankdiagram.jpg.html?sort=3&o=0
and here are the returns
http://s634.photobucket.com/user/black_keys09/media/tankdiagram2.jpg.html?sort=3&o=1
I have a 70 gallon tank dimensions 48"x16.5"x21.5"
I made a glass weir 38"x4"x5"
Here are the drains
http://s634.photobucket.com/user/black_keys09/media/tankdiagram.jpg.html?sort=3&o=0
and here are the returns
http://s634.photobucket.com/user/black_keys09/media/tankdiagram2.jpg.html?sort=3&o=1
Here is a better quality picture of the drawings.
Drains
http://s634.photobucket.com/user/black_keys09/media/2015-02-03003414.jpg.html
Returns
http://s634.photobucket.com/user/black_keys09/media/2015-02-03003109.jpg.html
Drains
http://s634.photobucket.com/user/black_keys09/media/2015-02-03003414.jpg.html
Returns
http://s634.photobucket.com/user/black_keys09/media/2015-02-03003109.jpg.html
shellsea
Member
The, can be converted, however it is a lot of work, with many design criteria in order for it to work right, without water falls, and friction losses. Basically this would be an L shaped shelf attached to the far end of the tank, and notched into the overflow so it is all one body of water (no water fall.)
A better solution is to remove the corner overflow, plug the holes with capped bulkheads, build an L shaped shelf in the upper part of the back of the tank, drill three holes out the back, and be done with it.
I really don't think a larger valve on the siphon is going to be worth much, you will simply have to close it more, to get a similar water level rise in the overflow. Net benefit: 0.
Thanks for advise uncle. Makes sense. Since tank is stocked and running I'll think about that option for awhile.
Here is a better quality picture of the drawings.
Drains
http://s634.photobucket.com/user/black_keys09/media/2015-02-03003414.jpg.html
Returns
http://s634.photobucket.com/user/black_keys09/media/2015-02-03003109.jpg.html
Has anybody been able to see it? Does everything look okay with the drains?
Also the return. Ive heard that using tees isnt good but how else can I get two return lines? Will it be better if I make it so the tee goes straight through to the bulkhead on the left and branches off to the right to the other bulkhead on the right?
uncleof6
Active member
Has anybody been able to see it? Does everything look okay with the drains?
Also the return. Ive heard that using tees isnt good but how else can I get two return lines? Will it be better if I make it so the tee goes straight through to the bulkhead on the left and branches off to the right to the other bulkhead on the right?
The drains look fine.
It is better to not use tees for the return, and use as few fittings as possible for all your plumbing. A 70 gallon tank is too small to justify the use of dual returns. It is not going to accomplish anything of value. Power heads mix the return water to all points in the tank. Dual returns just complicates the plumbing. Use a single return up over the back of the tank, one size larger than the pump outlet size, with the outlet just below the water surface. Get rid of the lock line also, nothing but hobby gimmicks, that restrict and reduce the flow.
Thank you for the reply uncleof6. Oh ok. I forgot about the powerheads inside circulating all the return water. So I'll just plumb one return line.
Just to be clear do I use one size larger then the pump outlet size on the whole return line? Or just the end where it goes in the tank? The pump I was thinking about getting is the sicce 5.0 and its outlet size is 3/4"-1". So a 1.5".
Also do you recommend I put something at the end of the return line to prevent snails from going in? Or will the flow be to great to worry about that?
uncleof6
Active member
Thank you for the reply uncleof6. Oh ok. I forgot about the powerheads inside circulating all the return water. So I'll just plumb one return line.
Just to be clear do I use one size larger then the pump outlet size on the whole return line? Or just the end where it goes in the tank? The pump I was thinking about getting is the sicce 5.0 and its outlet size is 3/4"-1". So a 1.5".
Also do you recommend I put something at the end of the return line to prevent snails from going in? Or will the flow be to great to worry about that?
Snails are not going to go in the return!
There are better pumps than the Sicce, looking at recent comments concerning them. But you want at least one size larger than the pump outlet size minimum. For the pump you mention, that would be 1" if you using the 3/4" outlet or 1.25" if using the 1" outlet. On the other hand, 1.5" is even better. This is the entire length of the return, no reducing, or restricting, other than at your main flow gate valve.
Oh ok cool. Those sneaky snails.
Yeah I dont think I am going to get the sicce anymore. Will the waveline dc 6000 do the trick? It's a $6 more than the sicce and it has variable speed. Also if I buy this pump at aquatic warehouse they will give me a $20 livestock credit!
The dc 6000 outlet external diameter is 32 mm so 1.26 inches. So now I can use that 1.5 return line pipe right?
Now to connect to the bigger pipe I'll need to get another adapter. Should I use tubing to connect to the pvc? Or just hard plumb the whole thing. I want it to be as quiet as possible.
Thanks for your help uncleof6.
uncleof6
Active member
Oh ok cool. Those sneaky snails.
Yeah I dont think I am going to get the sicce anymore. Will the waveline dc 6000 do the trick? It's a $6 more than the sicce and it has variable speed. Also if I buy this pump at aquatic warehouse they will give me a $20 livestock credit!
The dc 6000 outlet external diameter is 32 mm so 1.26 inches. So now I can use that 1.5 return line pipe right?
Now to connect to the bigger pipe I'll need to get another adapter. Should I use tubing to connect to the pvc? Or just hard plumb the whole thing. I want it to be as quiet as possible.
Thanks for your help uncleof6.
For a 70 gallon tank, the DC6000 is plenty. I am talking about RLSS, not Jebao, which I know little about.
1.5" pipe would be my choice. On the plumbing, the rlss pumps are rather quiet, in a sufficient volume of water (return section.) You will find that fittings for tubing will be somewhat restrictive, and not conducive to good flow.
Say hi to Pat, if he is still around.
Similar threads
- Replies
- 3
- Views
- 257
- Replies
- 2
- Views
- 1K
- Replies
- 4
- Views
- 1K