DIY Stands Template and Calculator

Well... Obligatory 'stack o' wood' picture...

As for pocket screws... I spent a LONG time drilling a lot of them.

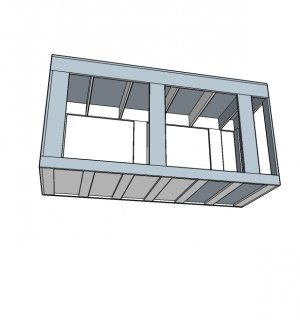
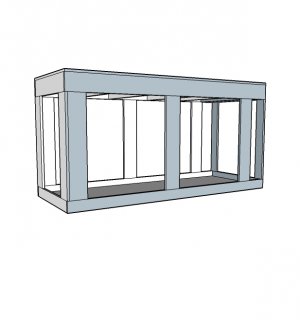
How many do you really need per leg etc?

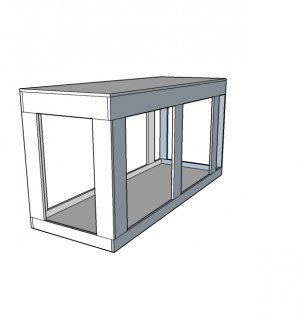
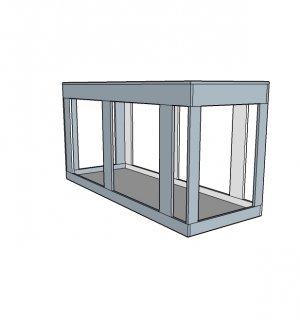
Do you need pocket screws or otherwise regular screws connecting the pair of legs in each corner into their L shape?

uploadfromtaptalk1408081898651.jpg
 
Interesting he didn't seem to use actual pocket screws in his tests...

Looks like he also used washers and the results were pretty good compared to some of the other methods:

"I used 2" #8 screws for the pocket hole joint in maple. The joint failed at 220 pounds, with the pocket holes splitting apart.
The joint with the 3 1/2" screws screwed through the post and into the end grain held up to 160 pounds before the screw heads got pulled into the post. After I put washers behind the screw heads, I was able to load the joint to 300 pounds"
 
Looks like he also used washers and the results were pretty good compared to some of the other methods.
I'm no physics major but to me a washer on a cone shaped screw head bridging a round hole is still only going to encourage the washer to fold up around the screw head with enough force. Basically just slightly enlarging the head (cone size) of said screw basically.

I would think an actual round (flat under head (pan or truss or similar Or perhaps a proper pocket screw) or the same with a washer would perform notably better as they don't act like a log splitter and better spread the pressure over a wider area.

Maybe RE has a better answer ;)
Looks like he also used washers and the results were pretty good compared to some of the other methods:

"I used 2" #8 screws for the pocket hole joint in maple. The joint failed at 220 pounds, with the pocket holes splitting apart.
The joint with the 3 1/2" screws screwed through the post and into the end grain held up to 160 pounds before the screw heads got pulled into the post. After I put washers behind the screw heads, I was able to load the joint to 300 pounds"
 
Been looking over this thread and even the original that started it all. I just bought a new 120 High tank (Glass black plastic top and bottom edges). 60"W x 18"D x 26"H. Using the plans can I get by with a 2x6 that will free span? Or would I need to add a support? looks like it would be a 4'-7 " span. I don't mind adding supports but would add two so I can put doors in and be able to access all the filter system.


With 2x6 free spaning?


If I add the 2x4 bracing would I be able to just use a 2x4 top then?
 
Last edited:
Got the stand made last night after work. Ended up going with all 2x4 construction since I will be having doors and would have to *** some sort of bracing for them anyway.


Now that the easy part is over I just have to make it look nice and I'm done.

I just have to say thank you RocketEngineer for making this tread and giving out so much information!
 
So we are upgrading from a 75G to a 220G and building our own stand. I have no worries but the wife is worried about it holding the weight. Drawings of the stand are attached; it is 80 L X 30 W X 40 H.
It's made out of 1 Xs (1x4 and 1x6) with 3/4 oak ply on the top; put together with pocket hole screws and glue. There are also metal brackets at all the leg joints.
I realize it's not as overbuilt as most DIY stands but I think it should hold the weight just fine. The wife would like an engineers thoughts to help her sleep at night :rolleye1:
 

Attachments

  • Front Profile.jpg
    Front Profile.jpg
    68.5 KB · Views: 4
  • Back Profile.jpg
    Back Profile.jpg
    63.4 KB · Views: 3
  • Bottom.jpg
    Bottom.jpg
    90.4 KB · Views: 4
  • Side Profile.jpg
    Side Profile.jpg
    66.3 KB · Views: 3
So can anyone tell me why in the 1st post and in the updated thread split the orientation of the green screw strips have been changed?

Also is seem like there is very little room to screw some of the load bearing legs to the screw strips on the legs that don't see the wide side of the green strip 2x4 material, I guess just be careful with how you are drilling into the tiny arse side of the 2x4?
 
I am in the process of purchasing all the materials to build my fish tank stand. I have a question about the "skin" process.

I was at HD, and I went back to the laminate aisle to see what types of options there were. I was debating between ply wood (paint it), or a laminate already the color I want.....black.

has anyone ever used this type of laminate to skin there tank stand, or any furniture in general? How does it handle moisture?

http://www.homedepot.com/p/Wilsonar...in-Black-Matte-Finish-1595603504896/203592675
 
Things to note:

A 2X4 is actually 1.5" X 3.5"; a 2X6 is actually 1.5" X 5.5"; and a 2X8 is actually 1.5" X 7.25".

Making a beam made up of two boards side by side is twice as strong as each of the individual boards. For a 48" span, a 2X4 supporting 1000#s deflects 0.269" while a 2X6 only deflects 0.069" and a 2X8 deflects 0.030". That said, it is much better to go up in size then it is to double up.

When assembling the stand, be sure all of the pieces have square cut ends and that they are as straight as possible. If one of the long boards for the top frame (red above) has a crown (bows up when stood on edge), be sure to place the crown up. Glue will help bond the pieces together and coated decking screws will resist rusting. Clamping the pieces together and pre-drilling the holes will help make assembly easier.

Pocket drilling the legs (purple) can eliminate the need for the screw strip (green) but I would make sure to skin the stand on three sides to keep it from racking/twisting. Also, be sure to screw both leg pieces together on the corner for added strength.

Why place the crown up... wouldn't that lead to inability of corner loading for rimmed aquariums. I'm assuming you meant when assembling the top box to make sure the crown is up (and therefore when on the top, the crown is down)
 
I am in the process of purchasing all the materials to build my fish tank stand. I have a question about the "skin" process.

I was at HD, and I went back to the laminate aisle to see what types of options there were. I was debating between ply wood (paint it), or a laminate already the color I want.....black.

has anyone ever used this type of laminate to skin there tank stand, or any furniture in general? How does it handle moisture?

The more common name is Formica ( a brand). Used for counter tops. Very water resistant.

It does need a substrate and then is glued down with contact cement. Usual substrate is MDF. MDF is NOT water resistant! So to use this product you build the skin and glue the Wilsonart to the face, back and all edges.

Painting is a lot easier! If you are looking for a very smooth, glossy black look start with a fine grained hardwood ply like Birch.
 
I am in the process of purchasing all the materials to build my fish tank stand. I have a question about the "skin" process.

I was at HD, and I went back to the laminate aisle to see what types of options there were. I was debating between ply wood (paint it), or a laminate already the color I want.....black.

has anyone ever used this type of laminate to skin there tank stand, or any furniture in general? How does it handle moisture?

http://www.homedepot.com/p/Wilsonar...in-Black-Matte-Finish-1595603504896/203592675
I have used MDO (very different from MDF). There is also HDO which does not need to be painted. I've seen aquariums made with plywood with Formica (yes the name brand) glued to the insides of the tank. It was done with the butcher block Formica which was probably popular when the tanks were built. Most of the tanks built that way, and the guy had room after room of them, held up very well. It was an exception for a tank to have a bubble or peeling laminate, and even then one the one tank with peeling, the adhesive left behind had so far prevented a leak.
 
As far as it being better to make a board wider than to double it, there is a gap in that logic. First, a 2 by 8 instead of a doubled 2 by four will block twice as much of the access below the tank. This can make working with equipment under the tank difficult or impossible. Second, two, two by fours doubled to each other without a spacer would only be three and a half by three inches. You can insert half inch plywood between them and create a standard dimension three and a half by three and a half. This will be much stronger than two doubled boards, and the plywood core and choosing complimentary grain in the boards will make this composite less likely to warp, bend or bow than either the two by four or the two by eight. Wood is not a perfect uniform material. The bow of the boards should be placed upwards. If the bow is extreme, those boards should not be used across spans but they may be OK to use in short uprights where their bow will be minimized. Glass tanks should be supported by the corners, By using plywood as the core, the bow can be pulled out of the boards as they are glued together. If you don't double the boards, you could have some planing, sanding, or building up in your future.
 
2acf2bcb854208c94157fac7db9f6ae4.jpg
aa4536da3ed5fb81d87c2b7d7e661272.jpg
417216daf76bc9eeca5864d58c5be403.jpg
df4b972aa1bdf82f166c9bdbfbc02286.jpg
108a4ccdffac0e76ab0f65fc9256190d.jpg
b082d97d3d9fbbf3c42facd39f0bd3c2.jpg
6918b82462277a721492d99f0ac975cc.jpg
d9efdc2b9a5d144078d9df499f669707.jpg
I build my stand out of 3/4 solid oak and 3/4 oak plywood no 2x4 is for a 60 cube and built it as same design as my 180gal most stand build with 2x4 is over kill and take too much room inside the stand
 
Back
Top