You are using an out of date browser. It may not display this or other websites correctly.
You should upgrade or use an alternative browser.
You should upgrade or use an alternative browser.
DIY Stands Template and Calculator
- Thread starter JohnL
- Start date
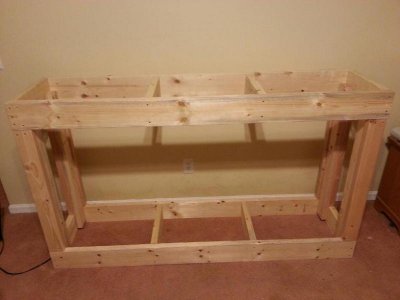
Thought I would add my contribution to this thread since I used alot of advice and information from here in my stand build. The aquarium is a standard 150G (5x2x2) with corner overflow in the back right. The following pics and progress spanned the course of the summer starting probably in July. Used 2x6s on the top frame and vertical supports, and 2x4s for the bottom frame. I wanted an open front for easy access to the sump so I followed the recommendations from the DIY stand thread over on the other site.

Used a Kreg jig and screwed everything together with pocket holes and the kreg blue-coated moisture resistant screws. Everything is level and square.

I got several coats of Kilz primer on the stand frame. Here you can see the pocket holes used to attach everything.

I added some ¾ in. plywood to the sides and back to add additional support to hopefully prevent racking and twisting when the tank is on and filled with saltwater. Made some cutouts for plumbing and cord access. Also put ¾ in. ply on the top and inside of the stand. I used wood filler to fill in my screw holes and get a cleaner look, and I caulked each corner and joint of the stand.

After three or four coats of Kilz, I filed the pocket holes in the stand and sanded them flush. I then painted the interior with high-gloss white. I want high visibility in the sump area and also want some moisture protection. Luckily I had some high-gloss white leftover from a previous build and so the decision was easy. I think I did about 2 coats of the high-gloss white.

Screwed and glued down the ¾ in. plywood top and also made a cut-out for my overflow. More wood filler and sanding for the screw holes.

I added some top trim using finishing nails. I used a punch to recess the nails a bit, more wood filler and sanding and I got a nice smooth finish.

Onto the cabinet doors, I used some nice 1x4 and 1x6 pine from HD and I was going for a shaker style door. I again used the kreg jig and joined the wood with pocket holes and used wood plugs this time. Here are some shots of the wood plugs before and after sanding.


I didn't take pics of the whole cabinet door building, but I used more left over ¾ in ply for the middle of the side door panels and some ¼" ply for the front panels. More wood filler to cover up the screw and finishing nail holes on the back of each door because I again wanted this thing to look as clean as possible (per wife's request).
Here's the end result. I only took some pics of the front door panels clamped in place so I could make sure I didn't mess anything up.

More to follow...
Used a Kreg jig and screwed everything together with pocket holes and the kreg blue-coated moisture resistant screws. Everything is level and square.
I got several coats of Kilz primer on the stand frame. Here you can see the pocket holes used to attach everything.
I added some ¾ in. plywood to the sides and back to add additional support to hopefully prevent racking and twisting when the tank is on and filled with saltwater. Made some cutouts for plumbing and cord access. Also put ¾ in. ply on the top and inside of the stand. I used wood filler to fill in my screw holes and get a cleaner look, and I caulked each corner and joint of the stand.
After three or four coats of Kilz, I filed the pocket holes in the stand and sanded them flush. I then painted the interior with high-gloss white. I want high visibility in the sump area and also want some moisture protection. Luckily I had some high-gloss white leftover from a previous build and so the decision was easy. I think I did about 2 coats of the high-gloss white.
Screwed and glued down the ¾ in. plywood top and also made a cut-out for my overflow. More wood filler and sanding for the screw holes.
I added some top trim using finishing nails. I used a punch to recess the nails a bit, more wood filler and sanding and I got a nice smooth finish.
Onto the cabinet doors, I used some nice 1x4 and 1x6 pine from HD and I was going for a shaker style door. I again used the kreg jig and joined the wood with pocket holes and used wood plugs this time. Here are some shots of the wood plugs before and after sanding.
I didn't take pics of the whole cabinet door building, but I used more left over ¾ in ply for the middle of the side door panels and some ¼" ply for the front panels. More wood filler to cover up the screw and finishing nail holes on the back of each door because I again wanted this thing to look as clean as possible (per wife's request).
Here's the end result. I only took some pics of the front door panels clamped in place so I could make sure I didn't mess anything up.
More to follow...
So I decided to paint the exterior of the stand a semi-gloss dark gray/black. Here are some pics prior to front door assembly. Paint is drying after several coats. My apologies for the crappy iphone pics.


Here's the stand in its final spot. Again sorry for the crappy pics and morning glare.

I decided to use these drawer slides to have the front doors slide open instead of out like normal cabinet doors. I thought it made for a decent look to the stand and I would have complete access to the sump area with both doors open. Hinges would've worked just as well, but I wanted to do something somewhat different for my build.


Thank goodness this thing is level. Hope it stays this way once the tank is on and it's filled.

Still need to put on the side doors and cabinet hardware. Then going to decide on a light stand since my wife won't let me hang my lights from the ceiling. And then finally gonna get the aquarium in the house and on the stand.
Here's the stand in its final spot. Again sorry for the crappy pics and morning glare.
I decided to use these drawer slides to have the front doors slide open instead of out like normal cabinet doors. I thought it made for a decent look to the stand and I would have complete access to the sump area with both doors open. Hinges would've worked just as well, but I wanted to do something somewhat different for my build.
Thank goodness this thing is level. Hope it stays this way once the tank is on and it's filled.
Still need to put on the side doors and cabinet hardware. Then going to decide on a light stand since my wife won't let me hang my lights from the ceiling. And then finally gonna get the aquarium in the house and on the stand.
RocketEngineer
Space is big.
I was thinking of building my 90 gal stand out of 1x4 or 1x3 poplar and wrapped in 3/8 birch, has anyone attempted this before, could I span the entire 4' with no center support?
My previous stand was a similar design with 2x4, I found it way to heavy and over built.
If you are going 1X material I recommend you stick with 1X4s. Poplar is easy to work with because it has almost the same mechanical properties as pine which means going without a center brace in such small material would be questionable. However, if you were to use oak or maple for the two long pieces, the higher wood strength will allow you to do it.
HTH,
Jstn
Member
If you are going 1X material I recommend you stick with 1X4s. Poplar is easy to work with because it has almost the same mechanical properties as pine which means going without a center brace in such small material would be questionable. However, if you were to use oak or maple for the two long pieces, the higher wood strength will allow you to do it.
HTH,
Thank you, that brings up a great point. I was either going to add a removable center brace for working on it; or I can just use a piece of oak. Granted Oak is pricey but for one or two pieces I feel it would be worth it. The bottom can be standard poplar, just the load carrying span should be (real) hardwood?
RocketEngineer
Space is big.
Thank you, that brings up a great point. I was either going to add a removable center brace for working on it; or I can just use a piece of oak. Granted Oak is pricey but for one or two pieces I feel it would be worth it. The bottom can be standard poplar, just the load carrying span should be (real) hardwood?
Correct.
dangros
New member
The pic vanished!!!
Stand BUILD! (Trim cont'd):
Then, I added some victorian trim. The trim was 3/4" wide, the same as the top and bottom trim. However, I was concerned about the trim not fitting exactly flush and wanted more detail in the profile. So, I used a table saw to trim the width down so that it was recessed between the top and bottom trim. I also mitered the edges. It was extra work, but I was really happy with the results:


Then, I put on the top "shelf" molding. I routed the edge to give it some detail. I did it on a less than stellar router table. It was a little tricky getting some of the wavy parts out, but I'm happy with the results:


And, to top it off.. I put some crown molding between the top "shelf" and the 1x4 on the sides/front. Couldn't believe how great it looked!!


Here's a shot of the different layers of wood on top of the framing to make up the skin and trim:


RocketEngineer
Space is big.
The pic vanished!!!
That post is over 3 years old so I'm not surprised. The older an image is, the less likely it is to stick around.
WestTxReefer
New member

lets see if this works..
reef tank 2.0
Member
I am glad I went back to this thread and re-read and double checked my dimensions. I did already precut my "purples" and after looking closely, they ended up making my stand 30" tall. DOH!!!
When I was first taking my measurements, the purples said "H-9"". i thought that meant aquarium height. not the stand height i preferred. DOH!! (again)
so, i have a 24" high tank (130 gallon), i was thinking of making the stand 40" high, with a plywood top. then the tank sitting on top. so it would end up being 64ish" high. So the "new" purples would be 31" long, and the greens would be 38" long.
now, i know some members brought up the "tipping over" part of it. So, to avoid that, are there any additional supports that I need to make the overall height safe from tip over?
I am using all 2x6 construction except for the green screw strips, which are 2x4's. Should those be 2x6 as well?
WestTxReefer
New member
I made my stand 36" tall with a 24" tall 180, I don't think I'll need to worry about it tipping over, so I wouldn't know
RocketEngineer
Space is big.
I am glad I went back to this thread and re-read and double checked my dimensions. I did already precut my "purples" and after looking closely, they ended up making my stand 30" tall. DOH!!!
When I was first taking my measurements, the purples said "H-9"". i thought that meant aquarium height. not the stand height i preferred. DOH!! (again)
so, i have a 24" high tank (130 gallon), i was thinking of making the stand 40" high, with a plywood top. then the tank sitting on top. so it would end up being 64ish" high. So the "new" purples would be 31" long, and the greens would be 38" long.
now, i know some members brought up the "tipping over" part of it. So, to avoid that, are there any additional supports that I need to make the overall height safe from tip over?
I am using all 2x6 construction except for the green screw strips, which are 2x4's. Should those be 2x6 as well?
The only thing that should be 2X6 is the top frame, all the rest should be 2X4.
If you were placing a 12" wide tank on a 40" tall stand, tipping over is an issue. Once you get to 18" wide it is a lot harder. If you are up against a wall it would take a lot to get it to tip over, mainly someone pulling on the tank. 1300 pounds just isn't going to want to move very easily.
reef tank 2.0
Member
Got it. Thank you for your help once again
reef tank 2.0
Member
i finally got done building my stand. phew. i certainly am no carpenter. It could be me or it could be the mitre saw. either way, I have some flaws. Where the vertical purples meet the red and orange, I have some small gaps. so i wedged the hell out of it with some wooden shims. is this a bad thing to do?
I'd hate to redo all of it but if shims are a bad thing to use after all said and done, please let me know, before i place the tank on top and fill with water.
after placing a level on the stand, it is almost near level. the floor is a little off so that accounted for the "almost" level. can I use shims under the stand to even it out? if not, whats the best way to raise the stand?
RocketEngineer
Space is big.
crankbait09, it is common to have small gaps because 2X lumber is never perfectly straight. Adding wedges isn't the best solution but it won't hurt either. As long as there is contact between the pieces, the legs should be fine.
The top of the stand should be FLAT. Make sure there are no high or low spots using a long straight edge (I use a 4 foot level but ignore the bubble). Once the stand is in place, shim below the stand to get the top level. Most floors are a little off so it will take shims under the stand to make the tank sit flat.
The top of the stand should be FLAT. Make sure there are no high or low spots using a long straight edge (I use a 4 foot level but ignore the bubble). Once the stand is in place, shim below the stand to get the top level. Most floors are a little off so it will take shims under the stand to make the tank sit flat.
reef tank 2.0
Member
so if there are areas where the purples do not meet the red/oranges entirely, how much gap in between is too much?
I think I may replace the vertical boards that have wedges placed between them and the red/oranges. I would really like to NOT use shims. I just hope I don;t have to reconstruct the whole thing again. that will be a confidence killer.
I think I may replace the vertical boards that have wedges placed between them and the red/oranges. I would really like to NOT use shims. I just hope I don;t have to reconstruct the whole thing again. that will be a confidence killer.
RocketEngineer
Space is big.
If you have one purple touching properly per corner, you are fine.
reef tank 2.0
Member
I did redo the vertical supports and one of the red boards and they are MUCH straighter now. the previous purples/red were slightly twisted. all is touching now. thank you
If I am not mistaken, I did read in one of the posts in this two part thread.........................for a 130 gallon tank that is 72-1/2" long, I DO NOT NEED A VERTICAL CENTER BRACE IN THE MIDDLE OF THE STAND, right?
I have the top frame, bottom frame and all the verticals shown in the first post of this thread. I did not see any additional vertical (purple) supports needed for the top/bottom span of 2x6's.
that's correct, right?
RocketEngineer
Space is big.
Got a pic of the stand as it is now? Specifically, the placement of the legs matters on how big the center span is so I can run the numbers.
reef tank 2.0
Member
Similar threads
- Replies
- 1
- Views
- 385
- Replies
- 0
- Views
- 144