DIY Stands Template and Calculator

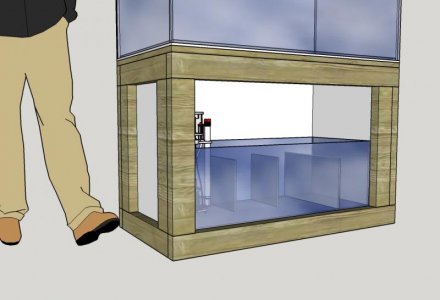
Actually the BEST design for a DIY stand is four pieces of plywood connected properly at the corners. Because the plywood is continuous all around each panel, they can't collapse sideways. Because you have the same in all directions, there is no way the stand can fold over as long as the corner joints hold. The problem isn't with the design, its that building such a stand takes the proper tools to cut the plywood cleanly and the skills to make the joints. Not everyone has both of these.

The original design still holds. Nothing has really changed on that.

Plywood on top is fairly typical. I have a trimmed piece for the top of my stand and use the ledge all the time for small items when I'm working around or in the tank. It isn't required by any means.
 
Thanks for the reply. I don't mean this snarky so please don't take it that way, but I know that MDF and water do NOT mix. My plan is to seal it with a high quality primer (Kilz etc.). I just wasn't sure if having a rim would cause stress issues (don't know why, but in my brain I have that worry). The solution to the extra depth is beautifully simple. Thanks again!
 
Thanks for the reply. I don't mean this snarky so please don't take it that way, but I know that MDF and water do NOT mix. My plan is to seal it with a high quality primer (Kilz etc.). I just wasn't sure if having a rim would cause stress issues (don't know why, but in my brain I have that worry). The solution to the extra depth is beautifully simple. Thanks again!
I have tried sealing this kind of product. It lasts longer than untreated but eventually fails. The best was a sealer they sold specifically for fiberboard. I used it outside exposed to the weather and sun. it was very watery and deep penetrating. I would not do it again if I could avoid it.
 
Thanks for the reply. I don't mean this snarky so please don't take it that way, but I know that MDF and water do NOT mix. My plan is to seal it with a high quality primer (Kilz etc.). I just wasn't sure if having a rim would cause stress issues (don't know why, but in my brain I have that worry). The solution to the extra depth is beautifully simple. Thanks again!

If you have a framed tank there is no need for a top.

Using MDF is a bad idea. All paint does is make the substrate water resistant. They do not waterproof anything. So if the MDF is not waterproof it will not survive.
 
Good points. I want the top for aesthetics, but I guess I could just use a cabinet grade plywood. MDF is just smooth as a baby's butt, but yes, I agree I would probably be creating an unnecessary risk that will eventually put me in the dog house!
 
Picked up some wood, a Kreg Pocket-hole jig, some screws and wood glue at Lowe's on Sunday afternoon. Spent the last three evenings cutting down the wood and assembling the stand.

I used the diagram above and made one little mistake - since the bottom and top long boards sit inside the ends, I needed to subtract the width of the 2x4 twice. Somehow I thought to do that with the top box, but not the bottom. The bottom box ended up 1.5" too wide. I ended up pulling the bottom box apart. I had one extra 2x4 and then reused the other two - with new pocket holes drilled. Since I am still going to use (the green) screw strips, I think I should be fine. If anyone has any comments, I would appreciate hearing from them.

Being somewhat of a novice with wood-working, I decided to use 2x8 rails for the top box. It was only a couple extra bucks and will give me some peace of mind.

Other than that, I designed the stand to be 40" tall. My last tank (many years ago) had a short stand. Other than the tank being low visually, I found working under the tank to be a pain in the butt. However, I'm now a bit concerned that it's too high. Doing some searches on RC, it appears that it's at the high end of what people use.

I know that I'll appreciate the room underneath the stand and I'll like it visually. On the other hand, it'll be a little bit more difficult to work in the tank. For that, I'll just use a little stool.

BTW, the tank will be a 120 gallon 48x24x24. The sump will be a 40 gallon breeder.

Thanks to Rocket Engineer for the design!

Again, any thoughts and/or advice would be appreciated.
 
After "sleeping on it" I think I am going to build another base/bottom box with shorter legs. Will probably drop the height by 3" or 4". I'll just need to buy some new 2x4's.
 
Jumping in this awesome thread. Thanks to all who have posted layouts and stands! Building one for my JBJ 45 Gallon Rimless.

vNHSce.jpg
 
Just a slight mod if anyone is interested.

This stand is almost perfect for soundproofing.
Once you skin the outside, you have the width of your frame wood inside to put batting, or ideally, rockwool etc. in. Then put an internal skin on the frames. Its then a dampened air-gap which we use in recording studios. You should be able to use very thin wood for the internal skin. obviously you lose some internal space but if its a fair sized stand it won't be a problem.

I've atached a quick render of the gap and internal skin.
The other spot to watch out for noise leak is door seams etc.which a bit of window/door sealing rubber will help out with.

Hope that helps make your wive's happier :P
 

Attachments

  • Airgap.jpg
    Airgap.jpg
    39.9 KB · Views: 3
I re-built the bottom box and legs of my tank stand last night - I'm happy that I did. First, I like that it's a bit shorter. Second, I certainly did a better job constructing it.

I have a couple questions for anyone who can help.

I used 2 x 8's for the top box. Apparently the wood was not a consistent height - the "8 part" of the 2 x 8. If I rested the 2x8 on the vertical leg, then it was not even as against the next 2x8. Here are some pictures to help.

Unfortunately, I didn't take a picture of the entire thing, but you can see where I added a wood "spacer" at the top of the vertical leg. If you look at the second picture, the top of the 2x8 is level with the other one after the spacer was added. The spacer is basically a thinly cut piece of 2x4. Should I remove it and replace it with a shim?

Any other suggestions/comments would be appreciated. Thanks!
 

Attachments

  • Tank Stand Bottom.jpg
    Tank Stand Bottom.jpg
    36.5 KB · Views: 3
  • Tank Stand Top.jpg
    Tank Stand Top.jpg
    26.7 KB · Views: 2
Any other suggestions/comments would be appreciated. Thanks!

Rant on...
One of the problems I have with using construction lumber (2x4s, etc.) is using a rough construction material to do finish cabinetry. Parts don't line up, aren't straight and can really move after construction. Because most doing this type of stand won't/can't mill the wood to accurate dimensions, material selection is very important. The catch is most doing this stand don't know how to do this critical selection.
Rant off...

Do you have a square? Are all the parts cut square in both directions. That would be square along the 4" face and 2" face. Square cuts should not be that far off. If they are not square there will be twists created. The result can be a top that is not co-planer. If the legs are square and all the same length, there is a good possibility the top frame is not co-planer. Glass boxes full of water don't like this!

You need to take some measurements to find out where the problems are. Is the 2x8 not a consistent dimension? Is the 2x8 warped? Are the cuts square? Are the legs the same length? Are the frames (top and bottom) square? (measure diagonals) Is the top frame co-planer? (use winding sticks to find out).

One other thing. (Yes I will stop soon! :thumbsup: )
The pocket holes look like they are a long way from the end of the board. How did you determine their location? Does the screw exit the middle of the board end?

Sorry, it might just be difficulty interpreting the pics, but the pockets look 'funny' to me. I've made thousands of pocket holes and these don't look right.
 
Hey John - Thanks for the comments - all of them!!!

I do have a square and will do some measurements tonight. I am fairly comfortable that the ends are square as they were cut (both ends) with my miter saw (see below). My sense is that end of the 2x8 just isn't the width that it should be, but I'll test that theory tonight.

For the pocket holes, I used the Kreg pictured below. Although it is not very clear, there are numbers along the near side of the vertical piece of blue plastic. The numbers go up to 1.5 inches along the side, which was where I set it for the pocket holes.

Here is a link to the jig: https://www.kregtool.com/store/c13/kreg-jigsreg/p34/kreg-jigreg-k4/#

To be honest, I didn't check to make sure that the screws come through the middle of the board end. I have some extra wood left over, so I can check that out tonight.

To the extent that it helps with anything, I used 2.5" screws, which I believe to be is what the Kreg manual recommends. To the extent someone else comes along wondering what I did, see "Choosing a Screw" in the manual linked below.

https://www.kregtool.com/webres/Files/k4-product-manual.pdf
 

Attachments

  • Saw.jpg
    Saw.jpg
    55.1 KB · Views: 3
  • Kreg.jpg
    Kreg.jpg
    103.6 KB · Views: 3
Hello everyone. I got a 45 gallon tank on Craigslist. I can't believe the store bought stands can support all of this weight! The tank measures 36x12x24 and I want to know if 1x4 lumber will be ok to use? What would be a good height for the stand?
 
Hello everyone. I got a 45 gallon tank on Craigslist. I can't believe the store bought stands can support all of this weight! The tank measures 36x12x24 and I want to know if 1x4 lumber will be ok to use? What would be a good height for the stand?

I'm very new to this, so take this with a grain of "salt". I have read more than I care to admit about the height of the stand. From that, you want to make sure that the bottom of the tank is high enough to fit whatever you want to put beneath it (protein skimmer?).

On the other end, consider the height with the tank on top of the stand. Do you want to be able to reach into the tank without a step stool? Maybe you want to make sure the top of the tank is below your arm pit? What is likely to be the primary viewing for the tank? Standing? From the couch? I've read anything from the stand being 30" high to 42".

As far as the 1x4 lumber, take a look at the first page of this thread.

Hope this helps.
 
Another question...

I am going to add either 1/2 or 3/4 birch plywood to the outside of the stand. My thought is that I will add some to the back as well, but cut out a portion of it for ventilation. The two sides and front will have doors for access.

My understanding is that the frame wood will expand and contract with the seasons, but the plywood will not. If that is correct, is there some method for attaching the plywood to address it? For example, should the screw holes be slotted?
 
Hi all,

Building a stand for a 60x28x24.

Figure 2x4's trimmed to about 3" to square them for the uprights/legs. Everything pocket-screwed and glued.

Question is, can I use the trimmed 2x4 for the top pieces?

I will have a 2x4 center brace/upright/leg in the front and the back; and I will build the top with multiple cross-members and a plywood top.

Tank is glass, with eurobrace and a floating bottom.

Thanks.

Paul
 
Just a few updates.

So for my stand, I finally got around to making a few mods to it.
20150114_085611_zpshxcoorl7.jpg


To vent out the moisture in the air, I added a fan to the left side.
20150301_223602_zps8zu6hsy3.jpg


I also cut a 3" hole in the back to run to the electrical box. I added a 3" raceway to help hide cords. It's a center overflow, so I had to cut the raceway in two.
20150301_222913_zpsfed4u6b5.jpg


I added the electrical box off to the right side and mounted on the wall.
20150301_103038_zpsrvzt2xjw.jpg


Quarantine Stand and storage box:
20150224_230343_zpskywet8hv.jpg


Quarantine Stand for my bedroom:
20150219_085359_zps3kqto7f2.jpg


And for kicks I made a console table for the TV to match.
20150205_084827_zps4jwp9abm.jpg
 
Back
Top