Silent and Failsafe Overflow System

So I've had this setup running on my new 135 for a few days. I set it up with no modifications. After a little tweeking, it starts flawlessly. 15 seconds to purge the air from the syphon then silent and 0 bubbles. Now I just have to figure a way to quiet down my skimmer.
 
Excellent news.

I'm getting excited ... ordered all my plumbing parts for my build.

Just had my skimmer arrive today ... what a monster!
 
I used sanitar 1.5" tees, the take up a lot more room because of the long sweep. Luckily my tank is caddy corner on two walls so not an isssue.

Gus

Here's a pic.
 

Attachments

  • IMAG0505.jpg
    IMAG0505.jpg
    31.5 KB · Views: 3
location of ball valve

location of ball valve

This is a wonderful thread. Thank you BA and all for putting the time and effort into this. I've combed it many times but still can't find any specifics to my question so here goes:

Does it matter where the true union ball valve is located? I don't have room for it during the 'drop' part of my plumbing run but have plenty of room on a horizontal run as it goes to the sump. Will it still work if I place it there? I presume it would but it'd be nice to get some reassurance. I can post a pick of my setup if it helps.

cheers.
DT
 
Dangtang,

Several times it has been stated that for long runs it is better near the sump, but your horizontal run may change that. I would still place it near the sump.
 
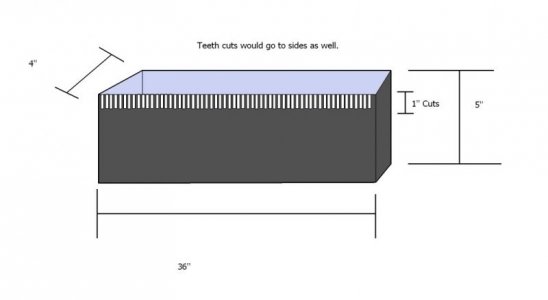
Well I got lucky enough to be able to move the tank to a new area and will be able to proceed with BA's setup. I am going to make the internal overflow box with the following dimensions

36''x5''x4''. It will be all the way to the top with teeth. The cuts on the box will be 1inch in height. Hope that makes sense.

This will be for a 55gal tank that is 48'' in length.

Does that sound ok or does anyone have any suggestions?

Attached is my sad attempt at creating an example.

Sorry for the duplicate didnt realize that it had been posted.
 

Attachments

  • Overflow Box.jpg
    Overflow Box.jpg
    18.2 KB · Views: 3
I have a tank that is drilled at the bottom can I still use this style.or do I have to drill the back glass


Certainly, you will simply have pipes going out the bottom of the tank, instead of the back of the tank. As long as the other construction details are attended to, it should work without issue.
 
cant decide what I want to do and want to know what everyone is doing and what would you suggest.

I currently have a HOB overflow that I made for a 40 breeder but put on a 75gal DT, needless to say it is undersized but luckily so is my Mag7 so they are both at their max. I’m LQQKing at upgrading to a 120 (48x24x24) or a 150 (48x30x24H).

The stand when finished will work for either and the sump is a 36gal (about 26gal) but the first chamber is not big enough so I will need to build another one. I currently have some fish and corals so when I get everything ready it will be like a water change but change the sump and tank instead.

The tank will be viewed from 3 ¾ sides. When looking at the front of the tank it will have a small area in the back left side that will be the overflow area. My questions are what next? Do I do a bean animal, dorso or a herbie? There are a couple others that I have not named. I oringanly wanted to do a bean animal but I don’t have enough room and keep it out of site. The back of the tank will be in the kitchen side and have a couple of chairs at the counter for a small breakfast area. I will only have about 8” from the wall to the fridge to have pipes come from the side of the tank. I don’t know if the tank I get will have tempered bottom or not.

I have planned to do a C2C but was going to do it on the left side and let it drain beside the tank but don’t think this will work as the bean animal needs 3 pipes. If I don’t get a tempered bottom I could do a left corner OF and a dorso with an extra pipe for the emergency OF. The return can come up the outside of the tank into the canopy on the left side.

I have tried to use the Google sketch up and auto cad but I don’t have a clue how to use it. That’s about 3 hrs of time I won’t get back. I prefer to use the T-square and good o’pencil. I can do pretty good in excel (don’t laugh).

So let me know what your thoughts are. And I guess I’ll never get the hang of this 5 line rule.

I sorta have a durso on the HOB OF now. It’s 1-1/4 and I have ¼ tube in the top but have the tee sitting about 3/8 offset of the BH to keep the level where I want it. The ¼ tube then bends down so if it gets too full it will go to full siphon. When I put my PS (sea clone (will be replaced)) in the sump and the large filter sock it really was crammed and I was getting another PS so I made a remote sump behind the fridge. And to get the water out I have sorta a durso there as well and it dumps in the sump. Due to the extra area I tried it without using the filter sock and I’m pretty pleased. It is much quieter now than it was so it makes since after thinking about the horizontal distance as it had no horizontal run. The Bulk Heads I have are 1-1/4 thread on both sides.

The opposite side of the wall will be a viewing area in the living room. I guess I could do a triangle sorta. 2 pipes on the left side behind the fridge and 1 on the back and bend some Lexan and paint it to cover the pipe up.


I have LQQKed at a new 125 left corner OF by Marineland it only has 1 durso drain and the return in the corner. I could use the return as a second drain? They also told me that the 150 OF could be the same location. I’m not worried about the pvc pipe part as I can get it real cheap. And if I do the bean I could flip the sump and add about 20” on the horizontal run. As I have been thinking about sump on one side and fuge on the other with the pump in the middle.

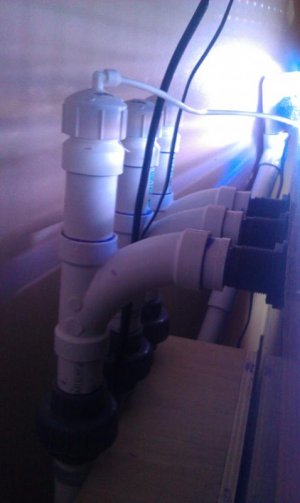
TANK.jpg~original
 
Last edited by a moderator:
No... We think he is a Beagle and Golden Retriever mix, as do most of the veteranarians who have seen him. He may have some Terrier in him as well. Oddly, over the years we see dogs here and there exactly like him. He is my buddy :)
 
Certainly, you will simply have pipes going out the bottom of the tank, instead of the back of the tank. As long as the other construction details are attended to, it should work without issue.
More questions pertaining to the application of this design in a bottom drilled tank;
I have my eye on a 125 that has two corner overflows.
There is currently one return and one drain per overflow for a total of 4 bulkheads. My initial plan is to 'Rock & Foam' aqua-scape the back and overflows.

1. Can I use 3 of these 4 connections for this system and the 4th one as my return?
2. Is there a way to incorporate a 'C 2 C' aspect to the current ones without having the new overflow area take up the entire depth of the current ones?
 
Sure, you can connect the two boxes with a a coast to coast overflow shelf several inches deep.

If you choose to leave the boxes as is, then one box will need to have the open channel and siphon standpipe in it. The smaller bulkhead will be the siphon and the larger the open channel. The second overflow box will use the smaller bulkhead as the return and the larger for the emergency. The catch is that the water in the second overflow box will stagnate as it will fill up but now flow. This is due to the fact that the emergency standpipe stays dry. You can fill this box with sand to create a small remote deep sand bed, the alternative would be to drill a few holes near the base of the return return standpipe to allow water to flow into the box and be pushed out the top. Doing so will increase backflow when the return pump is powered down.
 
Getting ready to glue up. Does anybody see anything wrong with the plumbing I might need to fix?

DSC01965.jpg

DSC01967.jpg


Need to drill hole in side of hood for return line and hole for airling tubing on open channel. Also need to put in fan in side of hood.
DSC01968.jpg

DSC01962.jpg

DSC01964.jpg
 
Back
Top