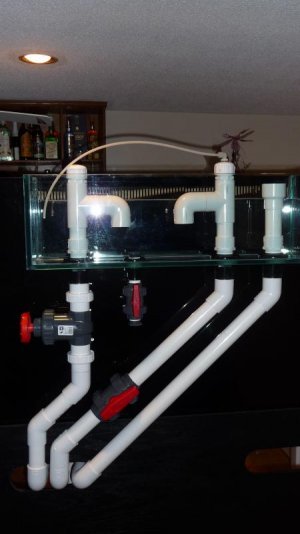
Silent and Failsafe Overflow System

Would not go any smaller than 1". It is just too easy to plug up 3/4". Though 3/4" would probably handle the flow rate, you would have problems especially with the open channel. 1" will give problems with the open channel as well. 1.25" (on a 1" bulkhead) would be a better choice for the open channel.
 
I can't think of a reason to have the open channel raised above the siphon, but it should work. Just make sure that the air line is above the dry emergency inlet, and the dry emergency inlet is above the open channel.
 
hi again.thankx .here is a photo of hopefully the final set up before i glue.i may lower everything 3/4" and dry emerg,1".i will set tube when i know water hight in overflow.
 
Last edited:
Okay thanks for the advice uncle. And thank you for the fast response. I hope to have this up and going soon i will definately come back if i have anymore questions.

Happy New Year!
 
here is photo i hope.
 

Attachments

  • P1040115.jpg
    P1040115.jpg
    38.5 KB · Views: 3
here is photo i hope.

The inlet to the air tube is too low. It needs to be above the inlet to the dry emergency. If it is lower than the inlet to the dry emergency, it will trip the open channel to siphon, before the main siphon starts, and the system will not start fully.
 
yes i didnt set it yet. i was going to lower all pipes but decided to leave it as is.once i glue everything i will tie it off at just above the dry pipe's hight 1/8" to 1/4"above should be good.i figured one would want the second siphon to begin as water just starts entering the dry pipe.but what would be the harm in lowering it to 1/4"below the dry pipe as long as it is still higher than the emergency pipe. should still work but earlier to start the second siphon before water enters dry pipe.or do you need water entering at least one pipe freely for this process to work properly.just asking why?thankx Uncle!!!
 
yes i didnt set it yet. i was going to lower all pipes but decided to leave it as is.once i glue everything i will tie it off at just above the dry pipe's hight 1/8" to 1/4"above should be good.i figured one would want the second siphon to begin as water just starts entering the dry pipe.but what would be the harm in lowering it to 1/4"below the dry pipe as long as it is still higher than the emergency pipe. should still work but earlier to start the second siphon before water enters dry pipe.or do you need water entering at least one pipe freely for this process to work properly.just asking why?thankx Uncle!!!

1/4" may not be enough. You need to test the system first and find out how high the water will go before the dry emergency will purge the overflow. It may be right on, or maybe not. Testing is a good thing.

If the open channel ( that is not the emergency pipe) trips to siphon before the main siphon starts, the main siphon will not start fully, defeating the system.

In normal operation at startup: water level rises, till the main siphon kicks in. Usually, the dry emergency will take some flow before the main siphon starts. After the siphon starts fully (all the air is purged,) using the valve on the siphon the water level in the overflow is raised, till water just flows in the open channel (the one with the air line.)

If, the air line is below the inlet to the dry emergency: water level rises, and instead of flowing in the dry emergency, the open channel trips to siphon mode (air line inlet submerged) and the main and open channel compete, and usually the main siphon will not fully engage, nor will the open channel fully engage. The system is defeated, and will not operate properly. Adjusting it can cure the issue, but on a restart, the system will not start properly.

There was some discussion on this topic a while back in this thread, and there are many variables that can cause a different outcome. However, in the interest of keeping with the theme of this thread "works as designed," and to keep consistency in information, it is recommended to keep the "trip order" as originally intended with the original design: with the open channel airline being submerged after the dry emergency is flowing. E.G. the airline inlet above the inlet to the dry emergency, with the open channel tripping to siphon as the "drop dead" fail safe. (both the main siphon and dry emergency fully plugged.)
 
Would not go any smaller than 1". It is just too easy to plug up 3/4". Though 3/4" would probably handle the flow rate, you would have problems especially with the open channel. 1" will give problems with the open channel as well. 1.25" (on a 1" bulkhead) would be a better choice for the open channel.


I got to thinking about this last night and I was wondering how many gph the open channel is handling in Bean's original design. Since I am only needing to run 300-400 gph is there any chance I could be successful by omitting the the full siphon and only running the open channel and the emergency drain if I use a 1" bulkhead and 1.5" plumbing? I am not normally not one to cut corners and probably will stick to the original design because this is in my bedroom and I want it as quiet as possible but I'm just curious to see if you all think it would work like that?
 
Such a modification would reduce the system to a "Durso" type drain system, with a fail safe. @ 300 - 400 gph through the "open channel" (which is nothing more than a "Durso" modified standpipe, on a 1" bulkhead) the flow would be loud, loaded with bubbles, unstable--toilet flushing pile of junk that will make you want to tear your hair out, beat your dog, and be an unfriendly person. Does that answer your question rather directly? ;) As designed the system has a wide bandwidth, however, omitting the main siphon, would reduce the flow capacity.......well to not have problems with it.

Bean quantified the split siphon/open channel. IIRC it was 80/20, but with a gate valve I think that can be cut down a bit. Not something I have really worried about.
 
If silence is what you are after, then that would be a good idea. At 400 GPH or so, the durso's may be doable, but it will be a gamble. The system (as designed) works well and is easy to implement.

Let us know how it goes!
 
First of all, Hi all. I'm the new guy, not only to the forum but to reefing.
My names Jason. I mainky joined up because of this overflow system and I'm sure there are other threads which will educate me. I have been looking for a while about how to plumb my tank. I came across Beans article a couple of ours ago! (Wow I gotta get of this computer! :lolspin: ) and have been reading through these threads. I haven't been able to read through all of it yet but I think I am beginning to understand, I just need to find out more about what pipe sizes and flow rates I should be trying to achieve.

So i just wanted to say hi and thanks for all the work that you have put into advising fellow hobbiests. I found found this information very useful. (Although by the time I wake up it'll probably all be gone outta my head!)

As I said I am completely new

welcome.gif

<b><big><big>To Reef Central
</big></big>
</b><big><big>

</big></big>http://www.beananimal.com/articles/hydraulics-for-the-aquarist.aspx
<big><big>
</big></big><b><big><big>
</big></big>
</b>
 
I've been through several pages of the first posts, until credit squabbling arose, and Bean's article on his website. Very clever, this drain scheme. I love it and will be using it soon on a new system in the works. I have a couple of implementation detail questions. I'm sure they've been asked before :deadhorse: but I'm not going through 5500 posts :hmm4: to find them!

1) Why are there Tees on the primary siphon and emergency circuits? Why not just Ells since they're both meant to only operate at full siphon? Is there some need for a pneumatic reservoir provided by the stems that sticks up? Maybe some startup transient thing?

2) On the open channel circuit where a Tee is needed for the airhose adapter, is there a reason why the stem needs to stick up so high rather than just be capped right at the Tee?

Thanks,
-bio
 
1) The Tee's facilitate the ability to clean the standpipes of organic material (yes this happens...). I also built all (3) standpipes the same for versatility.

2) It is best to extend the tee to above the waterline so that if the cap has to be removed, the system can still function without flooding the floor. In any case, by the time you add the threaded cap and adaptor (to facilitate cleaning), you will be a few inches higher than the tee anyway.

Alos note that on the open channel, the Tee creates a small air buffer where the airline can draw in air without gurgling. If an elbow were used, there is a very high probability of the air intake gurgling.
 
Internal is a bit more compact, overall, a bit simpler to build. Along with the external box, for most situations, you still need an internal overflow that feeds the external box. On the other hand, the footprint inside the tank can be smaller, with an external plumbing box, but an internal/external is a little more complicated to make, not much, but never-the-less. There are pros and cons to either way.

But, the bottom line is: It works as designed, and it is intended to be relatively uncomplicated to build and install. Of course, we are human, and want to make things more complicated--so we end up with threads with ~ 5500 posts, that are a bear to get through..... ;)
 
Back
Top