Silent and Failsafe Overflow System

Great idea. I was thinking of joining them with a weir between them but it's a 60" long tank so I think it would be too long to make work nicely, and it would create a shadow so I prefer to just leave the two boxes. I can setup the bean drains between the two of them.
Thanks!!

The problem is the water will not move through the pvc "bridge" fast enough for the two overflows to act as one body. On the surface it seems a reasonable solution, however, the physics are not favorable. The communication between the two overflows needs to be seamless, with no friction loss, to upset the balance. Modifications to accomplish this are rather complex, and have been detailed in this thread on a few occasions. Not many reports back on how well it functions though.

The functional solution, is probably a dual herbie, with a siphon and dry emergency in both overflows. If you like, you can run a siphon and open channel in one overflow, and the dry emergency in the other. The drawback being this effectively shuts down the 2nd overflow. This has also been detailed in both this thread and many others.

By far, since dual overflow/bottom drilled tanks are not conducive to well running systems, removal of the overflows, plugging the bottom holes, and drilling out the back--with a custom C2C overflow, is the best solution. Albeit tis a bit of work, the end result is well worth the effort.
 
Hey guys, my tank finally arrived but a couple things have come up. First, the holes were not drilled as far down as I requested which may or may not be a problem. Second, I with I would have thought about getting a wave box before my tank was built but I was thinking about altering the overflow. I want to lower the highest part by about 5/8" and that would put the water line just below the top of the drilled holes. There will still be plenty of room for the down facing elbows to be under water. Before I go ahead with the mod, can you think of any issues this may cause?

Here's a pic:

8734032410_c1944bcb54_z.jpg


Wave boxes really have no point. At best they mess with the physics of the drain system, and they accomplish nothing for the system except create complexity.

For safety, the holes need to be 1x the hole diameter down from the top edge of the glass. For 1" plumbing, the holes need to be at least 2 3/4" down from the top edge of the glass, to the hole center--this is a functional requirement, and is the absolute minimum. With the holes down this amount, and the weir placed 1" below the top edge of the glass, the system will function well.

The water level in the overflow will ultimately appear at the top of the down turned elbows, as you indicated. This gives a 1" drop into the overflow, with the holes dimensioned as above--just looking at it, they don't appear to meet the requirement.

It is a new tank I take it, and at this point, if the holes are in fact too high, (not dimensioned per above) the tank should be returned at the builders expense, and either done properly, or money refunded, rather than try to polish a tur*. All you will have is a shiny POS. ;)
 
Last edited:
Wave boxes really have no point. At best they mess with the physics of the drain system, and they accomplish nothing for the system except create complexity.

For safety, the holes need to be 1x the hole diameter down from the top edge of the glass. For 1" plumbing, the holes need to be at least 2 3/4" down from the top edge of the glass, to the hole center--this is a functional requirement, and is the absolute minimum. With the holes down this amount, and the weir placed 1" below the top edge of the glass, the system will function well.

The water level in the overflow will ultimately appear at the top of the down turned elbows, as you indicated. This gives a 1" drop into the overflow, with the holes dimensioned as above--just looking at it, they don't appear to meet the requirement.

It is a new tank I take it, and at this point, if the holes are in fact too high, (not dimensioned per above) the tank should be returned at the builders expense, and either done properly, or money refunded, rather than try to polish a tur*. All you will have is a shiny POS. ;)

I guess the wave box is out if it will mess with the drain.

The holes are 1.5" and 2 of the holes are 1 3/8" from the top and the last is 1 1/4" from the top. It is definitely short from what the minimum safety requirement is. He did upgrade me from 10 to 12mm glass for free and it is a shallow tank (4.5x2x18 tall) that gave a safety rating of 7 (4 being the minimum) on some tank building site I found. Given the thickness and safety rating, do you think this is still a serious issue?

Jeez man, Ive waited 4 weeks for the tank to be delivered, another week for this stupid enamel paint to dry and my glass may break once its filled! I just want to fill the tank and stock it all ready :headwally:
 
The problem is the water will not move through the pvc "bridge" fast enough for the two overflows to act as one body. On the surface it seems a reasonable solution, however, the physics are not favorable. The communication between the two overflows needs to be seamless, with no friction loss, to upset the balance. Modifications to accomplish this are rather complex, and have been detailed in this thread on a few occasions. Not many reports back on how well it functions though.

The functional solution, is probably a dual herbie, with a siphon and dry emergency in both overflows. If you like, you can run a siphon and open channel in one overflow, and the dry emergency in the other. The drawback being this effectively shuts down the 2nd overflow. This has also been detailed in both this thread and many others.

By far, since dual overflow/bottom drilled tanks are not conducive to well running systems, removal of the overflows, plugging the bottom holes, and drilling out the back--with a custom C2C overflow, is the best solution. Albeit tis a bit of work, the end result is well worth the effort.

I understand, thought of that, however it's not an option with this tank. The corner boxes are welded in with black acrylic so there's just no way to clean up a left over seam on both sides of the tank.

Shutting down the second overflow as an emergency drain isn't a very good option either, pretty much negates any capacity for skimming, and there will be stagnant water.

I'm starting to think joining them with a CtoC weir may still be the best solution. Not real excited about a 48" weir, although the whole thing wouldn't have to be weir, could be a cut out section, maybe half of that. Still, one is going to be a main drain (siphon) and the other isn't going to put much water through. I imagagine one or the other is still going to have stagnent water in the bottom.

I'm going to test run it with a couple of dorso standpipes in each box and see how it does. With an extra dry emergency I wouldn't be too concerned about overflow prevention, and if it's not too noisy would be the easiest solution. I"m not even sure elbows will fit in those boxes. They are about 6" square with a 1" bulkhead in the bottom center.

What the hell were they thinking when they built this tank? How would two drains ever be able to balance, even with just open standpipes?
 
Bean and Uncle... Thanks for clearing up the elbow issue for me. I decided to have a weir made from glass that will be able to accommodate the entire elbow inside so adding a piece of 1 inch pvc to make the spigot to fit the 1 inch bulkhead will work just fine.

On drilling, please bear with me... I'm afraid of messing up the math. On my 90 gallon tank, in order to accommodate the 1 inch bulkheads, I need to drill three 1.75 inches holes. Could you tell me the optimum distance to drill from the top of the glass to the top of the holes, please. And does positioning the weir one inch below the top of the glass still hold true in MY case. Thanks so much guys... It's really appreciated.

Randy
 
First and foremost, I'm sorry that these questions have probably been answered a bunch but after reading ~250 pages, my head is spinning some.

I'm going to try and do this system on my new tank. It is a dsa neo series tank. It has 2x 1" drains and 2x 3/4" returns in a middle back wall overflow. I was going to run the system like this...from left to right in overflow... 3/4 dry emergency, 1 siphon, 1 open channel and 3/4 return. Here are my questions.

1. Do I keep the open channel 1/2-1" above the siphon in the overflow box or keep the siphon and open channel the same?
2. Do I keep all 3 pipes no more than 1" below the waterline in my sump or just the siphon?
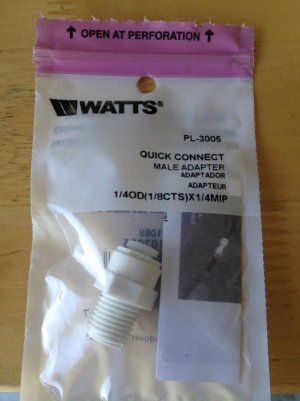
3. This is the quick connect fitting I got from Lowes. Is this correct or what would you recommend?

This is all I can think of for the moment, but I'm sure I will have more questions later.

Thanks very much
 

Attachments

  • fitting.jpg
    fitting.jpg
    44.3 KB · Views: 3
I'm in trouble I think with my bean overflow. Check it out.

I put the pieces together tonight and noticed that it is too high. I'm not sure what else I can do but I can cut the bushing down a little. Notice where the weir is and then the middle of the street elbow. From that view it looks okay but if the water line covers the street elbow I think I may be in trouble.

When placing the emergency pipe it does sit below the top but only by a 1/4". I need ideas or to be assured that im good to go. Thanks

<a href="http://s1251.photobucket.com/albums/hh542/lubecky1/?action=view&current=63031075-3EBA-45CE-AFB8-47D1A2DBE489-5864-00000D5390189FCD_zps84987533.jpg" target="_blank"><img src="http://i1251.photobucket.com/albums/hh542/lubecky1/63031075-3EBA-45CE-AFB8-47D1A2DBE489-5864-00000D5390189FCD_zps84987533.jpg" border="0" alt="Photobucket Pictures, Images and Photos" /></a>

<a href="http://s1251.photobucket.com/albums/hh542/lubecky1/?action=view&current=BFF3EABB-A0CE-4895-8858-3633ABD1B597-5864-00000D5392BAB7F9_zps55439100.jpg" target="_blank"><img src="http://i1251.photobucket.com/albums/hh542/lubecky1/BFF3EABB-A0CE-4895-8858-3633ABD1B597-5864-00000D5392BAB7F9_zps55439100.jpg" border="0" alt="Photobucket Pictures, Images and Photos" /></a>

<a href="http://s1251.photobucket.com/albums/hh542/lubecky1/?action=view&current=FAFBEBC3-4210-4812-BB2F-BAD58B88B61F-5864-00000D5391E660FB_zpseff958c2.jpg" target="_blank"><img src="http://i1251.photobucket.com/albums/hh542/lubecky1/FAFBEBC3-4210-4812-BB2F-BAD58B88B61F-5864-00000D5391E660FB_zpseff958c2.jpg" border="0" alt="Photobucket Pictures, Images and Photos" /></a>

This is where I can cut a little
<a href="http://s1251.photobucket.com/albums/hh542/lubecky1/?action=view&current=936753AB-690E-4F5B-932A-8357FCB181A4-5864-00000D538F3EBAEA_zps7c035262.jpg" target="_blank"><img src="http://i1251.photobucket.com/albums/hh542/lubecky1/936753AB-690E-4F5B-932A-8357FCB181A4-5864-00000D538F3EBAEA_zps7c035262.jpg" border="0" alt="Photobucket Pictures, Images and Photos" /></a>

<a href="http://s1251.photobucket.com/albums/hh542/lubecky1/?action=view&current=85A69C8F-C65E-459E-87CB-E3E591071FE9-5864-00000D538A877234_zpsaea76065.jpg" target="_blank"><img src="http://i1251.photobucket.com/albums/hh542/lubecky1/85A69C8F-C65E-459E-87CB-E3E591071FE9-5864-00000D538A877234_zpsaea76065.jpg" border="0" alt="Photobucket Pictures, Images and Photos" /></a>

Emergency drain
<a href="http://s1251.photobucket.com/albums/hh542/lubecky1/?action=view&current=F46B7B87-3905-482B-9B11-80851D4A7A7C-5864-00000D538E782E64_zpsa508b861.jpg" target="_blank"><img src="http://i1251.photobucket.com/albums/hh542/lubecky1/F46B7B87-3905-482B-9B11-80851D4A7A7C-5864-00000D538E782E64_zpsa508b861.jpg" border="0" alt="Photobucket Pictures, Images and Photos" /></a>

<a href="http://s1251.photobucket.com/albums/hh542/lubecky1/?action=view&current=C6D7CB19-78EF-4B81-9081-D18ABC1ECC3F-5864-00000D53859ACD2A_zpsc4cc2ff6.jpg" target="_blank"><img src="http://i1251.photobucket.com/albums/hh542/lubecky1/C6D7CB19-78EF-4B81-9081-D18ABC1ECC3F-5864-00000D53859ACD2A_zpsc4cc2ff6.jpg" border="0" alt="Photobucket Pictures, Images and Photos" /></a>

<a href="http://s1251.photobucket.com/albums/hh542/lubecky1/?action=view&current=84203CCB-77C4-4FBC-8AB9-C177832866F4-5864-00000D53800D0274_zpsd14051d8.jpg" target="_blank"><img src="http://i1251.photobucket.com/albums/hh542/lubecky1/84203CCB-77C4-4FBC-8AB9-C177832866F4-5864-00000D53800D0274_zpsd14051d8.jpg" border="0" alt="Photobucket Pictures, Images and Photos" /></a>

This the piece I could cut

<a href="http://s1251.photobucket.com/albums/hh542/lubecky1/?action=view&current=8268D3B7-3096-4BA5-A0A6-3D4D3E9A2F1C-5864-00000D537E727DEF_zps13caa485.jpg" target="_blank"><img src="http://i1251.photobucket.com/albums/hh542/lubecky1/8268D3B7-3096-4BA5-A0A6-3D4D3E9A2F1C-5864-00000D537E727DEF_zps13caa485.jpg" border="0" alt="Photobucket Pictures, Images and Photos" /></a>

<a href="http://s1251.photobucket.com/albums/hh542/lubecky1/?action=view&current=C36221A8-9077-486A-948C-E748ED3FD185-5864-00000D537F489749_zps173e7a79.jpg" target="_blank"><img src="http://i1251.photobucket.com/albums/hh542/lubecky1/C36221A8-9077-486A-948C-E748ED3FD185-5864-00000D537F489749_zps173e7a79.jpg" border="0" alt="Photobucket Pictures, Images and Photos" /></a>

The way I see it is the there won't be any fall into the overflow box which is fine with me. Do you think it's safe to cut that bushing down to gain an extra 1/4"? Would it be bad if the emergency drain took a few trickles of water because it looks really close to about even (unless I cut that bushing).
 
I guess the wave box is out if it will mess with the drain.

The holes are 1.5" and 2 of the holes are 1 3/8" from the top and the last is 1 1/4" from the top. It is definitely short from what the minimum safety requirement is. He did upgrade me from 10 to 12mm glass for free and it is a shallow tank (4.5x2x18 tall) that gave a safety rating of 7 (4 being the minimum) on some tank building site I found. Given the thickness and safety rating, do you think this is still a serious issue?

Jeez man, Ive waited 4 weeks for the tank to be delivered, another week for this stupid enamel paint to dry and my glass may break once its filled! I just want to fill the tank and stock it all ready :headwally:

I hear you! However, the holes are too close to the top of the tank, and you are going to have problems--both functionally, and perhaps safety wise.

The glass thickness is not going to help much. The safety factor means the tank will probably hold together. I build rimless tanks at or above 7.8. Less is iffy.

1.5" holes means 3/4" bulkheads. That in itself is something of a problem. 3/4" is too small for the systems we run.
 
Bean and Uncle... Thanks for clearing up the elbow issue for me. I decided to have a weir made from glass that will be able to accommodate the entire elbow inside so adding a piece of 1 inch pvc to make the spigot to fit the 1 inch bulkhead will work just fine.

On drilling, please bear with me... I'm afraid of messing up the math. On my 90 gallon tank, in order to accommodate the 1 inch bulkheads, I need to drill three 1.75 inches holes. Could you tell me the optimum distance to drill from the top of the glass to the top of the holes, please. And does positioning the weir one inch below the top of the glass still hold true in MY case. Thanks so much guys... It's really appreciated.

Randy

No. But I will tell you the minimum distance from the top of the glass to the CENTER of the hole: 2 3/4". Another half inch won't hurt either.

I run the weirs on rimless tanks 1" below the top edge of the glass. The drain system is reliable and safe.
 
I'm in trouble I think with my bean overflow. Check it out.

I put the pieces together tonight and noticed that it is too high. I'm not sure what else I can do but I can cut the bushing down a little. Notice where the weir is and then the middle of the street elbow. From that view it looks okay but if the water line covers the street elbow I think I may be in trouble.

When placing the emergency pipe it does sit below the top but only by a 1/4". I need ideas or to be assured that im good to go. Thanks


This is where I can cut a little


Emergency drain


This the piece I could cut


The way I see it is the there won't be any fall into the overflow box which is fine with me. Do you think it's safe to cut that bushing down to gain an extra 1/4"? Would it be bad if the emergency drain took a few trickles of water because it looks really close to about even (unless I cut that bushing).

You got some issues here, and I don't think cutting this or that is gunna fix them. My honest assesment is pull the box and start over. Looks like acrylic, and that is not going to be easy.

No. It is not a good idea to have any flow in the dry emergency. Looking at the photos, I don't think you have enough room to get the system to start to begin with. Sorry.

The water line in a running bean system is generally at the top of the down turned elbows.

Only thing I can suggest is do away with the tees, and use two 90°s instead. That may give you some more clearance, or may not.
 
What, if anything, do people use to cover the overflow holes? I am losing fish down the overflow and occasionally one gets trapped in the gate valve and dies. I am currently using gutter guard, but not very effectively. I have lost two fish in about 6 months, which annoys me.
 
First and foremost, I'm sorry that these questions have probably been answered a bunch but after reading ~250 pages, my head is spinning some.

I'm going to try and do this system on my new tank. It is a dsa neo series tank. It has 2x 1" drains and 2x 3/4" returns in a middle back wall overflow. I was going to run the system like this...from left to right in overflow... 3/4 dry emergency, 1 siphon, 1 open channel and 3/4 return. Here are my questions.

1. Do I keep the open channel 1/2-1" above the siphon in the overflow box or keep the siphon and open channel the same?
2. Do I keep all 3 pipes no more than 1" below the waterline in my sump or just the siphon?
3. This is the quick connect fitting I got from Lowes. Is this correct or what would you recommend?

This is all I can think of for the moment, but I'm sure I will have more questions later.

Thanks very much

I though of another question. Do I need to do anything to initially start the system or as the water fills up the overflow/siphon channel, it will start on its own?

Thanks.
 
Hey guys! I would like to put this overflow on my 125. It is already drilled at both corners for glass holes overflows, so both the internal and external boxes will have to be 67" long. (I'm going to drill another hole in the middle). I would like some suggestions on the other dimensions. I was thinking the internal weir would have 1.5" of clearance. How deep and wide should the external box be? Thanks in advance!
 
Uncle what is the goal? To ensure that the water needs to be able to go over the top of the open channel? If so how much clearance from the top weir ?

What if I used the same setup but used all 1" piping and then go back to 1.5" after the bulkhead? Will that work? I know that I will have plenty of room with 1" piping. I could see if 1-1/4" will work as well. I'm more concerned with functionality if the bean system will work as quiet and push as much water with 1" or 1-1/4" piping

Your suggestion of just using 1-1/2" 90s I'm not sure how to go about the air channel? Or if this option is the best option over the two options above?
 
I hear you! However, the holes are too close to the top of the tank, and you are going to have problems--both functionally, and perhaps safety wise.

The glass thickness is not going to help much. The safety factor means the tank will probably hold together. I build rimless tanks at or above 7.8. Less is iffy.

1.5" holes means 3/4" bulkheads. That in itself is something of a problem. 3/4" is too small for the systems we run.

Crap, I thought it was just a possibly safety issue, which the builder says is fine, and I could live with it if he is still guaranteeing the tank. How will this mess with the functionality of the system?

I guess Im REALLY glad he didnt give me 10mm glass like he originally quoted me if this is barely safe if that!

The bulkheads are 25mm (Im in Australia) which is basically 1" so that should be fine for the system.
 
Question. My tank with beans overflow have been running for last month and is silent when running. Which makes me very happy. But the problem is if power goes out how does the air get back out of the full siphon line. I'm have to turn the full siphon elbow to let the air out. I would prefer an easier way.
 
Uncle what is the goal? To ensure that the water needs to be able to go over the top of the open channel? If so how much clearance from the top weir ?

What if I used the same setup but used all 1" piping and then go back to 1.5" after the bulkhead? Will that work? I know that I will have plenty of room with 1" piping. I could see if 1-1/4" will work as well. I'm more concerned with functionality if the bean system will work as quiet and push as much water with 1" or 1-1/4" piping

Your suggestion of just using 1-1/2" 90s I'm not sure how to go about the air channel? Or if this option is the best option over the two options above?
 
What about this setup. This should work right? There is plenty of room between the top of the elbow and the bottom of the weir let alone the top of the tank. Don't you think? This is still using the 1.5" pipe

<a href="http://s1251.photobucket.com/albums/hh542/lubecky1/?action=view&current=6FF46763-0896-4C03-A989-6F3ACB34573D-3195-00000602FEC89F77_zps5ed05311.jpg" target="_blank"><img src="http://i1251.photobucket.com/albums/hh542/lubecky1/6FF46763-0896-4C03-A989-6F3ACB34573D-3195-00000602FEC89F77_zps5ed05311.jpg" border="0" alt="Photobucket Pictures, Images and Photos" /></a>

<a href="http://s1251.photobucket.com/albums/hh542/lubecky1/?action=view&current=F89154FC-E0A1-475C-981A-19EEAC23D319-3195-000006030ACCE126_zpsfc5f9f4b.jpg" target="_blank"><img src="http://i1251.photobucket.com/albums/hh542/lubecky1/F89154FC-E0A1-475C-981A-19EEAC23D319-3195-000006030ACCE126_zpsfc5f9f4b.jpg" border="0" alt="Photobucket Pictures, Images and Photos" /></a>
 
SO i have been running this system. I can get it to start, but many times I have to blow in an airline through the full syphon pipe to get that to run at full steam. It will not usually start on its own. The pipe runs are identical on all three pipes. It drops about a foot, hits a 45 goes another foot and then angles 45 into sump. It seems like alot of air gets jammed in system when turning off, and the emergency overflow takes a second to kick in as well to purge air. Other than chop system apart and change angles do I have any options here to make it stop doing this?
 
Back
Top